Pumpkin Week: Hazelnut Pumpkin Waffles with Cinnamon Honey Butter

Pumpkin Hazelnut Waffles - Title Text

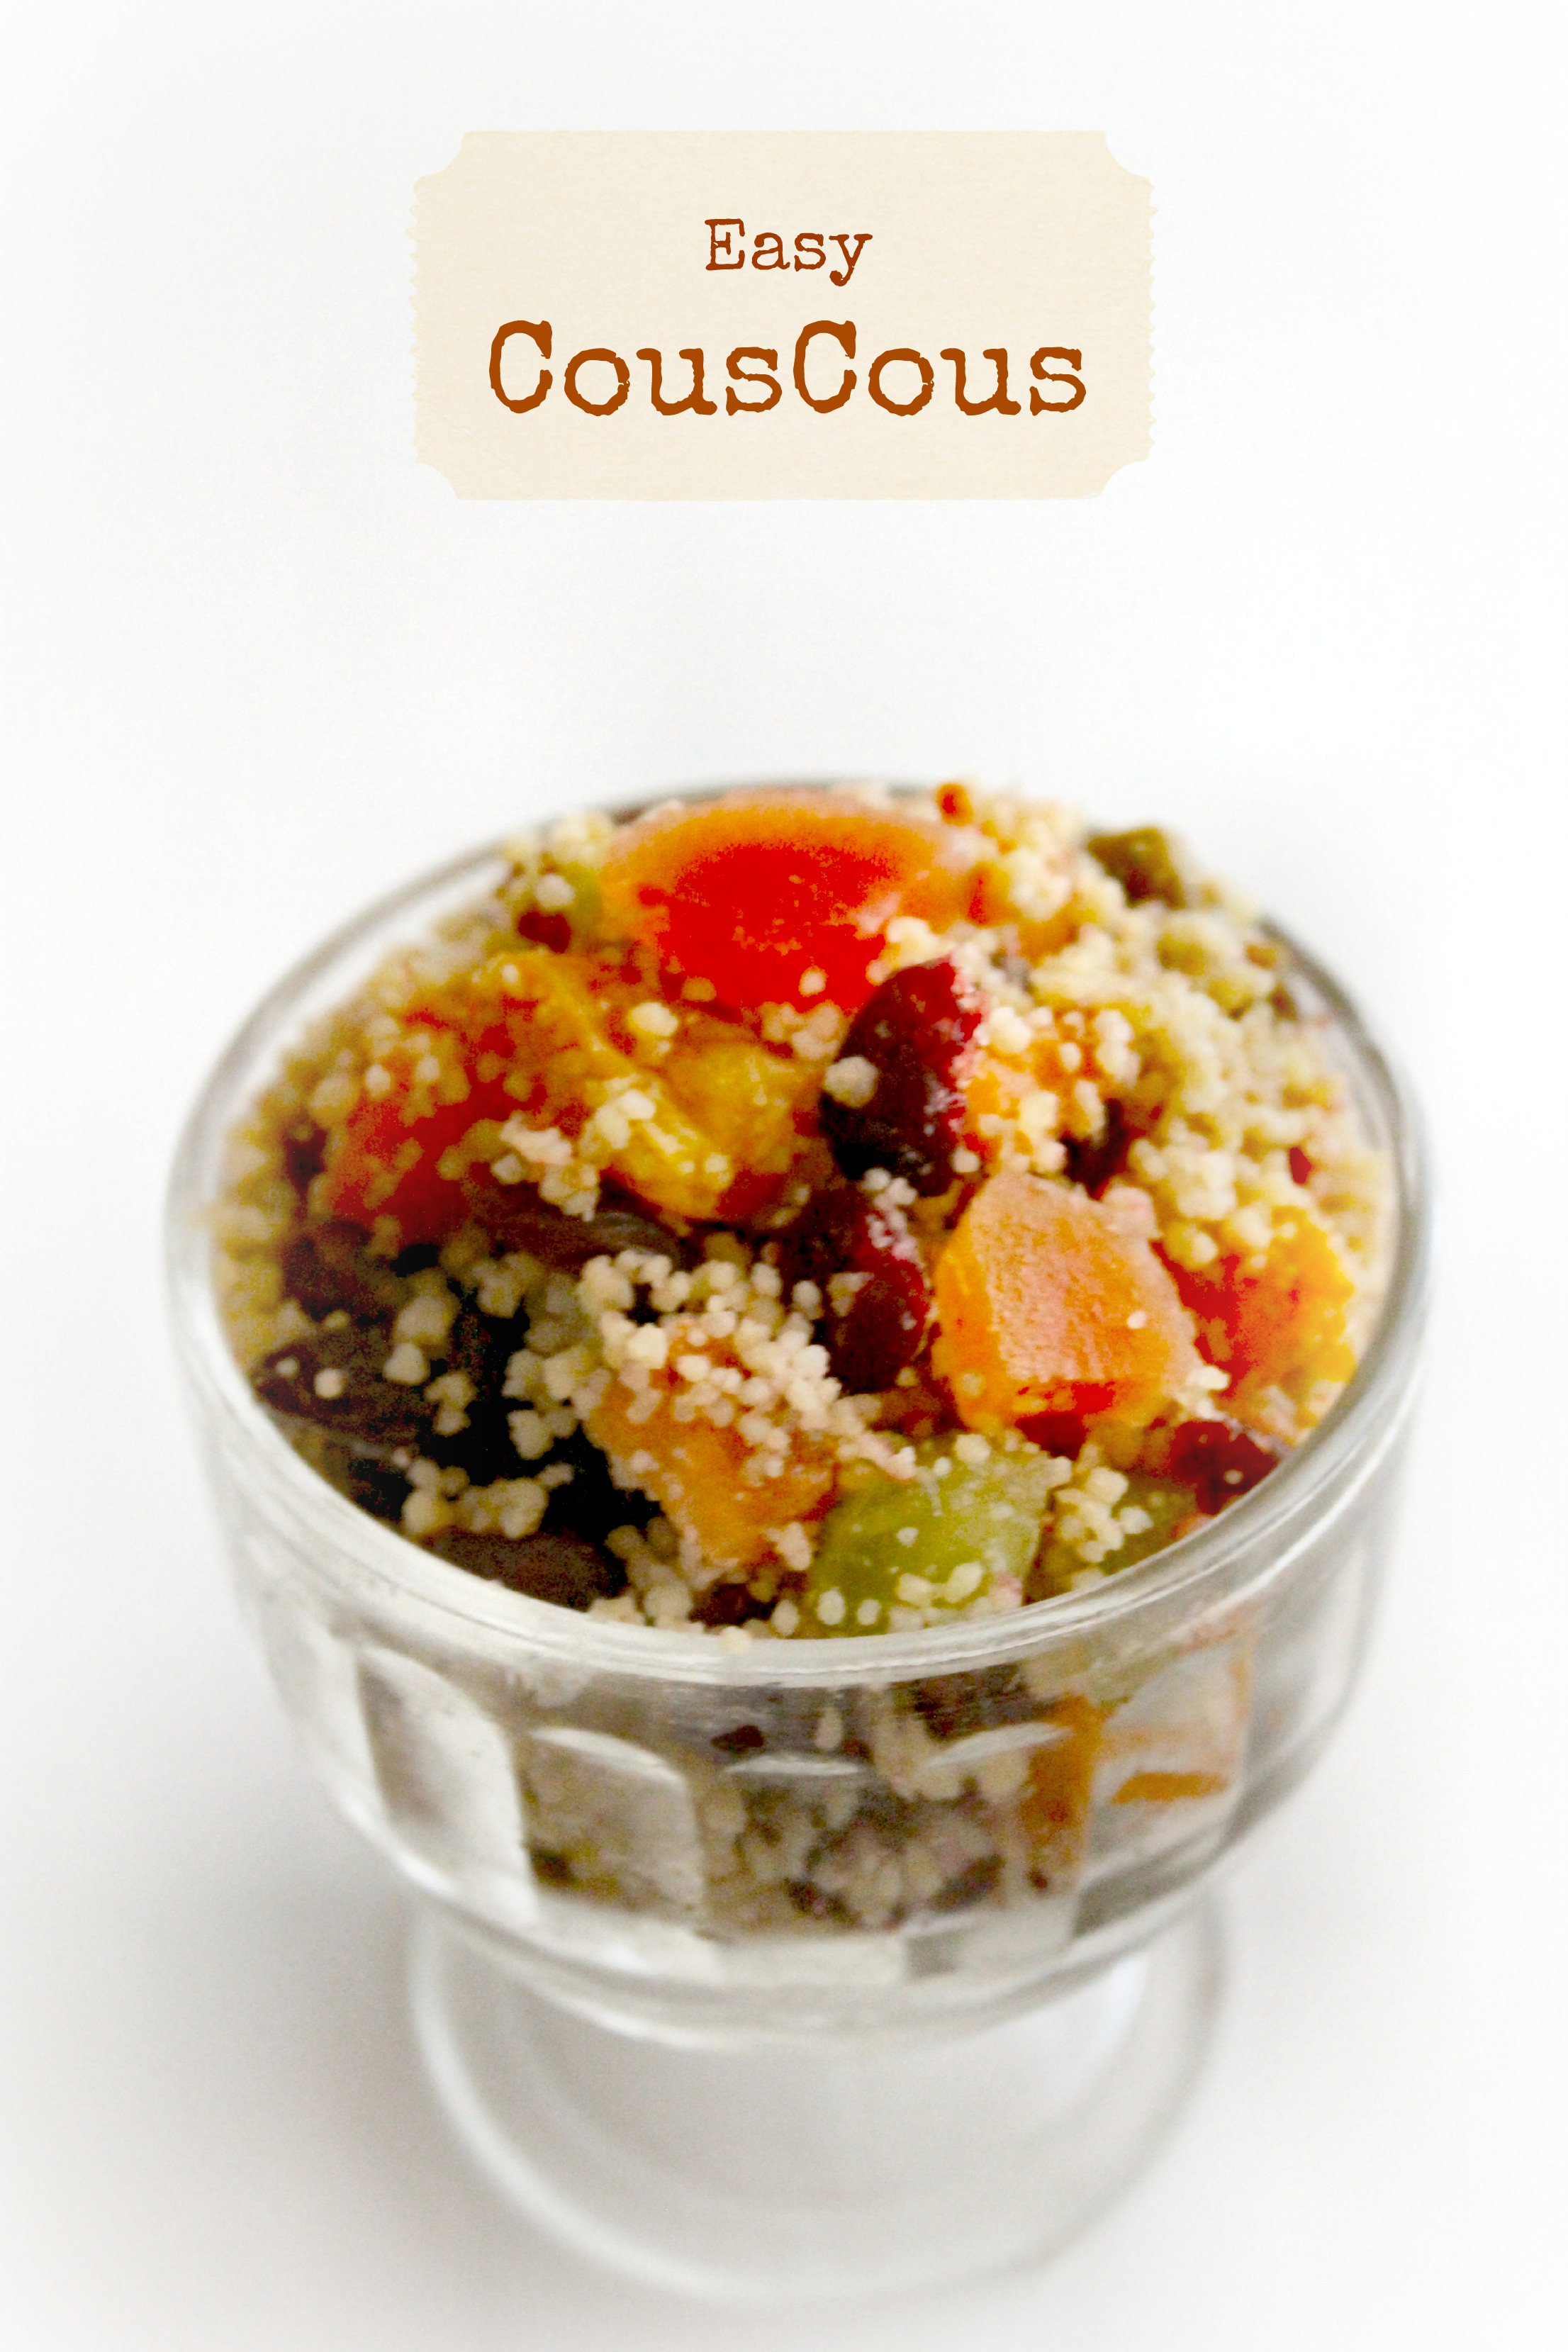
Pumpkin – most people either love it or hate it. I am firmly in the ‘love it’ camp. It’s one of the things I love best about fall. When All Things Pumpkin bombard Pinterest & Twitter full force, I know cooler weather is on the horizon. So hang on to your butts, because the Theme Weavers are celebrating all things orange and tasty with Pumpkin Week and an array of our fall favorites.

“We’re staying up late telling scary stories, and in the morning I’m making waffles!” Donkey from Shrek. These gorgeous pumpkin waffles are laced with toasted hazelnut meal, buttermilk and a hint of fall spice. Seriously, friends… if we just had smell-a-vision, you’d be clamoring to get over here for breakfast. They smell HEAVENLY! And I’ll use any excuse to break out our vintage waffle maker (circa 1982). Don’t laugh; it works. But before we do anything, we need to plug in the waffle maker and let it start getting good and hot.

Pumpkin Hazelnut Waffles - Our Vintage Waffle Iron

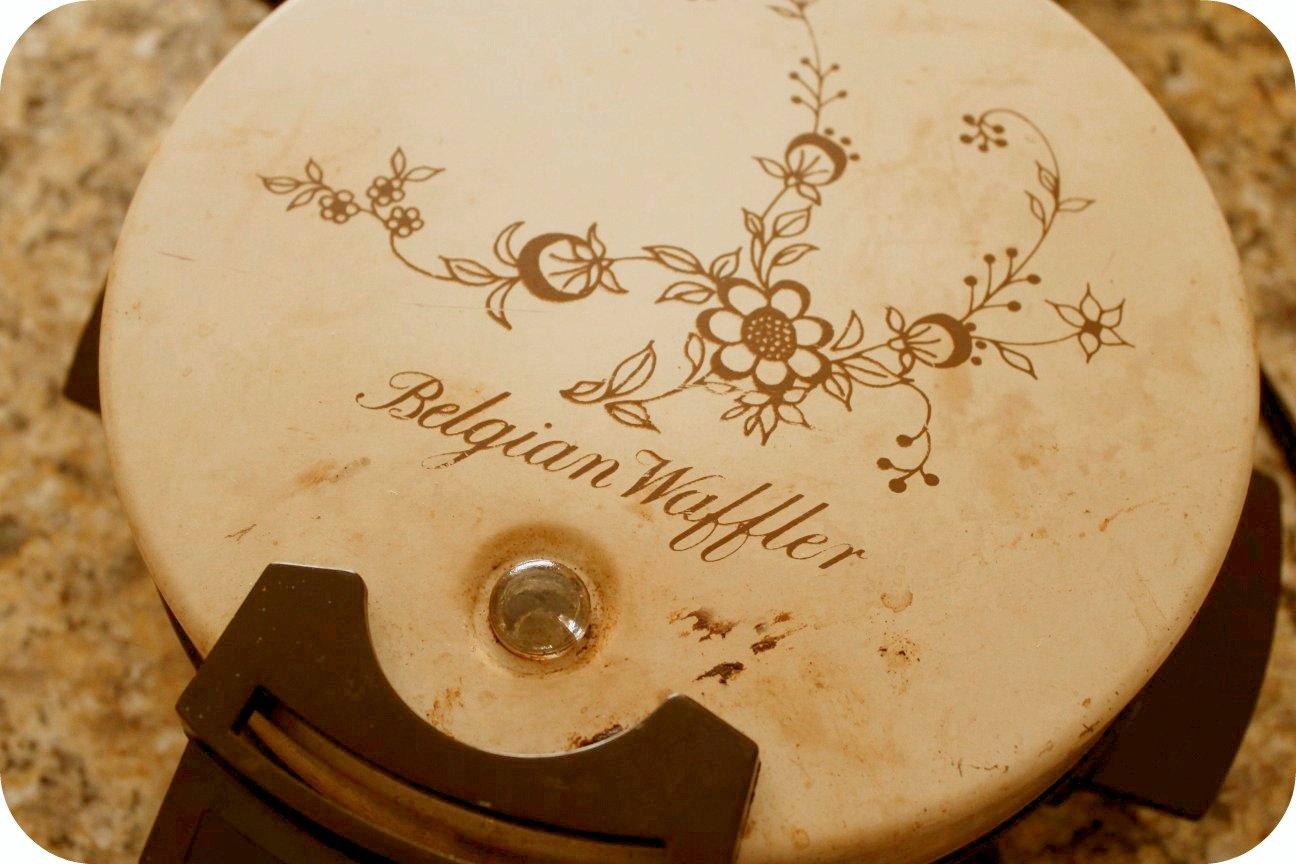
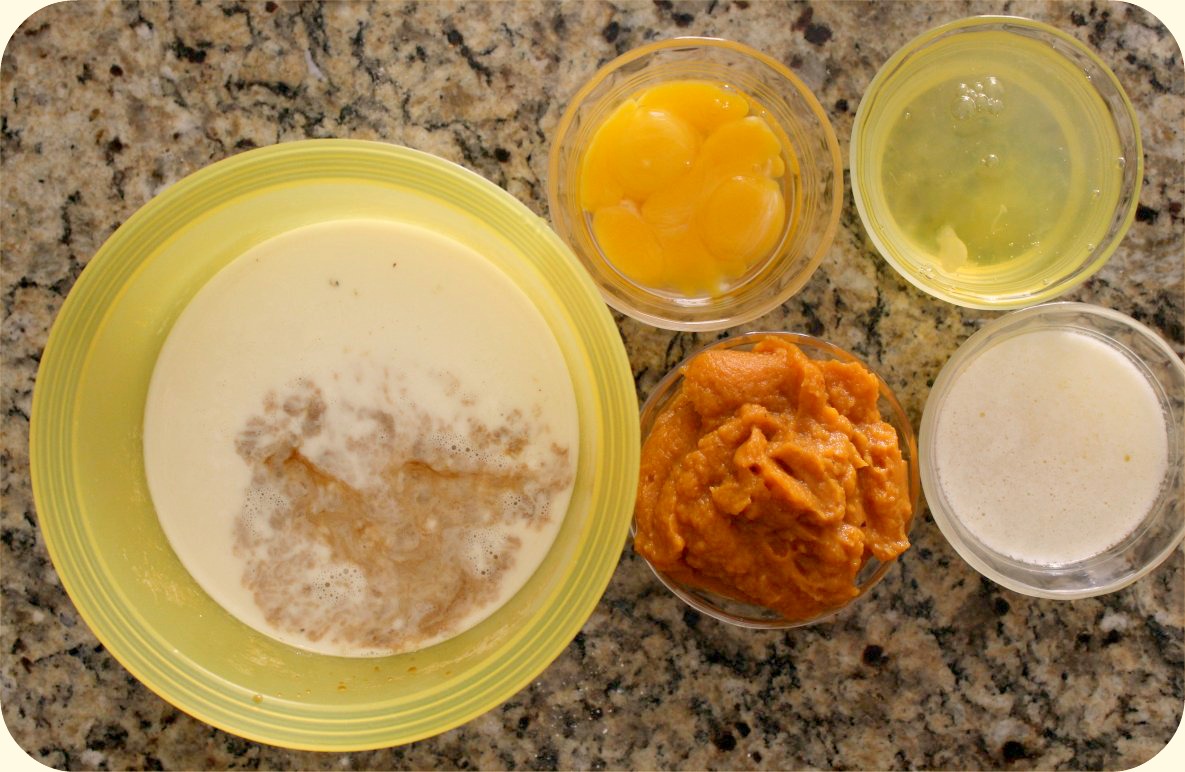
Please don’t laugh at my waffle maker. She may not look like much, but she’s a beast. And for the record, she’s not dirty, she’s just well-seasoned. While the waffle maker heats up, let’s prep the ingredients. I like to start with the wet stuff.

Pumpkin Hazelnut Waffles - Wet Ingredients

Then I toast the hazelnut meal in a non-stick skillet and toss it in with all the dry ingredients. Don’t be like me and forget the brown sugar until the last possible second (hence the golden brown blob in the photo below). If you think food bloggers are miraculously flawless and free of mistakes, you are quite mistaken. Trust me – I screw up all the time. I just don’t show you that part.

Pumpkin Waffles - Dry Ingredients Collage

Once your wet and dry ingredients are ready to go, take those egg whites and beat the tar out of them. We have one of those awesome KitchenAid stick blenders with a whip attachment that makes short work of this step. If you don’t have one yet, you should think about it. They are the Mighty Mouse of kitchen tools. When your egg whites hold firm peaks, they’re ready to roll.

To blend all of this into pumpkin perfection, whisk the dry ingredients in a large bowl. In a separate bowl, whisk your wet ingredients (except for those egg whites). Then invite the wet ingredients to play with the dry ingredients and blend them together with a whisk until they’ve all gotten to know one another better. Then it’s time to fold in those fluffy, snow-capped egg whites. Just remember – they’re sensitive. Fold slowly so you don’t scare the fluff out of them. Patience pays off in fluffy waffles here.

Pumpkin Waffle - Egg White Collage

When your batter is blended, it’s time to start makin’ the waffles. I always spray my hot waffle iron with a little of that canned cooking spray before the first waffle hits the pan, just to be safe, because no one wants to sit in the floor and cry when the first one refuses to release and burns. No one.

Remember when I said food bloggers make mistakes? Well, here’s your peek behind the curtain. Proof that I’m just like you (if you like to slop your waffle batter onto the machine and say ‘Sure…that looks like enough. Why not?’).

Pumpkin Hazelnut Waffles - Over Run

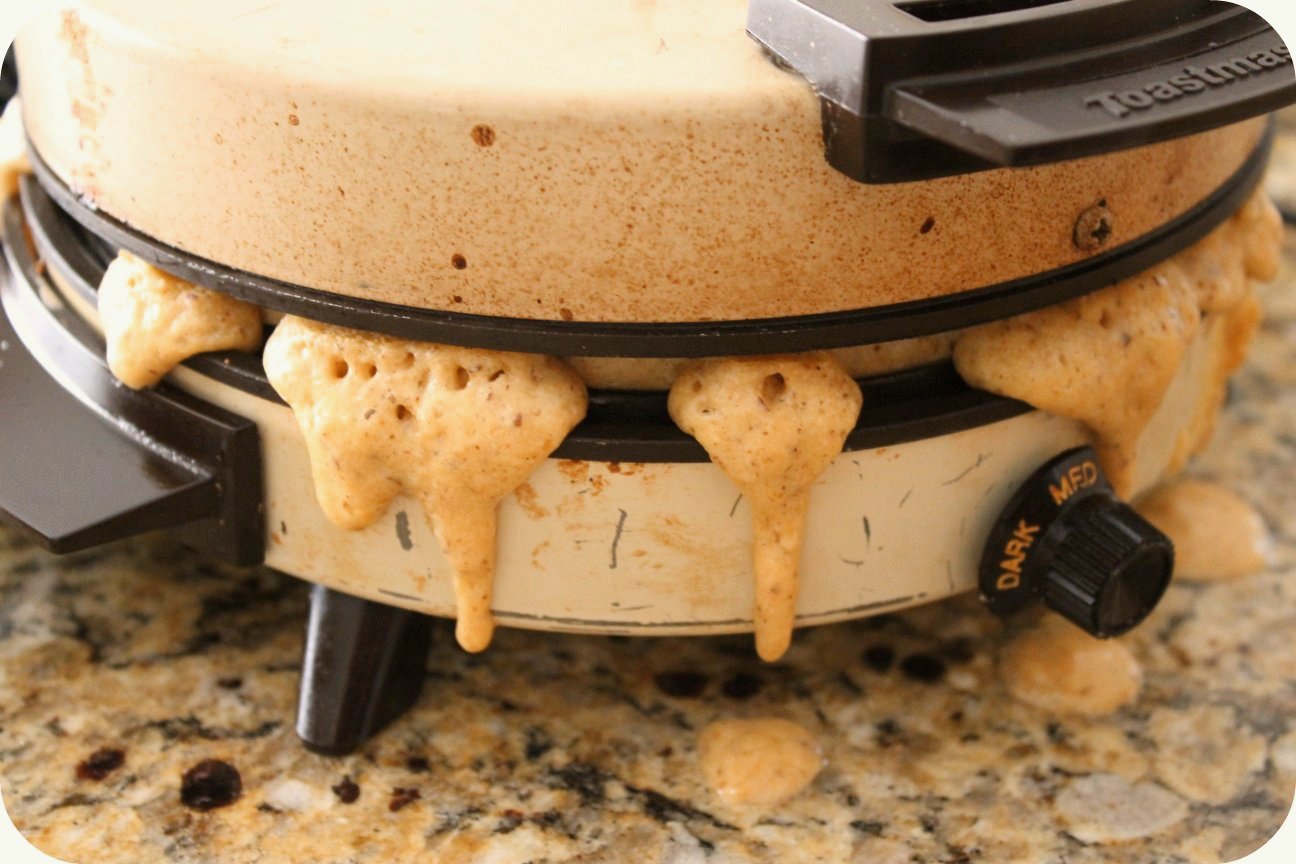
It’s not tragic or anything, it just takes longer to clean up. So for my waffle maker one cup minus 2 tablespoons = the perfect amount of batter for one waffle. I can’t speak for your waffle maker, so you’ll just have to get in there and give it a shot. If yours do run over, though, please promise you’ll tweet me a quick pic, because that would make me feel SO much better. #WaffleWrecks

Pumpkin Hazelnut Waffles - Just Out of the Waffle Iron

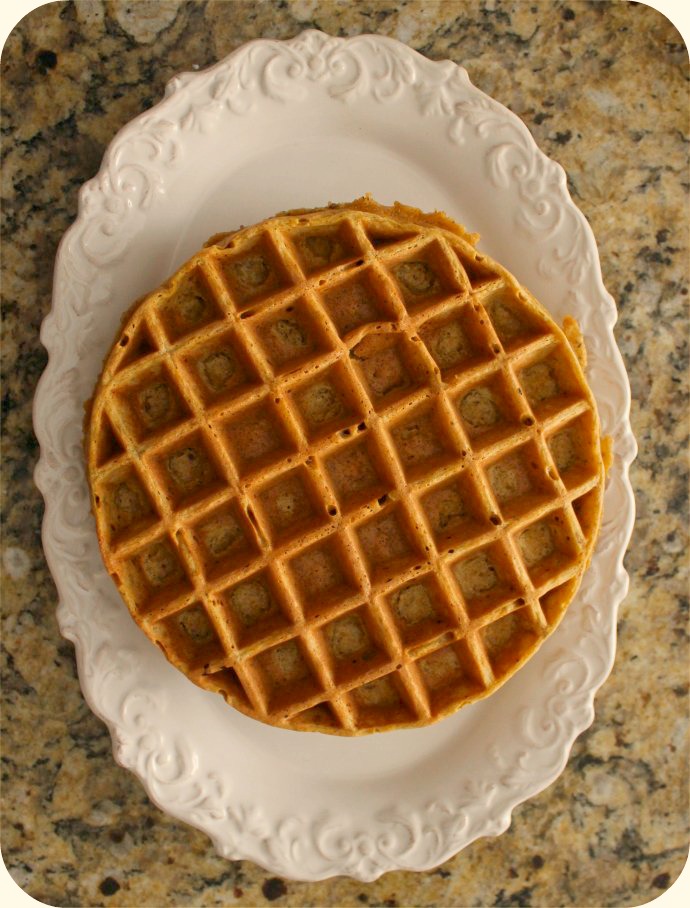
Hello, Gorgeous! So my first waffle may have been a mess, but when the second one came out PERFECT, you can bet your sweet bippy I did a happy dance. If you’re happy & you know it clap your hands {clap! clap!}

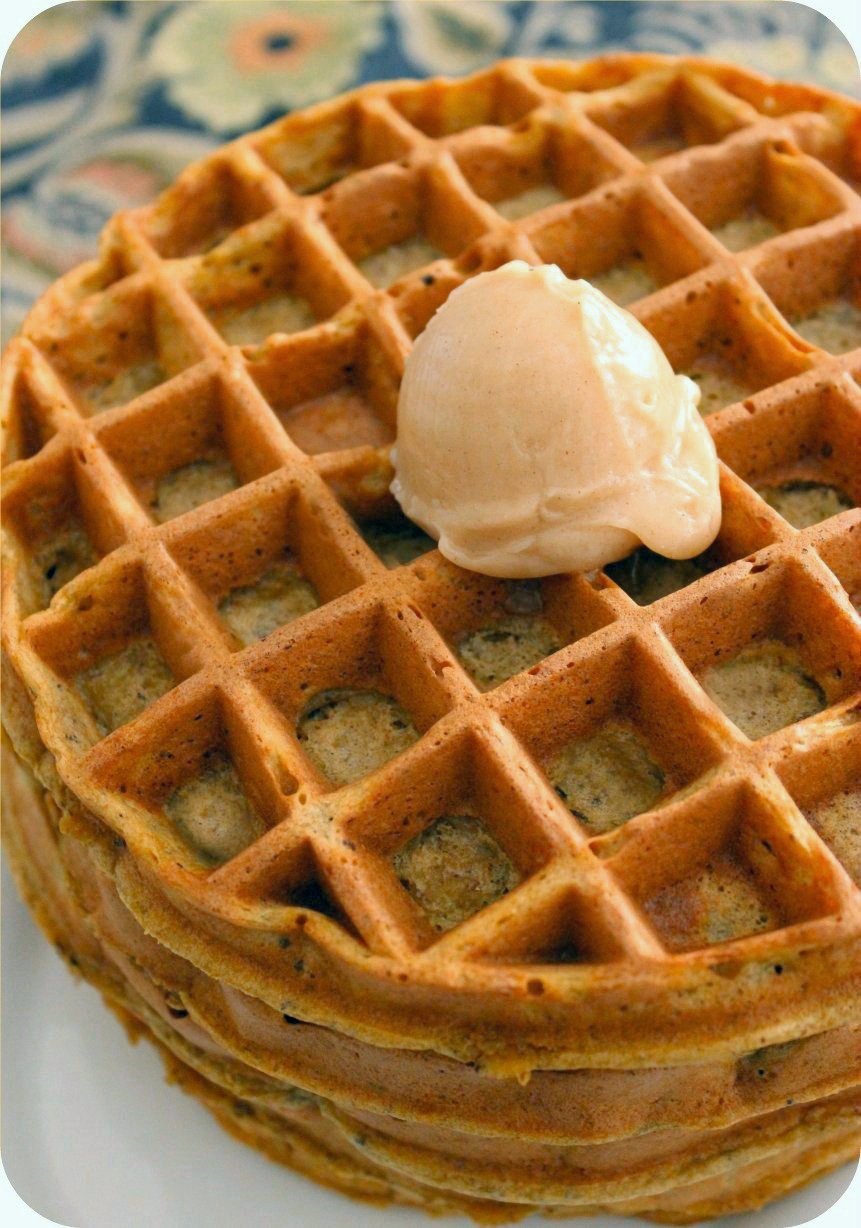
So let’s talk toppings. These waffles are so rich and fragrant, they just need a little something sweet on top. I chose cinnamon honey butter. Because butter is a given. Adding cinnamon and honey (or agave if you like) just brings it all in for a big group hug. I make it the night before and chill it so it’s scoopable. Yum.

Pumpkin Waffles - Honey Butter Collage

When that scoop of honey butter starts to melt into a hot waffle, I promise your eyes will roll back in your head and your heart will beat a little faster. And the only thing better than one hot waffle with honey butter is a big pile of them. You can poke me with a fork now; I’m done.

Pumpkin Hazelnut Waffles - Waffles with Cinnamon Honey Butter

NanaBread’s Hazelnut Pumpkin Waffles:
4 large eggs, separated
1 cup buttermilk + 1 cup vanilla milk
OR 1 cup buttermilk + 1 cup of whole milk
1 cup canned pumpkin puree (not pumpkin pie mix)
6 tablespoons unsalted butter, melted
1 teaspoon pure vanilla extract
1/2 cup Bob’s Red Mill hazlenut meal
2 cups all-purpose flour

1/3 cup brown sugar, packed
2 1/4 teaspoons baking powder
1 teaspoon baking soda
1/2 teaspoon salt
2 teaspoons ground cinnamon
1 teaspoon ground ginger
1/4 teaspoon ground cloves

Pre-heat your waffle iron while you mix up your waffles. To make, blend the egg yolks (egg whites come in later), buttermilk and milk, pumpkin, melted butter and vanilla in a bowl and whisk until well blended. In a non-stick skillet, toast the hazelnut meal over medium-low heat until it just starts to take on some color and smells robust and fragrant. Toss it into a large mixing bowl and add the flour, baking powder, baking soda, salt and spices. Whisk to combine. Add the wet ingredients to the dry ingredients and whisk until thoroughly blended.

In a deep mixing bowl, beat the egg whites until they form and hold firm peaks. Using a rubber spatula, gently fold the egg whites into the waffle batter. I like to scrape to the bottom of the bowl and flip it once very gently, then turn the bowl a quarter turn and repeat the process until you can no longer see streaks of egg whites (see photo above). Once blended, you’re ready to bake.

Lightly spray your hot waffle iron with cooking spray. Depending on the size of your waffle iron, spread one cup of batter (if your waffler makes one waffle) or up to two cups (if your waffler makes 4 smaller waffles). It truly depends on your machine, so use a little caution on that first one and adjust as needed until the batter spreads to all edges without running over. When done, remove from the waffle iron and place it on a ceramic plate; cover with a clean kitchen towel to keep them warm while the others bake. My old-school Belgian Waffler made seven waffles. Two died immediately and the others were frozen for later. These will keep in the fridge for 3-5 days or in the freezer (wrapped in waxed paper and placed into air-tight freezer bags) for up to six weeks.

Cinnamon Honey Butter:
1/2 stick of butter, softened
1 cup of your favorite local honey (or agave nectar)
1 teaspoon ground cinnamon

Beat together until smooth and creamy. Scrape into an airtight container and chill until needed. To use, simply scoop a tablespoon on top of a toasty warm waffle and enjoy. So good, y’all. So, so good.

Pumpkin Hazelnut Waffles - Digging In

Before I go, don’t forget to drop in on our other Pumpkin Week participants:

Monday
Kirsten @ Comfortably Domestic – Pumpkin Cinnamon Rolls

Beka @ Kvetchin’ Kitchen – Pumpkin Streusel Bread

Tuesday
Carrie @ Bakeaholic Mama – Pumpkin Pie Macarons

Jeanne @ Inside NanaBread’s Head – Look, Ma! I made waffles!

Wednesday
Megan @ Country Cleaver – Mini No-Bake Bourbon Pumpkin Cheesecakes with Crumble Topping

Allison @ Decadent Philistines – Pumpkin Marshmallows & Pumpkin Spice Syrup

Shanna @ Pineapple & Coconut – Creamy Maple Bacon Pumpkin Risotto

Thursday
Anne @ From My Sweet Hear – Pumpkin Doughnuts with Cream Cheese Icing & Candied Pepitas

Kat @ Tenaciously Yours – Marbled Pumpkin Gingersnap Tart

Madelyn @ La Petite Pancake – Pumpkin Spice Cake with Maple Frosting

Friday
Madeline @ Munching in the Mitten – Savory Pumpkin Tart

Lauren @ Climbing Grier Mountain – Pumpkin Mousse with Candied Squash

Kirsten @ Comfortably Domestic – Pumpkin Kiss Cookies

Saturday
Beka @ Kvetchin’ Kitchen – Pumpkin Scones

Monica @ The Grommom – Pumpkin Ice Cream

Pumpkin Week Badge

Note: this recipe is adapted from Smitten Kitchen.

34 Comments

Filed under Blogger Collaborations, Food & Recipes

Horchata at Home

Horchata - long grain rice

Rice. My family loves it. In fact, it we might even prefer it to potatoes. Sounds crazy, but we find ourselves craving rice more than french fries. This weekend, The Complete Package whipped up one of our favorite summer refreshers.

Horchata - Inside NanaBread's Head

Horchata: a refreshing Mexican drink made with rice & cinnamon.

So simple, delicate, and fragrant – a good horchata is a revelation. And it’s easy to make. It only takes a few ingredients, most of which you probably already have in your fridge or pantry. Horchata is best when allowed to sit and bloom overnight, so plan to start this a day in advance for best results.

Horchata - Ingredient Collage

TCP’s Horchata (updated 2/26/2014):
1 cup long-grain white rice
2 1/2 cups boiling water
1 3″ Mexican cinnamon stick (canela)
4 cups whole milk (not skim or reduced fat)
1 can (12 ozs) evaporated milk
1 can (14 ozs) sweetened condensed milk
1 teaspoon Mexican vanilla
1/2 teaspoon ground cinnamon

Combine the rice and boiling water in your blender; blend on medium to medium-high until the rice begins to break up into small pieces (about a minute or so). Add the 3″ cinnamon stick. Cover the blender jar and allow it to sit on the counter at room temperature overnight (or up to 48 hours).

Strain the rice water to remove the kibbles & bits and discard the rice. Rinse out the container to remove any debris and pour the strained rice water back into the blender pitcher. Add the milks (all 3), vanilla, and ground cinnamon. Blend on medium speed for one minute. Pour into a serving pitcher and refrigerate. Stir just before serving to blend all the ingredients, as the fine rice pulp tends to settle to the bottom.

Horchata - CloseUp

Notes:
1. Mexican cinnamon & vanilla really are different that the version you’ll find in most markets. If you can find it in your area, please use it. The delicate, floral aroma is heavenly and takes this recipe to a whole new level.
2. This recipe can be doubled for a crowd.
3. This recipe is adapted from Lola’s Horchata at AllRecipes.com.
4. Horchata is perfect on a hot day or paired with spicy foods.
5. Horchata will keep in the refrigerator for up to a week.
6 Horchata makes excellent coffee creamer.

13 Comments

Filed under Family Stuff, Food & Recipes

My Favorite Season: Fall

Maine - Somesville Bridge

Oh, fall… I miss you so much. I miss experiencing all four seasons and the benefits of each like leaves turning, snow falling or bulbs blooming. But mostly I miss sweaters and drinking hot cocoa at high school football games. I long for those days when you can step outside and see your breath. In the suburbs south of Houston, we have only two seasons – Summer & More Summer. Our change of season comes down to this: in February, we stop mowing for 3-4 weeks.

The Complete Package and I both love Fall. So much so, we usually travel north each year just to celebrate autumn. Since we’ll be remodeling our master bathroom instead of traveling this year, I’m celebrating the advent of fall with a few photos from our trip to Acadia National Park in Maine back in 2008. It was glorious. So welcome, Fall. Please come see us. We miss you something fierce.

Foliage in Acadia Natl Park

Acadia Maine - Sun Through Fall Foliage

Acadia Maine Leaves in Water

Acadia - Path to Jordan Pond

Somesville Main Tree in Fall

Ever thought of visiting Acadia National Park? Learn more HERE. Some of our other fall favorites – Glacier National Park, Calgary & Banff, Yellowstone & The Tetons, and the Oregon coast. Do you have a favorite place to visit in the fall? Please share! You may just inspire our next fall vacation or someone else’s.

18 Comments

Filed under Things I Love, Travel Tales

I don’t know how this happened.

Remember my post from 2 weeks ago? The one with the pineapple update? The update where I said we probably had at least 4-6 weeks until harvest? Well, we went to Austin last weekend to visit the kids and came home to this:

Pineapple Harvest 6

I don’t know how this happened. They went from firm, mostly green and this:

Pineapple Close-Up - Aug2013

to completely, thoroughly golden-yellow ripe in 4 days. FOUR DAYS!

Side by Side Comparison - 4 days

I can only attribute it to:
A.) four days of intense Houston heat, followed by
B.) a good solid day of rain during drought conditions, and
C.) my lack of experience growing pineapples (even with 15+ plants)

We had no choice but to harvest them before they got too ripe, which was disappointing because we really had hoped the kids would be here to participate. Instead, The Complete Package & I cut them down. No kids; no celebration.

Pineapple Harvest 1

Pineapple Harvest 2

Here’s a peek behind the curtain at how we’ve accumulated so many pineapple plants over the past few years. Each plant, while it’s fruiting, puts off several shoots (ratoons) that can be removed and replanted to form new plants. Each of our four fruiting plants put off at least 2 to 3 ratoons.

Pineapple Harvest 3

Pineapple Harvest 4

I’m no math whiz, but if each pineapple plant produces 3 ratoons PLUS a pineapple fruit, that means you now potentially have FOUR (4) additional future pineapple plants, because you can replant the ratoons and replant the top off the pineapple fruit. We started six years ago with the top of a pineapple plant we’d bought at the grocery store. We now have over 15 plants because we keep re-potting the ratoons & pineapple tops. I joke about our mini-plantation, but it’s actually kind of true. They’re taking over our back porch. Two years ago, we harvested one lonely but gorgeous pineapple. This year, we got this:

Pineapple Harvest 5

Which brings me to our new little gadget I just have to show off. My friend Kirsten of Comfortably Domestic (my sister from another mister) and her four boys were so excited about our pending pineapple harvest, they sent us the new OXO ratcheting pineapple corer & slicer. Oh, baby!

Pineapple Harvest 2013- Ready to Cut

To use it, lop the top off your pineapple, leaving about 3/4″ so you can replant it later and become a semi-obsessed mini-plantation pineapple farmer like me.

Pineapple Harvest 2013- Lop off the top

We set the pineapples into a mixing bowl to capture any juice so I could make marmalade (always thinking ahead), then TCP set about coring those golden puppies. The OXO pineapple corer tore right through each pineapple in seconds.
It was amazing to watch and surprisingly fun to use.

Pineapple Harvest 2013- OXO Pineapple Corer & Slicer

Did I mention it ratchets? You don’t have to turn the bowl or move the pineapple or anything! Just twist the handle on top and it ratchets after each cut until it reaches the bottom. Once done, you simply pull the rings right out of the shell. That’s right – I said rings!

Pineapple Harvest 2013- Rings on the Slicer

It cuts the entire pineapple into perfectly even rings. Shut up! I know!

Pineapple Harvest 2013- Perfectly Sliced Rings

We set aside one tub of rings for Jonah Bear & Lilly Bug, since they both said they’d like to recreate our pineapple upside-down cake from the 2011 harvest, and poured most of the pineapple and juice into the Dutch oven to make my first ever batch of pineapple upside-down marmalade (pineapple, brown sugar & maraschino cherries). With that, there was only one last task to conquer.

Remember that post I mentioned in the first paragraph? The one where I said we probably had a few weeks until harvest? Well, I may have mentioned in that post that I’d also like to make fruity cocktails with this batch of pineapples. And since the OXO corer/slicer did such a nice job of creating the perfect vessel, there was just one last thing to do.

Pineapple Harvest 2013- Pina Colada Fixings

You should know me well enough by now to know that I never turn down a fruity ‘pinkies up’ frou-frou girly cocktail. So here’s to you, and here’s to friends who send friends kitchen gadgets, and here’s to the great pineapple harvest of 2013.

Pineapple Harvest - Pina Colada

Oh, and just in case you’d like to join me:

Pineapple Harvest 2013  - Pina Colada Recipe

25 Comments

Filed under Family Stuff, Food & Recipes, Things I Love

One Kitchen Many Hearts: August

OKMH Collage 2013

It’s that time again – time for another OKMH box exchange! I love getting a box of love from my blogging buddies almost as much as I love sending them. This month, my box came from Megan of Country Cleaver fame. Megan hails from the Seattle area and mark my words – she will be a famous foodie soon. She’s destined for greatness and a spot on the Food Network. And I’m going to be a founding member of her fan club. Perhaps even Vice President.

Our theme this month was “Pimp My Desk” or “Office Essentials” or “Back to School” – whichever you think is less offensive. Here’s what Megan sent:

Photo5

This sweet little bookmark is adorable and Megan’s timing was perfect. I literally just set a new paperback out to read when her box arrived. It was immediately put to use in my copy of ‘The Winter Garden’ by Kristin Hannah. Ever read her stuff? This one tells the story of two sisters who grew up with an adoring father and a ridiculously frigid mother. Without giving too much away, the girls learn more about their mother through the Russian fairytales she shares from her youth. It’s a good story, but overall I think I preferred her other novel ‘Firefly Lane’. If you’ve read any of her other books and have recommendations, please share!

Collage3

What better accompaniment to a good book and a lazy Saturday than a cup of tea and some sea salt caramels? Again, perfect timing. The caramels died as soon as the box was opened (yes, all 3 of them). The tea lasted longer, but only because it wasn’t rolled in caramel and dipped in chocolate. So stinkin’ good!

Next up was a spa treatment box filled with lip balm, hand salve and a soap truffle. See my previous comment to know why Megan slapped a post-it note on it that read “Soap Truffle – DO NOT EAT!” She knows me well.

Collage2

She knows me so well, she fostered my obsession with Seattle’s Beecher’s Cheese by sending me a bag of their crackers. Beecher’s is always the first place I hit when we go to Seattle and walk through Pike Place Market. I love that place. If it were possible to die from the over-consumption of fresh squeaky cheese curds, I’d be the first to do it. I could eat them by the tub. Oh wait, I totally HAVE eaten them by the tub. I’m not called ‘The Cheesel’ (like weasel) for nothing, folks.

Collage1

These little pupper magnets have to be the most adorable things ever. There’s actually a Boston Terrier magnet in honor of our beloved Ziggy who passed away in March and a pug to represent our sweet friend Miss Josie Pugglesworth of the Long Beach Pugglesworths. If the magnets didn’t having me smiling ear to ear, the pens certainly did. They’re anti-theft pens for your desk. Why anti-theft? Just read them. Springfield Sexual Addiction Center? Hilarious!

I loved everything in my box, but I’ll cherish this card from Megan most.

Collage4jpg

The post-it notes explained each gift, but that sweet card and the love behind it are the real treasure. Our Story: Seven friends meet on the internet via their blogs and become real-life friends forever. And that is the greatest gift of all.

Want to see more? Check out what I sent to Kirsten at Comfortably Domestic by clicking HERE. From there, you can click from blog to blog & follow the fun.

13 Comments

Filed under Blogger Collaborations, Things I Love

Pineapple Update!

Our pineapple babies are growing nicely. I realized it’s been forever since my last update, and I thought you’d like to see how they’re doing. This year, we have four. FOUR! Well, four actual fruits. We’re currently up to eight pots and over a dozen plants. If you add in the ratoons (offshoots) that will have to be replanted soon, we’re up to 25+ potential pineapple plants. It’s practically a mini-plantation now. Watch your back, Dole. I’m coming for you.

Pineapple Collage - Aug2013

In my head I call them Eenie, Meenie, Miney & Mo. This is Mo (below).

Pineapple Close-Up - Aug2013

Judging by our last pineapple harvest in 2011, I’m guessing these are still at least 4-6 weeks from fully ripe which means late September or possibly even early October. But that’s okay, because we got another surprise this month – a new batch of bananas – and they’ll be ripe at about the same time.

Bananas - Aug2013

{sniff….sniff…} I smell daiquiris!

21 Comments

Filed under Miscellaneous Thoughts, Things I Love

Can It: Black & Blue Jam

Black & Blue Jam - Label Shot

Jam. It’s my jam. I love making it, which is convenient because I love eating it. There’s something magical about canning your own jam. When I open my pantry and see that Jelly Shelf with jars stacked high, I feel I’ve accomplished something. When I take a jar of homemade jam to my grandkids I feel like I’m sharing something homemade and wholesome. It’s a love that goes back to my own grandmother and memories of sitting on the steps of her root cellar, waiting anxiously to see what she might retrieve. It’s memories of my own mother baking homemade bread on glorious summer canning days, smearing warm slices of that bread with jelly foam and passing them out like Christmas presents. Magical.

When my Big Sister and I road-tripped up to Mom’s last month, I was fortunate to find gorgeous fresh blackberries and blueberries and saved them just for this – Black & Blue Jam. The combination of these two berries, blended into a rich, deep purple jam – well, it just sings to me and stirs some deep-seeded joy from my past as well as a fervent passion for the buttered toast in my future.

Black & Blue Jam - Berries in the Pot

Black & Blue Jam
7 cups fresh blueberries & blackberries, washed & stems removed
1/4 cup fresh squeezed lemon juice
3 boxes (1.75 ounces each) powdered pectin
10 cups granulated sugar
1 teaspoon real unsalted butter
6 pint or 12 half-pint canning jars
new lids & rings for each jar

In a large heavy saucepan, combine the berries and lemon juice. Cook over medium heat, stirring often, until the berries are soft and have released most of their juice, approximately 30-45 minutes. (Hint: I like to take an old-fashioned potato masher to mine after about 20 minutes to help extract the juice.) Add the pectin to the sugar and stir to combine, then gradually add the sugar to the berries, stirring constantly to prevent lumps. Drop in the butter and continue to cook, again stirring often, until the sugar has completely dissolved and the mixture has started to thicken. Using a big soup spoon, skim off any foam or bubbles from around the edge of the pan and save it in a bowl for jelly foam toast later. It’s a jam canner’s reward for a job well done.

Turn off the heat. If you dislike seeds (I do), place a strainer over another large pan and ladle the jam into a strainer, pressing the jam through using a flexible silicone spatula. Place your sterilized canning jars close to the pot. Using a canning funnel, ladle the jam into jars, leaving 1/4″ to 1/2″ of space at the top. Once filled, use a damp paper towel to thoroughly wipe the rim of each jar, removing any jam that may have spilled over.

In a heat-proof bowl, place new canning lids (I alternate them – one face up, one face down – to keep them from sticking together) and cover them with boiling water. Let them sit for 3-4 minutes, then carefully remove them one at a time, shaking off any excess water, placing one onto each jar. Screw a ring on firmly, but not so tight that it won’t turn at all, and set them aside until all are done.

I use this handy silicone canning basket when I can anything. It allows me to lower & raise jars without any slips or accidents, and is heat-proof so it stays in the pot the entire time without melting. Process your jam jars in a hot water bath for 15 minutes (half-pints) or 20 minutes (pints). If you’re unfamiliar with water bath processing, check out this tutorial.

Jelly Collage

In my house, jam isn’t ‘done’ until it’s properly labeled. I may be slightly obsessed with creating cute labels for all my jams & jellies. It’s my creative process. Once your jars are properly labeled, you’re free to box them for storage, stack them on a pantry shelf, or pass them out to friends and family. Homemade jam makes excellent gifts. And speaking of gifts, there’s just one more to enjoy before you go – that bowl of jelly foam on warm buttered toast.

Black&Blue Jam Collage

Oh, Mom. I cannot thank you enough. {hugs}

For more on home canning, visit http://www.freshpreserving.com/getting-started.aspx

26 Comments

Filed under Food & Recipes, Things I Love

“The Heat is On” Spicy PB Shortbreads

Heat Is On PB Shortbreads -Title Shot

I love peanut butter. This one time, in high school, a friend’s dad got me to run 5 miles for a giant jar of it on a dare. It was 1980, and there was a peanut butter shortage. I did what I had to do.

Fast forward to June of this year, when I attended the BlogHerFood conference in Austin. I had the best time and met so many fabulous food bloggers, but I was also fortunate to meet some really nice people from companies represented at the event like Adam Shapiro from Peanut Butter & Co.

Adam & I sat at the same breakfast table the first morning of the conference, but didn’t get a chance to talk. Later that weekend, I bumped into him again and got a chance to strike up a conversation and share how much I love their peanut butter (most especially their Dark Chocolate Dreams – it’s sin in a jar). Adam asked if I’d heard about their new flavor – The Heat is On. It’s a crazy blend of peanut butter and spicy chilies.

When I say crazy, I mean crazy genius. We talked about the standard things that came to mind, like using it in a peanut satay or in a dipping sauce for egg rolls or dumplings. But as we were talking, I kept thinking about what it would be like in a cookie. Specifically, a peanut butter shortbread cookie dipped in chocolate.

Adam was intrigued by the idea. Enough so that he offered to send me some peanut butter to play with. This was truly one of the greatest and most unexpected pleasures of attending my first food blogging conference – connecting with fascinating people you’d never have a chance to meet otherwise and sharing a passion for food. True to his word, here’s what Adam sent:

PB&Co Box

Not just one jar, but an entire box of various Peanut Butter & Co flavors. I was simultaneously stunned and thrilled. He even included a jar of the Dark Chocolate Dreams. What a guy! Lilly Bug (our granddaughter) immediately fell in love with the dark chocolate peanut butter. She’s a girl after her Nana’s heart. Jonah Bear (our grandson) loved the maple. He’s a pancake kind of dude, so that’s not really surprising. Personally, I went into that jar of Cinnamon Raisin Swirl with a spoon and almost didn’t come back out. I’m officially obsessed with it.

PB&Co The Heat is On

But this spicy The Heat is On is what inspired these cookies. This richly roasted peanut butter combined with a spicy blend of heat is as bold as it is fun. It’s just spicy enough to feel the burn spread across your palate, but not so spicy you’re running for a glass of water. It’s a party in a jar, and now it’s a party in a cookie. And all because I stepped out of my comfort zone and initiated a conversation with a super guy who just happened to work for a peanut butter company that I love.

The Heat is On Peanut Butter Shortbreads – for Adam
3/4 cup (1 1/2 sticks) unsalted butter, softened
1/4 cup ‘The Heat is On’ spicy peanut butter
1/4 cup plain crunchy peanut butter
1/2 cup brown sugar, packed
2 tablespoons honey or agave nectar
1/2 teaspoon pure vanilla extract
2 1/3 cups all-purpose flour
1/4 teaspoon table salt

In a large mixing bowl, combine the butter and peanut butter, beating with an electric mixer until well blended. Add the brown sugar, honey or agave nectar and vanilla extract, beating until combined. Sift together the flour and salt and add it slowly to the butter mixture, beating until the flour is fully absorbed.

Heat Is On PB Shortbreads - Pressed with a Glass

To press with a glass for a decorative cookie:
Scoop enough dough into the palm of your hand to form a ball roughly the size of a golf ball. Line a cookie sheet with a Silpat baking mat or parchment paper. Space the balls of cookie dough about 2″ apart and press with the bottom of a decorative glass. If the glass tries to stick to the dough, dip it in granulated sugar.

Heat Is On PB Shortbreads - Slice & Bake style

To use the slice & bake method:
Shape the cookie dough into a log and roll in plastic wrap, twisting the ends to seal them shut. Refrigerate at least one hour, then unwrap and slice into 1/4″ slices. Place the cookies 1″ apart on a lined cookie sheet.

To bake:
Pre-heat your oven to 275F. Place your oven rack in the middle portion of the oven, and bake the cookies for 40 minutes. Remember – everyone’s oven is different and some run hotter than others. Start checking the cookies at 30 minutes. If you gently press the center of the cookie and it gives a little, let them stay in a few minutes longer. I baked mine for exactly 40 minutes.

Remove from the oven and allow them to cool on the baking sheets until completely cooled. Store in an airtight container for up to one week. If you want to kick it up a notch, consider dipping them in chocolate. I did. #NoRegrets.

Heat Is On PB Shortbreads - Dipped Close-Up

To dip in chocolate:
I let the cookies cool overnight to make sure they were completely cooled. Next, combine 1/2 cup dark chocolate chips with 3/4 cup milk chocolate chips and set them over a double-boiler to melt. Once melted, whisk until the chocolate mixture is perfectly smooth, with no lumps. Scrape the chocolate into a small glass or ramekin and dip each cookie individually, placing them on waxed paper to set.

Heat Is On PB Shortbreads - Drizzed in Chocolate

In a rush? You can scrape the melted chocolate into a zippered plastic food storage bag, press it all down to one corner of the bag, and snip the corner off. Using a quick back & forth method, drizzle the cookies until all are decorated. Then squeeze some into your mouth for good measure, and throw away the used bag. After that, it’s just a matter of waiting for the chocolate to set up, if you can wait that long. I’ve never been good at waiting, especially with cookies.

Heat Is On PB Shortbreads - Final Close-Up

Tip: If you live in a warm, humid climate like I do (hello, Houston), spread your waxed paper onto a cookie sheet before you dip or drizzle your cookies with chocolate. Once done, you can pop the entire pan into the fridge for 30 minutes or the freezer for 10 minutes to help the chocolate firm up.

Note: This recipe is adapted from a shortbread recipe at Living Tastefully. This post is not sponsored by Peanut Butter & Co. As stated above, the company provided me with a box of product to sample. All opinions (and drooling) are my own. Special thanks to Adam Shapiro of Peanut Butter & Co for his generosity.

29 Comments

Filed under Food & Recipes, Things I Love

A Week at My Mom’s

That's my niece, capturing the excitement of our road trip to Mom's.

That’s my niece, capturing the excitement of our road trip to Mom’s.

Hello, everybody… I’m back! My week-long visit to Mom’s was most excellent. I picked up Big Sis and her daughter in Dallas and we beat cheeks north to avoid the thunderstorms that chased me from Houston all the way to Mom’s. From my door to Mom’s is about 9 to 10 hours, which made for a long drive, but it allowed us to get an early jump on Saturday morning. To add to our excitement, Sister #4 drove up from Dallas late Friday night to join us for our first weekend because in our family, the more = the merrier.

Saturday morning started with a trip to the farmers market in Fort Smith, which totally blew my mind. The variety and quality we found was shocking and wonderful, and this from someone who visits farmers markets in Houston and Austin. I’m telling you, these folks weren’t messing around. We hit that market like we were preparing for the apocalypse and ate like kings off our bounty for an entire week. We had bags upon bags of field peas, carrots, kale, squash, heirloom tomatoes, okra, Asian eggplants, honey, homemade bread and more. In fact, Big Sis and I ended up bringing some goodies home. She ended up with kale, carrots and assorted other veg. I brought back peaches, blackberries, blueberries and Thai bird chilies. Win/win all the way.

We also hit a vintage flea market at the fairgrounds and picked up a few great pieces for great prices. I bought vintage kitchen utensils and pans for blog props (of course), including an antique cake comb for my friend and fellow blogger Anne of From My Sweet Heart. She should be getting that box any day now. Then it was on to Van Buren for lunch and more antiquing. So fun!

Overall, our week consisted of way too much really good food, including that Blackberry Cake I made for Berry Week. It died a noble death. We also whipped up a few cocktails, got in a few rounds of croquet when the oppressive Oklahoma heat wasn’t trying to kill us, played more than a few board games chased with a few rounds of Mexican Train dominoes, and tackled some crafting. (I tried to crochet but failed miserably.) There were also visits from our Baby Sister and her son as well as a day spent with our oldest niece. Mostly, our week can be summed up as: we spent our week running Mom ragged by dragging her to every antique and quilt shop within a 100 mile radius. And it was glorious.

Here are a few snaps of our week in the country.

Typical sunset over Mom's place in the country.

Typical sunset over Mom’s place in rural eastern Oklahoma.

One of the many cottontail bunnies that live in Mom's yard and terrorize her attempts at gardening.

One of the many cottontail bunnies that live in Mom’s yard and terrorize her attempts at gardening. It’s a good thing they’re cute.

Mom's yard is covered in these bushes - nicknamed Rose of Sharon.

Mom’s yard is covered in althea bushes – nicknamed Rose of Sharon.

Mockingbird eggs - there were four in that nest by the time we left.

Mockingbird eggs – there were four in that nest by the time we left.

A day trip to White Rock Mountain for a picnic lunch.

A day trip to White Rock Mountain for a picnic lunch.

Mom at the overlook gate at White Rock Mountain.  I'm comin', Ma!

Mom at the overlook gate at White Rock Mountain. I’m comin’, Ma!

Mom, Big Sis & my niece checking out the cliffs at White Rock Mountain.

Mom, Big Sis & my niece checking out the cliffs at White Rock Mountain.

34 miles to Fort Smith, Arkansas where I spent my formative years.

34 miles to Fort Smith, Arkansas where we spent our formative years.

Big Sis & my niece check out the treacherous drop at the overlook.

Big Sis & my niece check out the treacherous drop at the overlook.

A perfect peck of peaches from Poteau, Oklahoma. Gorgeous!

A peck of perfect peaches from Poteau, Oklahoma. Gorgeous!

What to do with a peck of perfect peaches - preserve!

What to do with a peck of perfect peaches? Preserve!

There was much, much more to our week – most of which I did not photograph because I was too busy enjoying it. We took a day trip to Eureka Springs, which was lovely and included a stop at an old favorite – Bubba’s Barbeque.

Photo of Bubba's taken by my Big Sister

Nothing says pulled pork like the pink pig at Bubba’s. Photo taken by Big Sis & used with her permission.

In the end, we had a lovely week and were thoroughly exhausted by the time we all got home; I can only imagine how tired Mom must have been. We totally wreaked havoc on her quiet country life for an entire week, but we had such fun doing it. We did it all – from feeding fruit to the cows to playing croquet with the bunnies. Our hearts and stomachs were full, even if our wallets were significantly lighter after all that shopping. Still, it was so worth it.

Since my niece kicked off this story, I’ll let her finish it. Even though she’ll most likely be horrified. Sorry, K. When you pose around a blogger, things happen.

The End.

The End.

19 Comments

Filed under Family Stuff, Travel Tales

My Favorite New Salad: CousCous

Couscous - Banner Shot - Inside NanaBread's Head

I am addicted to couscous. I blame my little sister (aka #4). She’s the one who first introduced me to it, and since then I have come to love it beyond words. It’s hard to even pinpoint what I love most. Maybe it’s the couscous grain itself – so buttery and delicious. Or perhaps it’s the combination of fresh & dried fruits; it does pair my favorite tart dried cherries, cranberries and apricots with the sweetness of fresh melons. Or maybe it’s the nuts? That’s a strong possibility, since toasty roasted pistachios, walnuts & pecans are showcased.

Couscous - Ingredients - Inside NanaBread's Head

Who am I kidding? It’s all of it, tossed together to create a sweet & savory, soft & crunchy perfection you just can’t find in other salads. And the best part is that you can customize it to include any of your personal favorites. My little sister loves to add pomegranate seeds. I adore it with the fresh melon and dried papaya. Any way you choose to make it, be forewarned – once you try it, you may never stop obsessing over it. Trust me.

NanaBread’s Easy CousCous:
1 cup water
1 pinch of table salt
1 tablespoon agave nectar or honey
1/8 teaspoon ground cinnamon
4 tablespoons butter
1 cup uncooked couscous
1/2 cup dried cranberries
1/2 cup dried papaya, diced
1/2 cup dried apricots, diced
1/2 cup dried, pitted tart cherries
1/2 cup fresh honeydew melon, diced
1/2 cup fresh cantaloupe, diced
1/2 cup roasted & salted pistachios
1/2 cup toasted pecans
1/2 cup toasted walnuts
zest & juice of one orange

In a saucepan, combine the water, salt, agave, cinnamon and butter; stir over medium-high heat until the water mixture comes to a boil. Quickly add the couscous and stir constantly for one minute, to prevent the couscous from sticking. Cover tightly with a lid, turn off the heat, and let it sit for 5 minutes.

While the couscous is resting, chop your fruits and nuts into roughly the same size pieces and place them in a large mixing bowl; toss with the juice and zest of one orange. Once the couscous is ready, fluff it with a fork and pour it over the fruits and nuts; toss to thoroughly combine.

Couscous - Close-Up - Inside NanaBread's Head

Let the mixture sit at room temperature for at least 30 minutes before serving. Leftover couscous should be refrigerated in an airtight container and should keep for at least 4-5 days. I don’t think mine will last that long. Not even close. Nope. Not at all. Not sharing, either. Nuh-uh. {going back for more}

14 Comments

Filed under Food & Recipes