Category Archives: Things I Love

These are the things I love. They’re not paid endorsements in any way. If they were, I would certainly tell you. They’re just a collection of things I love enough to share with you.

Vintage Vanilla Wafer Cake

This is not just a story about a recipe – it’s about a quest. A search and conquer mission. Okay, there IS a recipe, but it’s also about the journey to get here.

vanilla-wafer-cake-sliced

When The Complete Package and I moved to the Austin area last spring, we discovered Opie’s Barbecue in Spicewood, Texas. On a whim, he grabbed a slice of what they called Coca Cola Cake and a new obsession began. Each time we visited, he would look for the cake on the dessert rack, and most of the time it was sold out. Life can be cruel, and missing this cake became a constant topic for him, just as Opie’s famous butterbeans became for me (sold Friday-Sunday only; dine-in only; no whining allowed).

Because the cake became so elusive, I began to dig for recipes. Searches for Coca Cola Cake resulted in chocolate sheet cakes with fudge frosting, which is the traditional Texas way. Those cakes, however, did not resemble Opie’s version in the least. The cake TCP pined for tasted of vanilla, coconut and pecans. It was sold by the slice and slathered in cream cheese frosting. No chocolate. No fudge. No hope in sight. Then I ran across a blog post about a trip through Spicewood and a coca cola cake that prompted the writer to share a memory of her grandmother’s old-fashioned vanilla wafer cake. She included a family recipe, and that’s where I decided to begin.

The first time I made the cake, I followed the recipe exactly and the result was brickish. Too dense, too sweet, and no hint of coca cola anywhere, thus leading to further confusion about why Opie’s would call it such. The second time I made it, I scaled back on the sugar and liquids, reduced a Coke in a saucepan to create a syrup, and glazed the warm bundt with coke syrup before frosting. Result – still brickish, still too heavy, and slightly soggy from the syrup. Two fails in a row, but my mama didn’t raise a quitter.

On my third attempt, I went a completely different route. What the cake lacked was lift. Soft, fluffy lift. It was at that moment that it struck me. What if I added a plain yellow cake mix to the otherwise traditional ingredients? What if I gave up on the cola aspect all together and focused on keeping it simple? Could I use that dusty can of coconut milk in my pantry to boost the overall flavor? What was there to lose in trying? Sometimes one must be bold, or at least willing to fail. Again & again.

The surprising part is that it worked. Not just worked, though. It was delicious. So much so that The Complete Package declared it a winner. And that’s how we came to create our own version of this vintage Vanilla Wafer Cake with a modern twist. Thank you, Betty Crocker.

This comes together quickly, so pre-heat your oven, grease/flour your bundt pan, gather your ingredients and let’s get started.

vanilla-wafer-cake-ingredients

NanaBread’s Vanilla Wafer Cake:

  • 1 box (11 ozs.) Nilla Wafers, crushed
  • 1 bag (7 ozs.) shredded, sweetened coconut
  • 1 1/2 cups pecan pieces
  • 1 box (15.25 ozs.) yellow cake mix
  • 6 whole eggs
  • 1 can (13.5 ozs.) coconut milk  (not reduced fat)
  • 1 teaspoon vanilla bean paste or vanilla extract
  • 1/2 cup raw or granulated sugar (I used raw)

Pre-heat your oven to 350F. Grease and flour a bundt pan and set it aside.

In a food processor, combine the vanilla wafers, coconut and pecans. Pulse until blended to the consistency of coarse sand and no large chunks remain.

vanilla-wafer-cake-processor-collage

Pour the crumb mixture into a large mixing bowl and add the cake mix, eggs, coconut milk, vanilla and sugar. Just dump it all in there. No need to be delicate.

vanilla-wafer-cake-dry-wet

Grab a spatula and stir to combine (no mixer needed), just until all ingredients are moistened. Pour into your prepared bundt pan and smooth out the top.

vanilla-wafer-cake-ready-to-bake

Bake at 350F for 30-35 minutes, or until a toothpick comes out clean or with a few small crumbs. Keep an eye on it near the end. You don’t want to over-bake this one. Remove from the oven and allow it to cool in the pan for 15 minutes, then invert onto a cake plate and allow it to cool completely.

vanilla-wafer-cake-naked-bundt

I swear, your house will smell like heaven right about now. This cake is good enough to eat as is, but I think we all know everything’s better with cream cheese frosting. I like to keep mine simple.  In a small mixing bowl, combine one 8-oz package of cream cheese and 1/2 a stick of unsalted butter. Allow both to rest at room temperature until softened. Add 1 teaspoon vanilla extract or vanilla bean paste (my favorite), and 1/2 to 1 cup of powdered sugar, depending on how sweet you like it. Whisk until smooth and put it in a bag for piping.

Want a quick tip for piping frosting? I do it with a Ziploc freezer bag. Simply take a quart freezer bag and put your hand inside. Then put your hand & the bag down into a tall drinking glass and remove your hand. Then fold the edge of the bag over the rim of the glass. It keeps the bag upright while you fill it.

vanilla-wafer-cake-frosting-in-the-bag

Fold the edges of the bag up, press out the air, and seal the bag. If you have time to kill before your cake is cool, simply pop the bag back into the refrigerator. When you’re ready, snip the corner off and you’re ready to pipe. I love this time saver.

vanilla-wafer-cake-piping-bag-trick

I like to use a sheet of parchment paper to keep excess frosting from running off the cake plate after it’s piped. You’ll see what I mean in a second. Twisting the top of the bag to press the frosting down to the corner, start piping in the center of the bundt and work your way from inside to outside around the entire cake.

vanilla-wafer-cake-cream-cheese-frosting

I’m not playing when it comes to cream cheese frosting. I put it on thick, and I make sure there’s excess frosting in the middle, just in case I want more. And I always want more.

vanilla-wafer-cake-sliced

So simple, y’all. And so flavorful. And look at that lift! This one’s a keeper.

Sorry, Opie. I’ll gladly stand in line for your beautifully smoked meats, your creamy tater tot casserole, and your dine-in only butterbeans every weekend, but I’ll be having dessert at home from now on. Care to join me?

Advertisement

31 Comments

Filed under Food & Recipes, Things I Love, Travel Tales

Spring Outdoor Gardening With OXO

I haven’t posted since March? Well, we’re not dead – we just moved!

The Complete Package pulled the trigger on retirement and the lure to be close to our grandkids was just too strong for me, so we packed up our stuff and we moved to Beverly. Hills, that is. Okay, not Beverly Hills exactly, but we did move to the hills west of Austin. Hello, Hill Country!

Two weeks after we moved into our new home, we were hit with a massive hail storm that blew out three picture windows, totaled TCP’s truck, dented the guttering, destroyed our roof and beat our landscaping to a pulp. (Stupid hail.) Not the welcome we expected, but it didn’t dampen our love for the new place. It just meant we had more work to do. And we still absolutely love it.

While we wait for contractors to fix the big stuff, we started on the yard with a little help from OXO. Their Spring Gardening campaign kicked off just as we were preparing to redo the flower beds. Perfect timing! The box of tools they sent were exactly what we needed.

OXO Spring Outdoor Gardening Tools

I’ve made no bones about the fact that I love OXO products. Their commitment to smart design at a great price continually knocks me out. They don’t just design comfortable handles, for example. They add gel pads to the grips to prevent blisters. Ergonomic and comfortable for the win!

OXO Transplanting Trowel - Gel Pad Comfort

I decided to start with the hand plow and tackle replacing the salvia that got beat literally to death. Hail hath no fury? Try telling that to the salvia.

OXO Plow To the Rescue

Because of the pointed tip, I could literally plow through the rock to the soil beneath. This is a serious hand tool. Besides digging rocks, I also used it to re-trough the edge of the bed where approximately two gallons of tiny gravel from our asphalt shingles washed off the roof. Apparently, when golf ball size hail beats your roof badly enough, all that gravel will indeed come off and end up in your yard, which is totally bizarre. But fear not! The hand plow is your friend.

OXO Pointed Plow Blade

Next, we tackled trimming the broken branches from our oak trees and bushes. (Stupid hail.) I don’t have any idea what this bush is, but I like it. Could it be a blueberry bush? Only time will tell. If you recognize it, feel free to shout it out.

OXO Bypass Pruners

The bypass pruners made quick work of those branches and also helped me clean up our poor agave. He did not fare so well with the hail. Poor guy had holes blown all the way through his fronds.

Our Poor Hail-Damaged Agave

Once he was spruced up, I used the hand rake to create a zen pattern in the sand. You know… to help calm him and restore order. Quick question: Do you talk to your plants? I’m asking for a friend.

New House - Agave & Rock Bed

And the hand rake I mentioned? Wait until you get a load of it. Man, I love this thing. It’s the Edward Scissorhands of hand tools.

OXO Hand Rake - Fully Expanded

We used it to help spread new mulch because the storm washed all of our previous mulch into the adjacent greenbelt. (Stupid hail.) What I loved about this rake is that it’s expandable. Did you hear that? I said expandable!

OXO Expandable Hand Rake Collage

You can’t help but play with this thing, but the truth is it’s so functional and easy to use. TCP dumped piles of mulch, and I played with the new hand rake. I mean I ‘worked hard to improve the beds’. (Sometimes I wish he didn’t read my blog.) It made getting into tight nooks and crannies super easy.

OXO Hand Rake - Working Those Corners

Because you can release the lock and adjust the rake width in or out, you can put that mulch into any corner instead of accidentally flinging it out into the grass. That’s a big bonus for a klutz like me.

Now for my personal favorite – the Pour & Store Outdoor Watering Can. I’m telling everyone about this puppy. It’s pure dynamite. The spout actually swivels so you can fill and store with ease. What?!? You heard right!

OXO Pour & Store Watering Can - Easy Fill

And it holds 2+ gallons of water! You’d think that would be heavy and awkward to carry, but it’s really not. The can is so well balanced, you can grab it and go. And you don’t have to constantly peek into the can to see if it’s full yet, because the handle is translucent and you can see the water as it fills. See what I mean? The designers at OXO are so smart! Why did no one think of this before? Why didn’t I think of it before? I coulda’ been RICH, I TELL YOU!

OXO Pour & Store Watering Can - Easy View Fill Level

Other features that rock – the pivoting spout that allows you to fold and store easily and the removable spout head that goes from rain function to full stream with a twist. You’d better believe I am watering ALL the things now.

OXO Pour & Store Watering Can - Thoughtful Design

Once you’re done, give it a quick wipe, twist the spout back around and pop it under a kitchen cabinet. Pure genius.

OXO Pour & Store Watering Can - Easy Storage

We had so much fun playing with our new toys, we got a wild hair and planted a herb container for the front entry. In case you’re wondering, I’m already planning a Margherita pizza around that basil. ‘Hey, Basil…looking good! What, these? Oh, they’re just bypass pruners. No big whoop.’

New House - Herb Container Garden

It felt good to stand in the driveway and look over our work. The beds look good again. The plants are pruned, watered and feeling loved again. The oaks are still bruised and holding a grudge, but 2 out of 3 landscapers agree that they’ll probably recover and grow to be big and strong despite the trauma they endured.

Yes, we are still waiting for guttering and the roof to be replaced, but we really can’t complain. It could have been worse, that’s what insurance is for, and no one got hurt. For that, we are truly thankful.

New House - Front Beds & Porch

Now if OXO could just design a shingle remover and a guttering installer tool, we’d be set. Go ahead, guys. I know you can do it, and I’m willing to wait.
Up Next:
An update on the inside of our new house, including photos from that storm. (Stupid hail.)

NOTE: As a member of the OXO Blogger Outreach Program, I am occasionally given the opportunity to test OXO products, which I receive at no cost to me. I do not receive any other compensation and all opinions are my own. If you are a blogger and would like more information on the OXO Blogger Outreach Program, CLICK HERE.

15 Comments

Filed under Blogger Collaborations, Family Stuff, Things I Love

Peanut Butter & Co Plays Two Ways

Confession: I once jogged 5 miles for a big jar of peanut butter.
It was my junior year of high school and a friend’s dad bet he could train me to run 5 miles. My first thought was “Joke’s on you, suckah! I don’t run unless my butt’s on fire.” My second was “What’s in it for me?” His bait: a giant jar of peanut butter. This will date me, but it was 1980 and there was a nation-wide peanut butter shortage. As a PB junkie, I was game. After a few weeks of training, I ran that 5 miles and claimed my prize. Then, because I have 4 sisters, I promptly hid it under a pile of laundry in my room because a.) kids never touch laundry, b.) I didn’t care to share, and c.) see above re: peanut butter shortage.

If any sisters are reading this, I apologize. It was a dark time for peanut butter lovers and I went into “every man for himself” mode. I did what I had to.

Peanut Butter & Company recently issued a Mystery Ingredient Challenge to members of its Yum Squad. Sign up, and they would send you not only the peanut butter to play with, but a secret ingredient. Until your box arrived, you would have no idea what your mystery ingredient might be.

Here’s the peanut butter I chose to play with for this challenge:

PB&Co - White & Dark Chocolate Peanut Butters

And here’s my mystery ingredient:

PB&Co - Secret Ingredient - Espresso Powder

If you know me, you know I’m a coffee lover. I don’t function in the morning until I’ve quaffed my first cup, so this secret ingredient was perfect for me. Pinterest has been taunting me with scones lately and I found myself craving warm, flaky layers. So the first thing I made was a two-tone layered scone based on the America’s Test Kitchen cream scone recipe.

PB&Co - Two-Tone Scones2 - March 2015

NANABREAD’S TWO-TONE CHOCOLATE PEANUT BUTTER SCONE

For the white chocolate peanut butter layer:
1 cup all-purpose flour
3 tablespoons sugar
1/2 tablespoon baking powder
3 tablespoons butter, cut into small cubes & chilled
3 tablespoons White Chocolate Wonderful peanut butter
1/2 to 2/3 cup heavy whipping cream, as needed

Place all ingredients except the cream in a food processor and process for 6-8 pulses. Turn the processor on and slowly add enough cream until the dough sticks together and starts to form a ball. It should be the consistency of a soft biscuit dough. Scrape the dough out onto a floured surface and knead a few times, forming it into a square about 3/4″ thick.

For the dark chocolate peanut butter layer:
1 cup all-purpose flour
2 tablespoons sugar
1/2 tablespoon baking powder
1 tablespoon Medaglia D’Oro instant espresso powder
1/2 cup semi-sweet miniature chocolate chips
3 tablespoons butter, cut into small cubes & chilled
3 tablespoons Dark Chocolate Dreams peanut butter
1/2 to 2/3 cup heavy whipping cream, as needed

Place all ingredients except the cream in a food processor and process for 6-8 pulses. Turn the processor on and slowly add enough cream until the dough sticks together and starts to form a ball. It should be the consistency of a soft biscuit dough. Scrape the dough out onto a floured surface and knead a few times, forming it into a square about 3/4″ thick.

To layer, make sure each square of dough is the same size. Brush the top of the dark chocolate dough with a little cream and place the white chocolate layer on top. Press gently and square up the sides, then set aside while you make the glaze.

For the espresso glaze:
2 tablespoons heavy whipping cream, chilled
1 teaspoon Medaglia D’Oro instant espresso powder
1 tablespoon honey or agave nectar
2 tablespoons raw or Demerara sugar crystals, to sprinkle on top

In a small bowl, combine the cream, espresso powder and honey or agave. Whisk until smooth.

Pre-heat your oven to 425F and prepare an 8″ square baking pan by spraying it lightly with baking spray or lining it with parchment paper. Using a large kitchen knife or a bench scraper, cut the layered scone dough into equal pieces (I cut mine into 3 rows of 3 for 9 smallish scones). Place them in the baking pan so that the sides are just touching. Using a pastry brush, brush the entire surface of the scones with a thick coating of glaze, then sprinkle generously with raw sugar crystals. Bake for 14-18 minutes, or just until a toothpick comes out clean. I don’t like dry scones, so I tend to take mine out of the oven when there are still a few small crumbs sticking to that toothpick. Serve warm from the oven with a pat of butter and a hot cup of coffee. Man, I wish you could smell these.

PB&Co - Two-Tone Scones1 - March 2015

“But NanaBread… that recipe only used 3 tablespoons of each peanut butter. What else can we make with all of the ooey gooey peanut butter goodness left in those jars?” Well, I’m glad you asked, because (and I love to say this)…

BUT WAIT… THERE’S MORE!

I also made a layered peanut butter parfait using both White Chocolate Wonderful and Dark Chocolate Dreams peanut butter AND my beloved secret ingredient espresso powder. That’s right, folks! It’s a parfait of chocolate espresso cake layered with creamy peanut butter custard and topped with espresso whipped cream and cake crumbs. SHUT THE FRONT DOOR!

PB&Co - Chocolate Espresso PB Parfaits - Trio

NANABREAD’S TWO-WAY PEANUT BUTTER ESPRESSO PARFAIT

For the cake:
1 box (15.25 ozs) Betty Crocker Triple-Chocolate cake mix
1 1/4 cup water
1/2 cup canola oil
3 large eggs
1 tablespoon Medaglia D’Oro instant espresso powder

Whisk all ingredients until smooth and pour into a prepared 13″ x 9″ baking pan. Bake according to the directions on the cake mix box, just until a toothpick comes out clean. Remove from the oven and set aside to cool.

For the peanut butter custard:
1 box (4.6 ozs.) Jell-O Cook & Serve vanilla custard mix
2 cups milk (I used 2%)
1 tub (8 ozs.) mascarpone cheese (or cream cheese)
1/2 cup each of White Chocolate Wonderful & Dark Chocolate Dreams

In a saucepan, combine the vanilla custard powder and milk and whisk until combined. Cook over medium-high heat, whisking frequently, until the mixture is thick and bubbly. Remove from the heat and allow it to cool, then transfer to a bowl, cover with plastic wrap and refrigerate until completely chilled.

Once chilled, divide the custard equally into two bowls. Add half of the mascarpone (4 ozs.) and one type of peanut butter to each bowl. Whisk until smooth and keep refrigerated until assembly.

For the espresso whipped cream:
1 cup heavy whipping cream, chilled
1 teaspoon Medaglia D’Oro instant espresso powder
1 teaspoon vanilla extract
2-3 tablespoons sugar, to taste

In a mixing bowl, combine all of the ingredients. Whip with an electric mixer until it thickens and holds stiff peaks. Scrape it into a plastic bag and press all the air out, and place in the refrigerator until needed.

To assemble, cut the cooled cake into circles the size of the glass you’re serving these in. Start by placing a layer of cake, then spoon in the dark chocolate peanut butter custard. Top it with a another layer of cake, followed by the white chocolate peanut butter custard. Continue to layer until each glass is full, then snip the tip off that plastic bag and pipe a layer of espresso whipped cream on top. To finish, crumble leftover cake scraps over the top of each parfait. Keep refrigerated until ready to serve.

PB&Co - Chocolate Espresso PB Parfaits - Close-Up

I made these in two sizes – small 8-oz disposable cups for ‘party-size’ servings and large 20-oz iced tea glasses for ‘I’m alone watching a movie in my pj’s and no one can see me’ servings. As I’ve said before, this blog is a no judgement zone. These were so good, Jonah Bear & Lilly Bug didn’t come up for air.

Me: “Is it good? Do you like it?”
Them: Nod vigorously; keep shoveling
Verdict: The proof is literally in the pudding.

PB&Co - Chocolate Espresso PB Parfaits - Mine

Special thanks to Peanut Butter & Co for sending me a big ol’ box of fun for their Mystery Ingredient Challenge. They were kind enough to provide multiple jars of peanut butter and a jar of espresso powder at no cost to me, and I had a ball playing with it. To clarify, as a member of the Peanut Butter & Co Yum Squad, I am not compensated in any way. I just love the product and enjoy experimenting with it. To find out more about the many fabulous flavors they sell, CLICK HERE.

YumSquad-Banner-MysteryIngredient-espresso

11 Comments

Filed under Blogger Collaborations, Food & Recipes, Things I Love

OXO offers pans now? YES!

We all know OXO makes a million fabulous kitchen gadgets, and I’ve made no bones about the fact that I use mine with enthusiasm. They are some of my favorites because of three key things:

1. they’re thoughtfully designed,
2. they’re well constructed & durable, and
3. they’re always affordable

When OXO launches something new, my ears perk up. When they announced they were launching a new line of pots & pans, my jaw dropped. And when they then offered members of their Blogger Outreach Program the chance to possibly test drive one, I jumped at the chance. With both feet. Receiving the e-mail that I’d been selected to receive my pan of choice was like opening presents on Christmas morning. I was giddy. Openly, gleefully giddy.

Here it is, y’all – My Precious.

OXO - 12 Inch Non-Stick Skillet - With Text

It’s sturdy. A little on the heavy side, but WOW is it solid. My first test was a simple soft fried egg. Nothing tests a new non-stick pan like a delicate egg. Result: so slippery, it sent my fried egg spinning when I swirled the pan. Also impressive was the heat distribution of the skillet due to the hard-anodized aluminum construction of the pan and that built-in heat disc in the bottom. Smart.

OXO - 12 Inch Non-Stick Skillet - Bottom

I also like the rise and slope on the sides of this skillet. The rolled edge is high enough to contain bubbly sauces and perfectly pitched to slide those early morning omelets onto a plate, even before you’ve had your coffee. It also allows sauces to be expertly poured. Again, smart design.

OXO - 12 Inch Non-Stick Skillet - Coating

My ultimate test for a new non-stick pan is caramel – hot, gooey, sticky thermonuclear caramel. To put my pan to the test, I opted for a baked caramel apple pancake. It starts on the stove and finishes in the oven, so it was a perfect way to test this pan. And since this skillet can take oven temperatures up to 430F, you can fearlessly go from stove to oven.

Baked Apple Pancake - Browned Butter & Brown Sugar

I started with butter and brown sugar and let it heat up to see if it would stick. I was surprised at how easily I could move the caramel around the pan without anything sticking. As it got hotter and hotter, I kept moving it around with a silicone spatula. As you can see from the photo, it didn’t stick at all and moved easily around the pan.

Baked Apple Pancake - Easy Caramel

While the sugar was caramelizing, I peeled and sliced 3 apples. I like firm, sweet apples like Gala, Pink Lady or SweeTangos. Cored and sliced into even pieces (about 1/4″ thick), they’re ready to roll.

Baked Apple Pancake - Apples1

Baked Apple Pancake - Apples2

Tip: remove the skillet from the heat while you add the apple slices. It takes a few minutes to get them arranged to look pretty, and removing the pan from the heat keeps your caramel from burning while you work.

Baked Apple Pancake - Apples in Caramelized Butter & Sugar

Because I prefer firm apples, I like to pop them in the oven and let them bake 5-10 minutes before adding the pancake batter. Once the caramel is bubbling and the apples are toasty, I remove the pan from the oven and pour the batter evenly over the top. It goes back into the oven for 12-15 minutes, or until the pancake is just set and firm. Confession: I love bubbly edges on pancakes.

Baked Apple Pancake - Pancake Batter - Post-Bake

You know it’s done when you can gently press on the surface of the pancake and it bounces back. It’s better to take this one out a little early than to over bake it, so keep an eye on it during that last few minutes.

Now for the tricky part – flipping it out of the pan. I flipped mine immediately after I took it out of the oven and got a caramel burn on my wrist, so in retrospect, I’d wait 5-10 minutes and let it cool next time. I need to learn to be patient when pancakes are involved. To flip mine, I placed a piece of parchment over the pancake, then set a plate on top of that. Using a folded kitchen towel, I grabbed the skillet on both sides instead of the handle and gave it a quick flip.

The true moment of truth is when you lift the skillet. That’s when you see if your pan is a hero or a zero based on how many apple slices are stuck to the pan. Here’s what I got. You be the judge.

Baked Apple Pancake - Flipped & Flawless

Booyah, baby! Look at that gorgeous golden caramel apple beauty.

Want to see what the skillet looked like? I expected it to be coated in a thick, deeply entrenched layer of molten sugar but this is what I saw.

Baked Apple Pancake - Sticky Caramel Goo

This is the part where I’d usually mutter bad words and grab a scouring pad. Oh, OXO… how I test thee. Instead, I ran a little hot water in the skillet and let it sit for a minute while I grabbed plates, forks and syrup. To my surprise, the remaining crusty sugar wiped right out. No scrubbing. No sweating. No cursing. It seriously wiped right out with a paper towel. Way to go, OXO. You win again. And technically, I win too.

OXO - 12 Inch Non-Stick Skillet - Handle

Final Thoughts:
1. This is my new favorite skillet. For real.
2. The size (at 12″) is great for just about any task.
3. It is well constructed and sturdy, which I expect from OXO.
4. It browned evenly and held heat beautifully, which is a must for me.
5. OXO says this skillet is dishwasher safe, but I always hand wash non-stick pans because I’m a big ol’ chicken.
6. This skillet is on the heavy side, which may prove hard to handle for someone who’s older, younger or has problems handling heavier pots or pans. If heft isn’t an issue, you’ll love it.
7. Overall rating – two thumbs way up. I’ll be using this pan for years to come.

If you’d like to take a shot at this easy baked caramel apple pancake, here’s how you can recreate it at home.

2 cups baking mix (Bisquick or my favorite – Pioneer Buttermilk Baking Mix)
2-3 tablespoons raw (or granulated) sugar
1 pinch of salt
3 large eggs
1 teaspoon vanilla extract
2/3 to 1 cup low-fat buttermilk (can sub regular milk)
2-3 large apples – peeled, cored & cut into 1/4″ slices
6 tablespoons unsalted butter
1/2 cup brown sugar

Pre-heat the oven to 375F.
In a large mixing bowl, combine the baking mix, raw or granulated sugar, salt, eggs, vanilla & buttermilk. Whisk until smooth. Batter should be a little on the thin side, like crepe batter. Set aside to rest, and start on your apples. Peel, core and slice the apples. Heat your non-stick skillet over medium-high heat, then add the butter and brown sugar. Stir until the sugar melts and the mixture begins to bubble. Remove from heat and arrange your apple slices. Pop the skillet into a hot oven for 10-12 minutes, or until the caramel mixture is bubbling furiously around the edges. Remove the skillet from the oven and pour the pancake batter evenly over the top. Return to the oven and bake just until the pancake is set, approximately 12-15 minutes. Remove from the oven and allow your pancake to cool for 5-10 minutes before flipping.

To flip, invert a plate larger than the skillet over the top, place one hand firmly on top of the plate, grab the handle with a dish towel and flip quickly. If you’re not a confident or expert flipper, invert the plate over the skillet, then place a kitchen towel folded lengthwise across the skillet. Place one hand on each side of the skillet, grabbing the plate with your thumbs and using your fingers to grab the skillet. Either way, flip quickly.

Note: if you’re using an older non-stick skillet that doesn’t release as well, run a silicone spatula around the edge of the skillet to help the pancake release prior to flipping. If you’re still left cursing your old ratty non-stick, consider acquiring one of these new OXO beauties. You will not regret it.

For this apple pancake, I made a simple cinnamon cream syrup.

1/2 cup real maple syrup
1/2 cup heavy whipping cream
1/2 teaspoon ground cinnamon

Heat all 3 ingredients in a small saucepan over medium-high heat, whisking often, until the mixture comes to a rolling boil. Remove from heat and transfer to a small pouring pitcher. Serve hot.

Baked Caramel Apple Pancake - Breakfast is Served

Disclaimer: This OXO 12″ non-stick skillet was provided to me free of charge by the OXO Blogger Outreach Program so that I could play with it and share my experience. All opinions are my own, and are my honest take on it. Have you tried OXO yet? Which are your favorite OXO products? To learn more about OXO cookware, CLICK HERE.

4 Comments

Filed under Blogger Collaborations, Food & Recipes, Things I Love

The times, they are a-changing.

So many changes in this new year, my friends. I’ll start with an apology for not posting since before Thanksgiving. Your patience has been greatly appreciated. In fact, readership has actually increased, and for that I am truly grateful. That you choose to follow the random thoughts in my head is an endless source of amazement and joy, and I love you for it.

What’s happening? Lots. First, The Complete Package is retiring! He likes to joke that I retired years ago when our first grandchild was born. He is not wrong, although technically it was more like dropping out to play Nana than retiring. The fact that I never went back to work was just a bonus (for me). Now, at long last, he will be joining me in what I like to refer to as our “funemployed years”. What’s on tap? All kinds of things, starting with this:

WE’RE MOVING TO AUSTIN!

Austin House - Street View with Banner
We found our ultimate retirement home in the rolling hills west of Austin. It’s a beautiful 4 bedroom, 3 1/2 bath one-story home with all of the features we’ve dreamed of – an open floor plan, low maintenance, high ceilings, wood floors and sweeping hill country views. Oh, and did I mention the kitchen? I knew I was home the instant I saw it.

Austin House - New Kitchen

Austin House - Kitchen Island

Austin House - Kitchen Tile

That island! Huge is an understatement. By all estimates, I’d guess it should accommodate 40 pies, 400 cinnamon rolls (at least), and sleep 4 full-grown adults if we run out of beds. It’s insane. I also love the great windows, morning light, deep counters and that herringbone subway tile backsplash. I can hardly believe I’m going to get to live here. For real – it almost brings tears to my eyes.

I’m looking forward to baking with the kids and cooking big family dinners. The idea being close enough for regular Sunday Suppers with the family has been a dream since our daughter graduated from UT and settled in Austin. We’ll be able to take the kids for long hikes in the hills, ride bikes around the miles of paved trails, and spend quality time at the neighborhood pool & play areas. Something else I’m looking forward to – a covered porch where I can relax and enjoy a good book or a cup of coffee. Guess what? Dreams do come true, kids.

Austin House - Back Porch

Austin House - Hill Country Views

And because the new house sits on top of a hill, we have great views of our new neighborhood and the rolling hills out by Lake Travis. I can hardly wait to pick out patio furniture. Besides the new house, we are thrilled to pieces to be closer to our daughter, Jonah Bear and Lilly Bug. With her pending divorce, we’ll now be there to help out and that gives all of us greater peace of mind. The kids are already plotting weekend sleepovers and calling dibs on bedrooms. They’re not alone. The Complete Package & I are ridiculously exited, too.

Blog posts may be few and far between for a bit. We’re working to list and sell our home of 25 years in Houston and prepare for the big move to Austin. If all goes well, we’ll be moving in early April (fingers crossed). I’ll try to keep you posted on our progress, if you’re interested. My goal is to be back up to full speed by May, with as many posts as possible in between, until I’m firmly planted here:

Austin House - Kitchen Desk with Arrow

Once we’re settled, I’ll break in that kitchen, hit the back roads to explore, and bring you new content from our little corner of Austin. Oh, the places we’ll go!
If you live in the Austin area, be forewarned – I’M COMING FOR YOU!
And I could not be more excited. -jeanne

18 Comments

Filed under Family Stuff, Miscellaneous Thoughts, Things I Love

Simple Apple, Pear & Cranberry Pie

Hello, Fall. I’ve missed you terribly. You didn’t write. You didn’t call.

Apple Pear Cranberry Pie - Inside NanaBread's Head

I love fall fruits, especially apples and pears. Earlier this week, a blogger tweeted that she’d just tried her first SweeTango apple and it blew her mind. She mentioned her favorite apple had always been the honeycrisp, and that’s what caught my attention. Honeycrisps are my favorite apple, too. So my next visit to the grocery store, guess what I looked for? You got it. And was she right? You betcha. Crisp, super sweet and beautifully colored, I’m afraid these are going to become my new apple obsession. They are spectacular. Pie worthy, in fact.

Apple Pear Cranberry Pie - The Fruit

For this pie, I sliced my apples thin and my pears even thinner. I usually like a big chunky apple pie, but for this one, I wanted thin slices piled high and dotted with dried cranberries. The heart wants what the heart wants.

Apple Pear Cranberry Pie - Sliced Fruit

Here’s food for thought… I watched an episode of Cook’s Illustrated on PBS and they used fruit pectin powder to thicken a peach pie. Say what? Now I’ve used pectin for years when canning fruit, but it never occurred to me to bake with it. Makes sense, if you think about it, so I decided to try it with this one. And since I used instant tapioca granules to thicken my peach pie this summer, I wondered what would happen if I did both. For science. Why not, right?

Apple Pear Cranberry Pie Thickeners

Combining apple juice, sugar, instant tapioca, pectin & vanilla extract, I made a slightly thick, gently sweetened, vanilla-kissed filling that paired perfectly with the apples and pears and created a nice balance for the tart cranberries. Once the mixture was thickened, I just poured it over the fruit and tossed it to coat. So quick and simple. The tapioca still looks a little cloudy here, but don’t worry – it’s clear and unrecognizable once it’s baked.

Apple Pear Cranberry Pie - Fruit & Thickeners

After that, it’s just dough, butter, blah blah PIE! Man, how I love pie. But seriously, there’s only one pie dough recipe for me, and it’s Kirsten’s ‘No Excuses Pie Dough’ from ComfortablyDomestic.com. Once you make this one, nothing less will do. I make it in batches, wrap it in plastic, seal it into heavy bags and pop it in the freezer so I can produce pies on a whim. And that’s another reason I love this recipe – Kirsten’s dough freezes beautifully.

Apple Pear Cranberry Pie - Kirsten's Pie Dough

Just thaw, roll on a floured surface, and pop it in a pie tin. And then concentrate on stuffing every last bit of that filling into that shell. Top with a fat, rustic lattice, crimp the edges, brush with melted butter and sprinkle generously with raw sugar crystals. Easy, right?

Apple Pear Cranberry Pie - Ready for Baking

It really is easy. The only hard part is the waiting – for it to come out of the oven when it smells so amazing, for it to thicken and cool, for dinner to end so you can cut it. It’s always the waiting part that gets me.

Apple Pear Cranberry Pie - Warm from the Oven

NanaBread’s Apple, Pear & Cranberry Pie:
1 recipe for Kirsten’s ‘No Excuses’ pie dough
1 1/2 pounds (3 large) SweeTango apples
1 1/2 pounds (3 large) Star Krimson red pears
1/2 to 2/3 cup Craisins dried cranberries (to taste)
1 cup apple juice or apple cider
3 tablespoons quick-cook tapioca granules
1 tablespoon powdered fruit pectin
1/2 to 2/3 cup granulated sugar (to taste)
1/2 teaspoon pure vanilla extract
1/2 stick unsalted butter, melted
2 tablespoons raw sugar granules

Start by making the pie dough and chilling it in the refrigerator for at least 2 hours or the freezer for 30 minutes. While your dough is chilling, prep your fruit and filling.

Peel, core and thinly slice the apples and pears. I sliced my pears a little thinner than the apples since they take a little longer to bake. Place in a large mixing bowl and sprinkle in the dried cranberries.

In a small saucepan, combine the apple juice or cider, tapioca granules, pectin and sugar. Cook over medium-low heat, whisking often, until the sugar is melted and the mixture begins to bubble. Turn off the heat and whisk in the vanilla extract.

Remove the pie dough from the fridge and roll out a bottom crust, placing it gently into the pie tin. Roll a top crust and cut into wide strips (1 1/2″) so you can form a rustic lattice top.

Pour the filling over the fruit and toss to thoroughly coat all the fruit. Spoon it into the pie shell, pressing it gently into the crust to compact the fruit. Lattice the pie dough strips onto the top of the pie, then roll the lower crust edges around the edge of the pie tin and crimp all around.

In a small bowl, melt the butter and brush the entire crust. If there is melted butter left, simply pour it over the top of the pie. Sprinkle the entire pie with the raw sugar granules.

Bake in a pre-heated oven (375F) for 45-60 minutes, turning every 20 minutes, until light golden brown. Watch it once it starts to brown. Everyone’s oven is different, and yours may take more or less time depending on how hot it runs. Once golden brown, remove the pie from the oven and allow it to cool completely before serving (4-6 hours).

Apple Pear Cranberry Pie - Cut Pie - Inside NanaBread's Head

This pie was so good! It’s going on my ‘must make’ list for the holidays now. I might even rank it above all former apple pie recipes as my new favorite. Maybe even above most other pies in general. It’s definitely invited for Christmas.

Sorry, Pumpkin Pie. I’m breaking up with you.

It’s not you. It’s me.

15 Comments

Filed under Food & Recipes, Things I Love

OXO’s #WhatAGrillWants – and what this girl wants is some smokey meat, sweet corn & fried green tomatoes

What’s missing from my website? Please don’t say humor, good writing or appetizing recipes. What I was shooting for is ads. There are none on my blog. It’s a personal choice made when I started blogging four years ago, and one I’ve stuck with since. It’s not a monetary or political issue, it’s just that I started blogging to share with friends and family, and ads never felt appropriate.

What you will see – products I occasionally share for one reason only – because I love them. OXO is one brand I stand firmly behind. Their products are well made, sturdy, easy to use and affordable. Because OXO supports the blogging community and blogs of all sizes, they created the Blogger Outreach Program. As a part of this program, I am occasionally selected to try random products. This month, it was OXO’s ‘What A Grill Wants’ collection.

OXO - What A Grill Wants Project

Included in package:
1 pair of 16″ grilling tongs
1 meat tenderizer
1 silicone basting brush
1 dressing shaker
1 corn stripper

That the box arrived just prior to the July 4th weekend was a bonus. We immediately plotted our attack. First up was playing with the corn stripper.

OXO Corn Stripper - What A Grill Wants

We started by grilling ears of fresh Texas sweet corn. Char = flavor.

OXO Corn Stripper & Grilled Corn - What A Grill Wants

Once they were cooled, The Complete Package grabbed that stripper and put her to work. The key was to start at one end apply the proper amount of pressure. {cue the uncontrollable giggling}

OXO Corn Stripper Collage

The Complete Package’s Review: (Overall Grade = C+)
1. He wasn’t sure it was any easier or quicker than using a knife.
2. The cutting blade tended to clog, which meant you had to stop & clear it.
3. Because one end was open, kernels tended to fall out constantly.
4. Cut kernels tended to be more pieces than whole kernels.
5. Pluses: OXO’s quality is always high & the ergonomics were good.

My Review: (Overall Grade = B)
1. I thought it WAS quicker than using a knife.
2. I also had issues with the blade area clogging occasionally.
3. A cap would be nice, as I somehow dumped corn all over the counter.
4. I had no issues with cutting whole kernels because I applied more pressure.
5. I love the size – it fits easily in your palm for ease of use.

What I also found was that the OXO corn stripper tended to remove ALL of the corn from the cob, while a kitchen knife tended to just shear off the tops of each kernel. This photo illustrates what I mean.

OXO Corn Stripper Comparison - Stripper vs Knife - What A Grill Wants

The cob in the front was denuded with a chef’s knife. You can see the flat surfaces of the cut kernels where the bottoms of the kernels are still attached. The cob in the back was cleaned with the OXO corn stripper, and you can clearly see that the entire kernel is missing. All that remains is the fibrous walls surrounding each kernel. Less waste and more volume of corn was a plus for me.

What did we do with all that cut corn? We made kicked-up creamed corn.

Grilled Creamed Corn

TCP’s Creamed Corn:
2 cans (15 ounces) sweet creamed corn
2 cups roasted sweet corn, stripped from the cob
4 tablespoons unsalted butter
2 tablespoons sugar
kosher salt & fresh cracked black pepper, to taste

Combine all ingredients; simmer over medium heat until warm.

Now, I’m not usually a fan of creamed corn because it tends to be mushy and flavorless, but this was really good. The char and flavor of the roasted corn really shines, and I found myself basically eating it right out of the pan with a spoon. I have no shame when it comes to corn, and I am unapologetic about it.

The Complete Package also broke in those 16″ tongs by grilling a pair of pork tenderloins. There’s something about meat smoked over post oak lump charcoal that touches my very soul. TCP’s pork tenderloin turns out juicy, smokey and perfect every time. For me, the mark of good smoked meat is that it needs no sauce and this needed nothing short of a napkin and some personal restraint.

TCP's Smoked Pork Tenderloin

TCP’s Smoked Pork Tenderloin:
3 pounds pork tenderloin, trimmed
Morton’s Nature’s Season Salt
Hungarian paprika
post oak hardwood lump charcoal

Start by removing the pork tenderloin from the package and rinsing them thoroughly. Pat dry with paper towels and remove any fat or silver skin. Sprinkle the meat liberally with Nature’s Season Salt and paprika.

TCP starts the smoker by stacking oak lump charcoal into a chimney and lighting it. When it is white-hot, he pours it into the smoker section of our grill along with a metal pan of hot water to create humidity. He then opens the grill vents on the opposite side of the grill to pull the smoke through the smoker. Placing the pork tenderloin over indirect heat, he smokes the pork for approximately 90 minutes at 250F, flipping once at the halfway mark, until the internal temperature reaches 160F. Removing it from the grill, he then wraps it in aluminum foil and allows it to rest on a cutting board on the kitchen counter for 30 minutes. Then it’s just a matter of slicing and serving. To sauce or not to sauce is a personal matter, but this pork needs no adornment.

OXO 16 Inch Tongs - Great Length for Grilling - What A Grill Wants

TCP’s Review of the 16″ grilling tongs: (Overall Grade: A+)
1. He loved the longer length, as it kept him from burning himself.
2. The silicone grips with thumb indention provided great grip.
3. The scalloped edges of the tongs provided a better grip on food items.
4. He loved the easy to use lock/unlock mechanism at the back of the tongs.

OXO 16 Inch Tongs Collage

In addition to the smoked pork and creamed corn, I also made fried green tomatoes. Please tell me you’ve had these before. It’s a southern favorite, and a clear sign that summer is upon us.

Fried Greed Tomatoes - Golden Brown
To make, start with firm green (unripe) tomatoes. Big slicing tomatoes work best. Here’s what you’ll need.

Fried Green Tomatoes - What You'll Need

NanaBread’s Fried Green Tomatoes:
2 large green tomatoes
2 cups all-purpose flour
1 tablespoon Morton’s Nature’s Season Salt
1/2 teaspoon freshly cracked black pepper
1 cup milk (whole or 2%)
canola oil, for frying

Wash the tomatoes, remove the core, and cut into 1/3″ slices.

Fried Green Tomatoes - Remove the Core

In a mixing bowl, combine the flour, season salt and pepper; whisk until well blended. Dredge each slice of tomato in the flour mixture, coating both sides, and lay them on a sheet of parchment or waxed paper. Once all slices are dredged, allow them to sit for 10-15 minutes to absorb the flour.

Fried Green Tomatoes - First Dredge in Flour

After 10 to 15 minutes, the flour on the tomatoes will look damp. When it does, pour the milk into a container for the second flour dredge.

Fried Green Tomatoes - Dredged

Dip each slice into the milk, then into the flour mixture for a second coat. Tap your fork on the side of the flour container to shake off any excess flour.

Fried Green Tomatoes - Dredge Collage
Place the freshly dredged tomatoes back onto the parchment paper, until all slices are coated twice. Why coat them twice? Well, the first coating of flour is not enough to adequately cover the tomatoes and keep them from splattering when fried. The second coat, along with the milk bath, creates a thick coating to help protect the tomatoes inside and create a crispy, crunchy coating.

Once your tomatoes are coated, add about 1/2″ of canola oil to a large skillet. Heat on high until the oil is shimmering and blazing hot. Carefully lower a few tomato slices into the oil (don’t crowd the skillet) and fry until the edges are clearly golden brown, then flip and fry until the second side is golden. Remove to paper towels and keep warm until all are fried. Serve immediately.

This time, we used the OXO dressing shaker to make a balsamic vinaigrette to drizzle over the finished tomatoes. It was a good call. While the tomatoes were frying, TCP whipped up a quick dressing.

OXO Salad Shaker - Balsamic Vinairgrette Ingredients

The OXO dressing shaker made this come together in a snap. Because volume measurements are printed on the side of the shaker, you can measure directly into the container. The one cup capacity is perfect for a quick vinaigrette of balsamic vinegar, olive oil, Dijon mustard, garlic and a pinch of salt.

OXO Salad Shaker - CloseUp

From there, you just screw on the lid, close the pour vent on top, and give it a good shake. We both loved this salad dressing shaker. And because the pour top seals to keep it closed, you can store unused dressing in the shaker. Just pop then entire thing into the fridge. (Overall Grade = a solid A.)

Fried Green Tomatoes - Finished with Balsamic Dressing

So we used our new OXO tongs to grill up some pork tenderloin, used the corn stripper to make quick work of grilled corn for creamed corn, and whipped up a quick vinaigrette for our fried green tomatoes. OXO delivered what they always do – fun, function, and affordability. It’s not only #WhatAGrillWants, it’s what THIS GIRL wants. Now if you’ll excuse me, there’s a plate of grilled goodness with my name on it. Hello, Summer!

Fried Green Tomatoes - Finished Meal

Special thanks to OXO for sending ‘What A Grill Wants’ products for me to play with via their Blogger Outreach Program. I was under no obligation to blog about these products, but because we love OXO & their products, I chose to share. All opinions are my own, as always.

6 Comments

Filed under Food & Recipes, Things I Love

Getting Crafty with Pin Cushions

There’s a bee in my bonnet – Lori Holt’s Bee In My Bonnet blog. It’s spectacular. I often drool over her beautiful website with its plethora of quilts, her line of custom-designed fabrics and patterns, and adorable craft tutorials.

Pin Cushion Crafts - Finished Lawn Chair Pin Cushion

This lawn chair pin cushion tutorial is one of my favorites. It starts with a metal lawn chair candle holder sourced from the dollar store. Mine is a vibrant shade of teal. From there, you just need a few basic items from the craft store.

Not pictured - loose quilt batting (a.k.a. fluffy stuff).

Not pictured – loose quilt batting (a.k.a. the fluffy stuff).

I love this bright argyle print. It’s perfect for my tiny teal chair. To start, I measured the width and length of the chair. Stitching around three sides, I then turned it right-side-out and stuffed the ‘seat’ with batting. A quick stitch across the width of the cushion helped divide the seat from the back. The seat gets twice as much batting so the pins have something in which to rest. The back of the cushion gets a light stuffing and then the top is stitched shut.

Pin Cushion Crafts - Lawn Chair Pin Cushion - Overview

To keep the cushion in place, I opted to stitch a color-coordinated ribbon to the back of the cushion and tie it to the chair. It can be hot-glued into place, but I opted for a ribbon so I can use it as a candle holder or blog prop at any time.

Pin Cushion Crafts - Lawn Chair Pin Cushion Collage

The last small detail, and I do mean small, is the button tufting on the cushion. Using tiny white buttons from the craft department at Hobby Lobby, I used embroidery thread to attach them at intersecting lines on the argyle print. Pulling the buttons tightly and stitching them down at the back creates that cute tufted cushion detail. And you don’t have to worry about the stitching showing on the back because the metal covers it. Perfect!

Pin Cushion Crafts - Button Detail Close-Up

Okay, before I let you go I have to show you one more cute pin cushion idea I saw on Lori’s Instagram feed. She made a tiny travel-size pin cushion out of plastic Easter eggs. For real! They could not be cuter, so of course I had to try it. Tis the season, after all. Here’s how mine turned out.

Pin Cushion Crafts - Easter Egg Pin Cushion Collage

Those glittery Easter eggs are from WalMart. I love the colors and texture. The fabrics are remnants from my fabric basket. This one it just too easy. To make, cut a 4″ circle of a color-coordinated fabric for each egg. Stuff it with quilt batting and pin or tie it into a ball. Use a glue gun or quick-drying craft glue to glue it into the bottom of the egg and allow it to dry completely. Once dry, add pins and presto! A tiny portable pin cushion you can pop in your pocket.

Pin Cushion Crafts - Easter Egg Travel Sewing Kit

I went a step further and added a few safety pins and two needles pre-threaded with tan and black thread to convert it to a portable sewing kit. I can toss this little gem into my cosmetic bag for travel and never have to worry about losing a button again. Even better, these would make perfect gifts for a Ladies Only weekend. Thanks for the inspiration and tutorials, Lori!

Pin Cushion Crafts - Easter Egg Pin Cushions - Dozen

If you love to get crafty or just appreciate true creative genius, visit Lori Holt’s Bee In My Bonnet blog. The links to these tutorials are imbedded above, or can be found by clicking here:

Lawn Chair Pin Cushion Tutorial at Bee In My Bonnet Co.
Apron Water Bottle Cover – Bee In My Bonnet Blog
Easter Egg Pin Cushion – photo on Lori Holt’s Instagram feed

4 Comments

Filed under Craft Projects, Things I Love

OKMHHOU: The Great Reunion

OKMHHOU - Group Snap

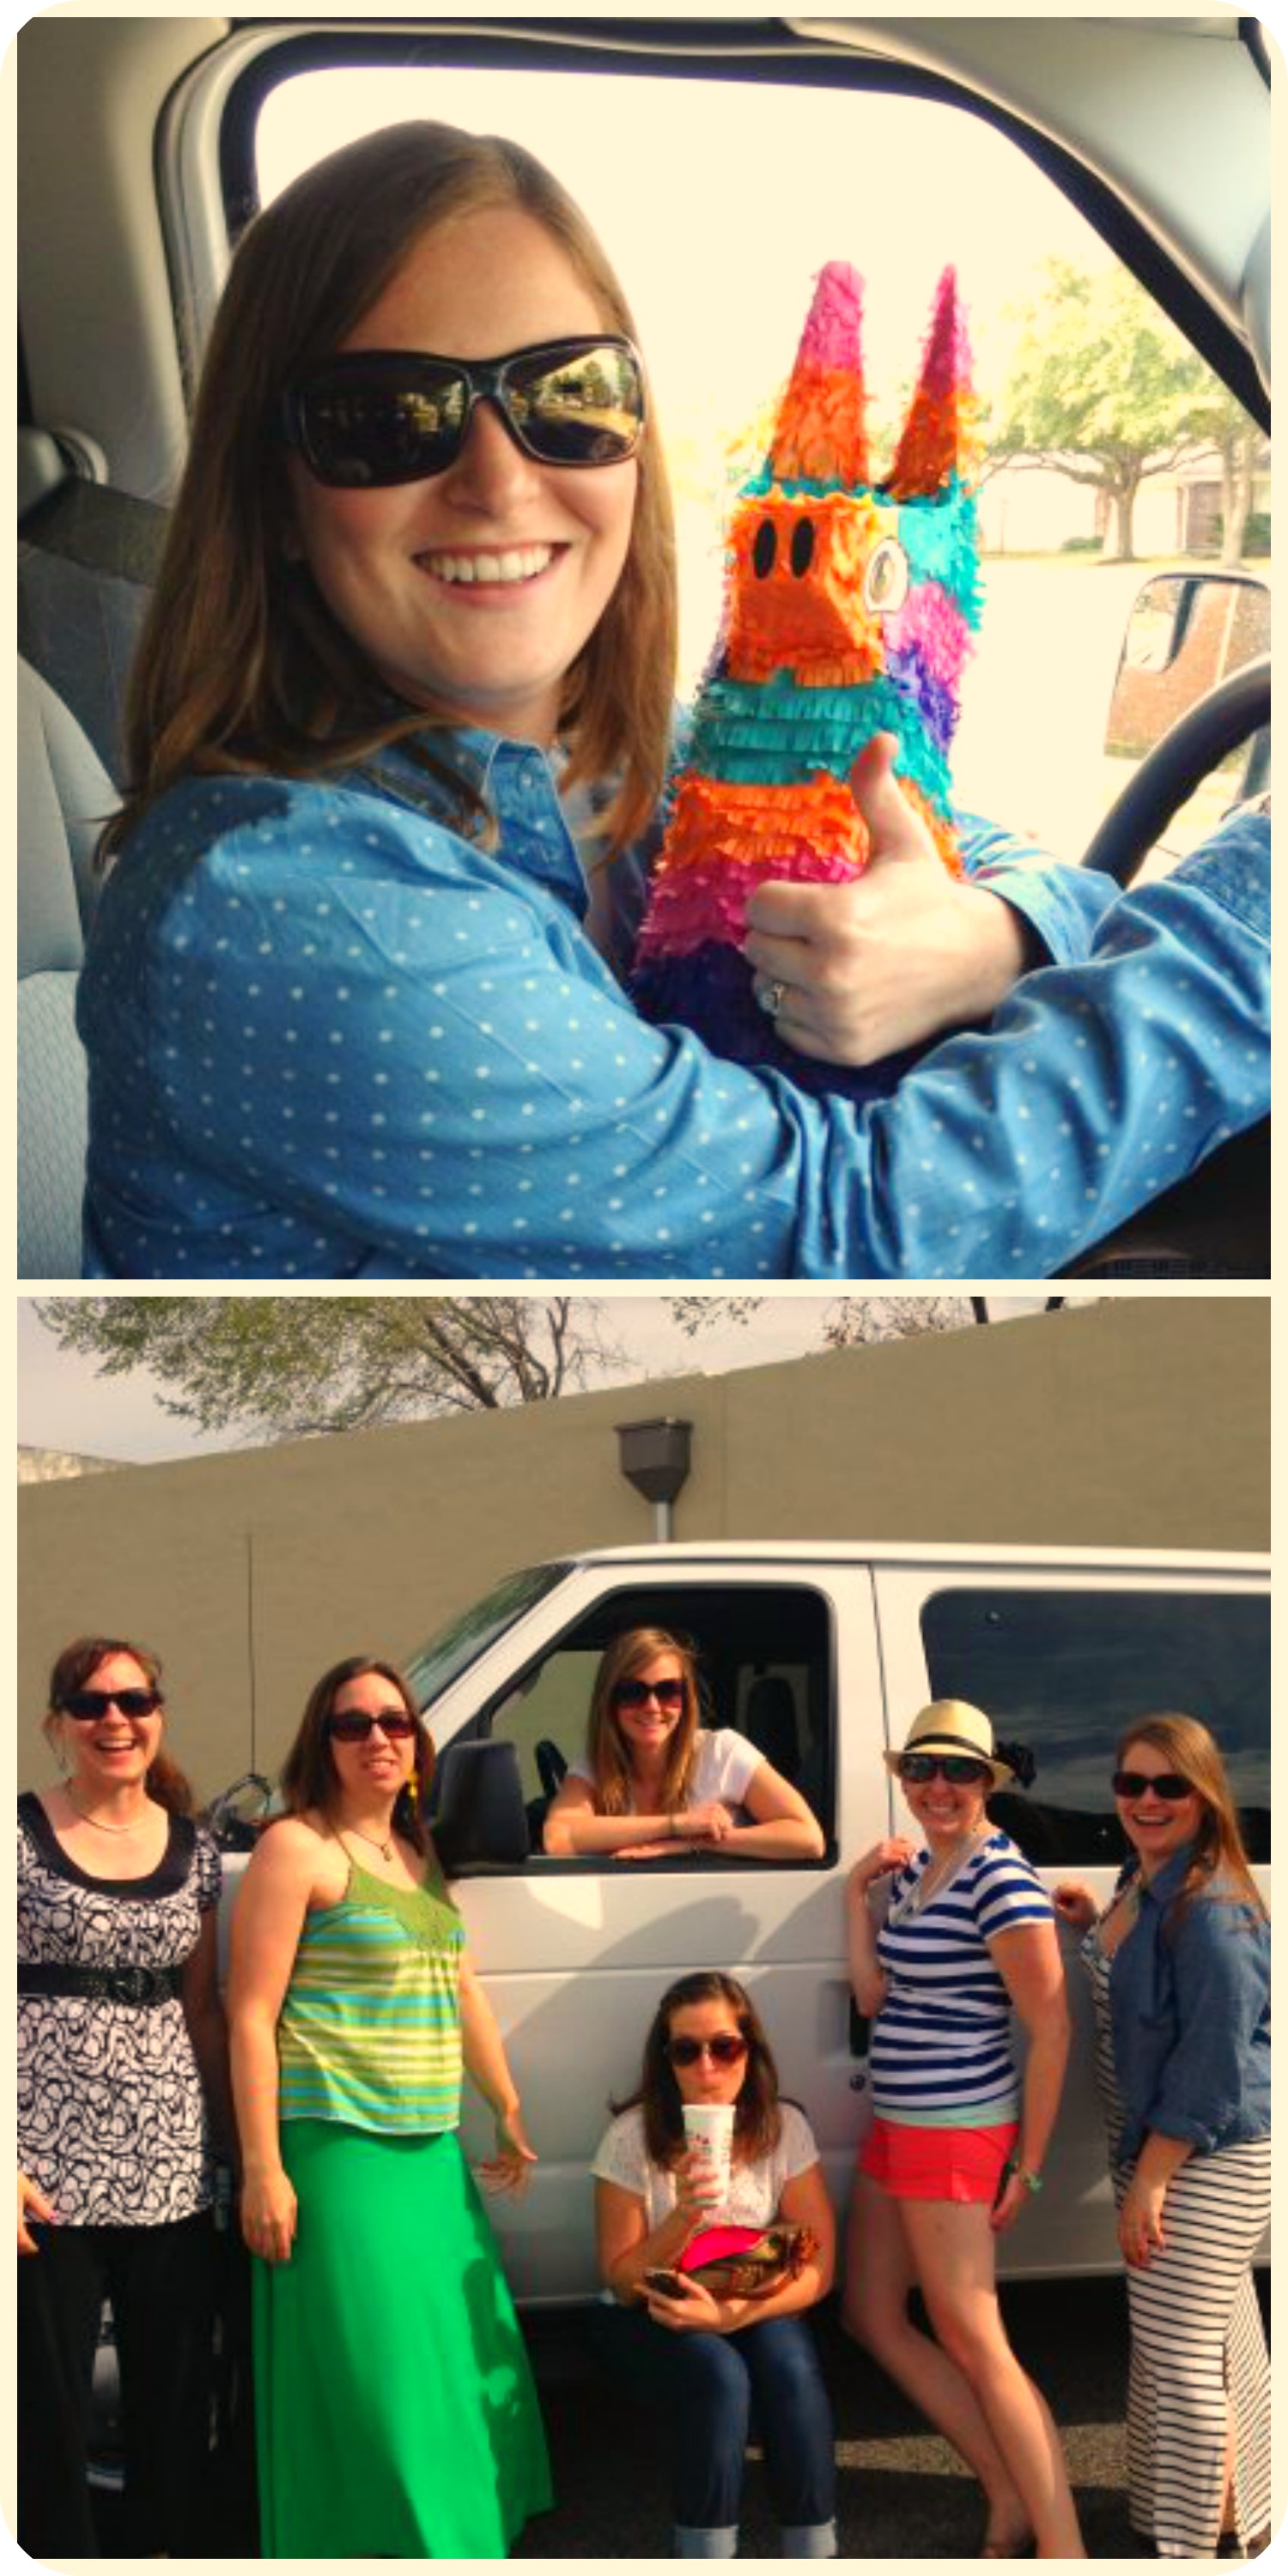
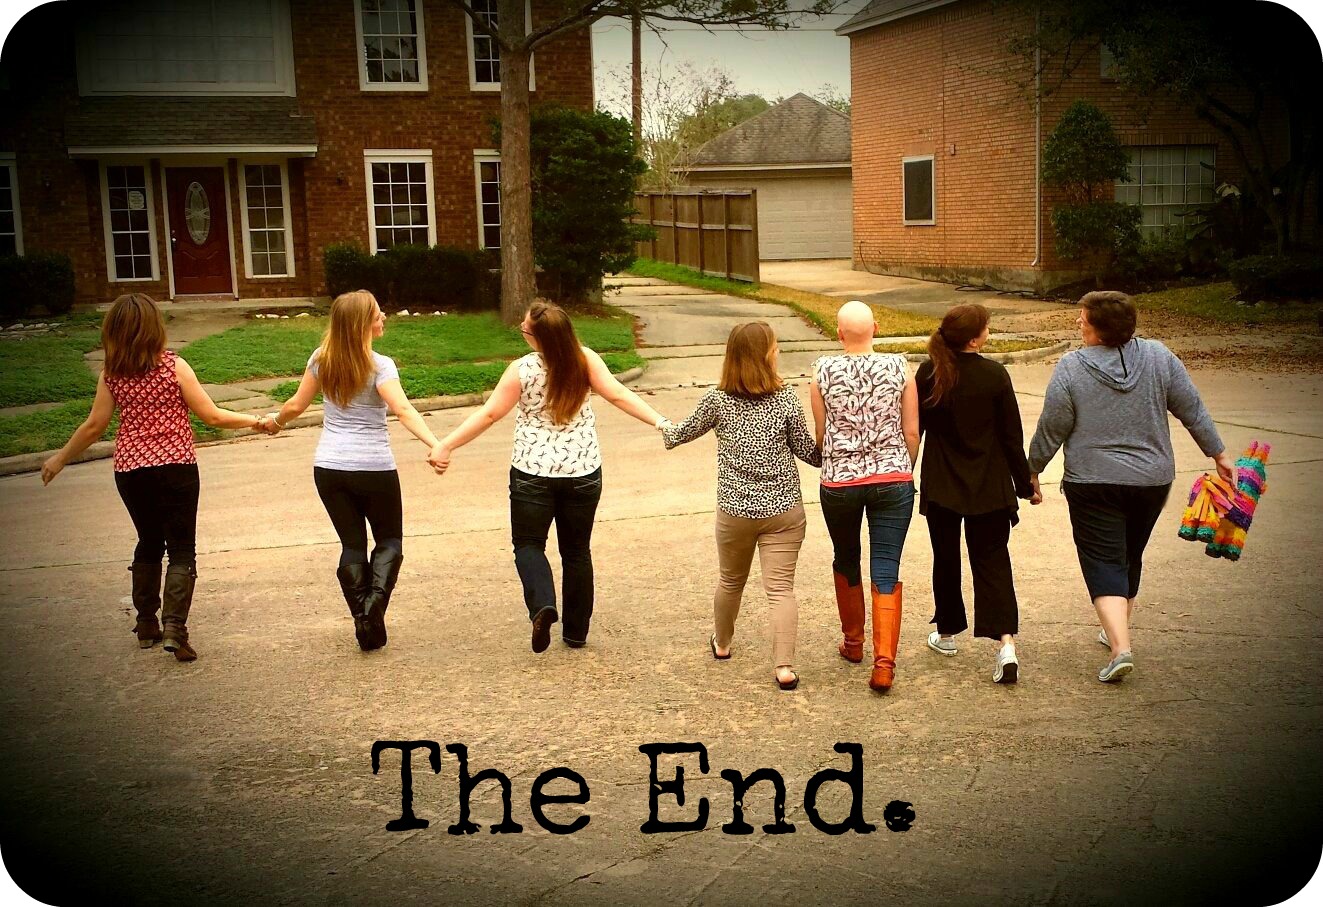
I love this photo! What’s most notable is not the colorful donkey piñata (whom we named Kevin), but that all seven of our OKMH (One Kitchen Many Hearts) crew are in the same place at the same time for the first time ever. That’s right. We all gathered here in Houston so that we could gaze upon each other’s faces live & in person for the first time ever. Granted, some of us have met over the past 3 1/2 years since we met via The Pioneer Woman‘s website, but never have we all been in the same place at once. Until now. But let’s start at the very beginning. In a galaxy far, far away…. no, wait. That’s another saga.

Once upon a time, about 3 1/2 years ago, several of us started reading The Pioneer Woman‘s website. And during that time, we began to reply to one another’s comments, or comment on the recipes each of us would upload to the Tasty Kitchen page. Over time, we began to write our own blogs and continued to comment and subscribe to each other’s blogs. That gradually morphed into closer friendships via Twitter, Facebook and Instagram. Eventually, we all joined Group Me (an instant messaging app) where we began to share even more personal aspects of our lives. Things we wouldn’t share on the Internet for everyone to see. Personal things. Things you share with your closest girlfriends. And eventually, we became more like sisters.

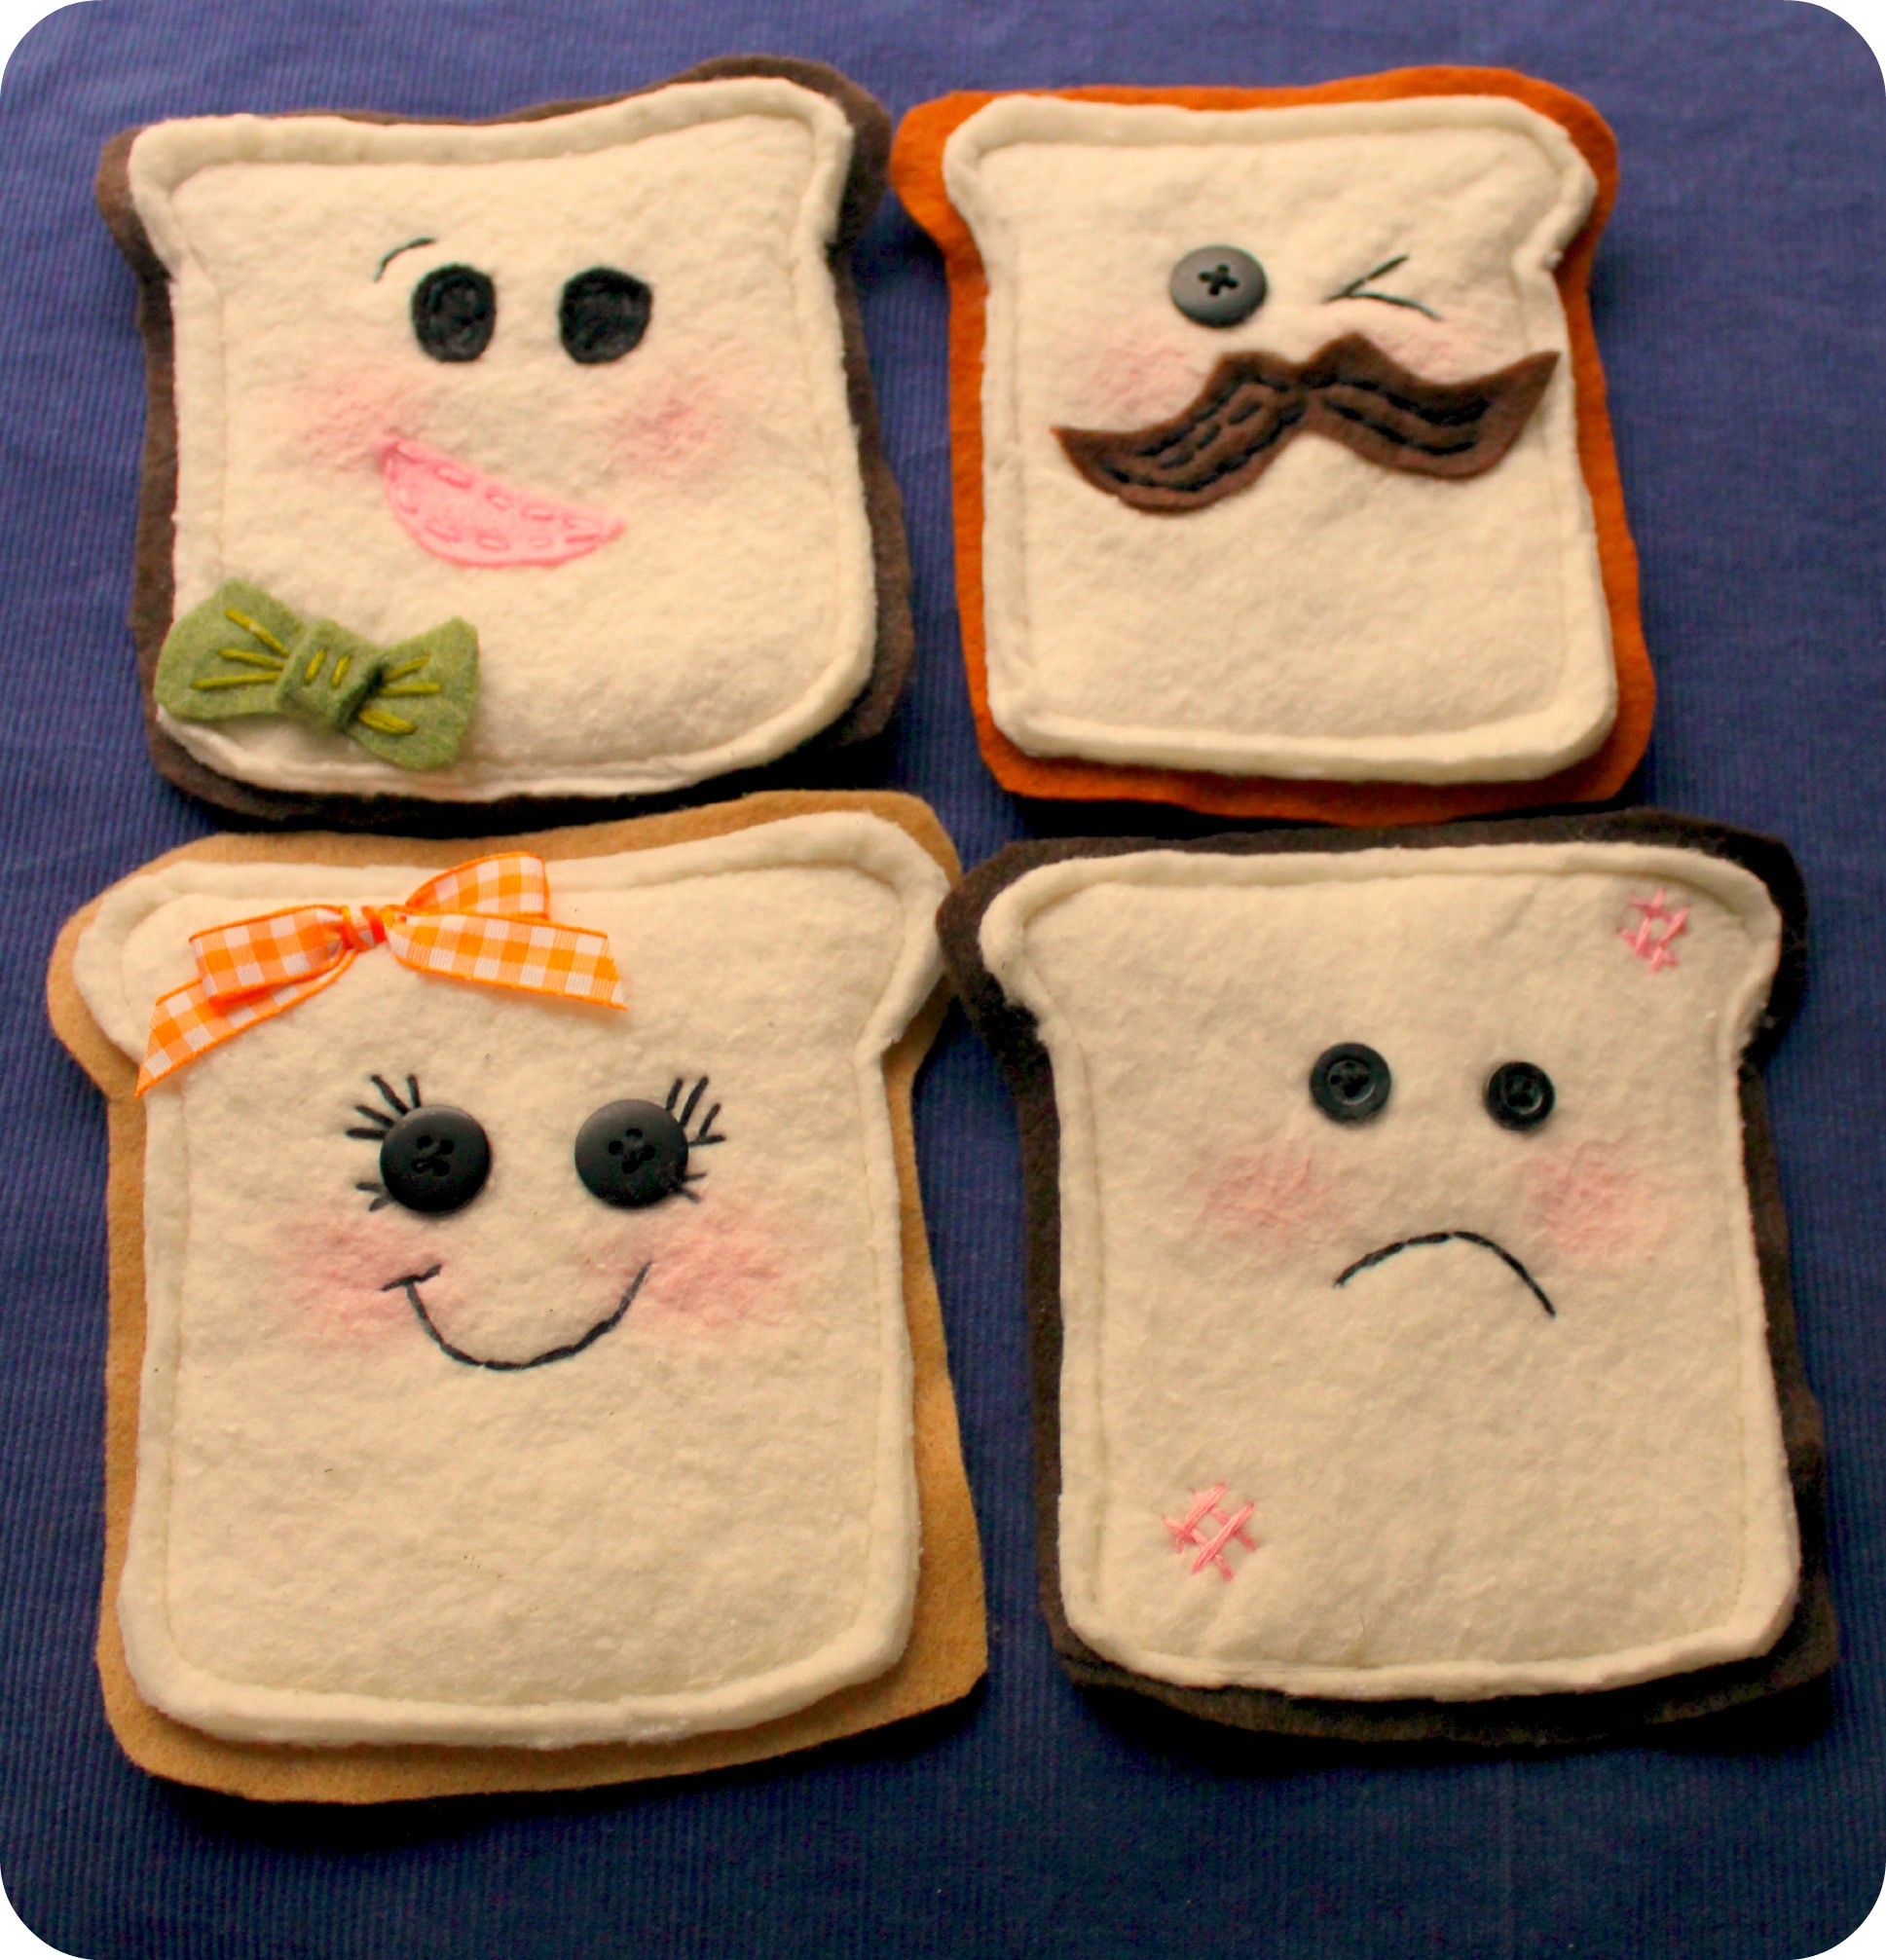
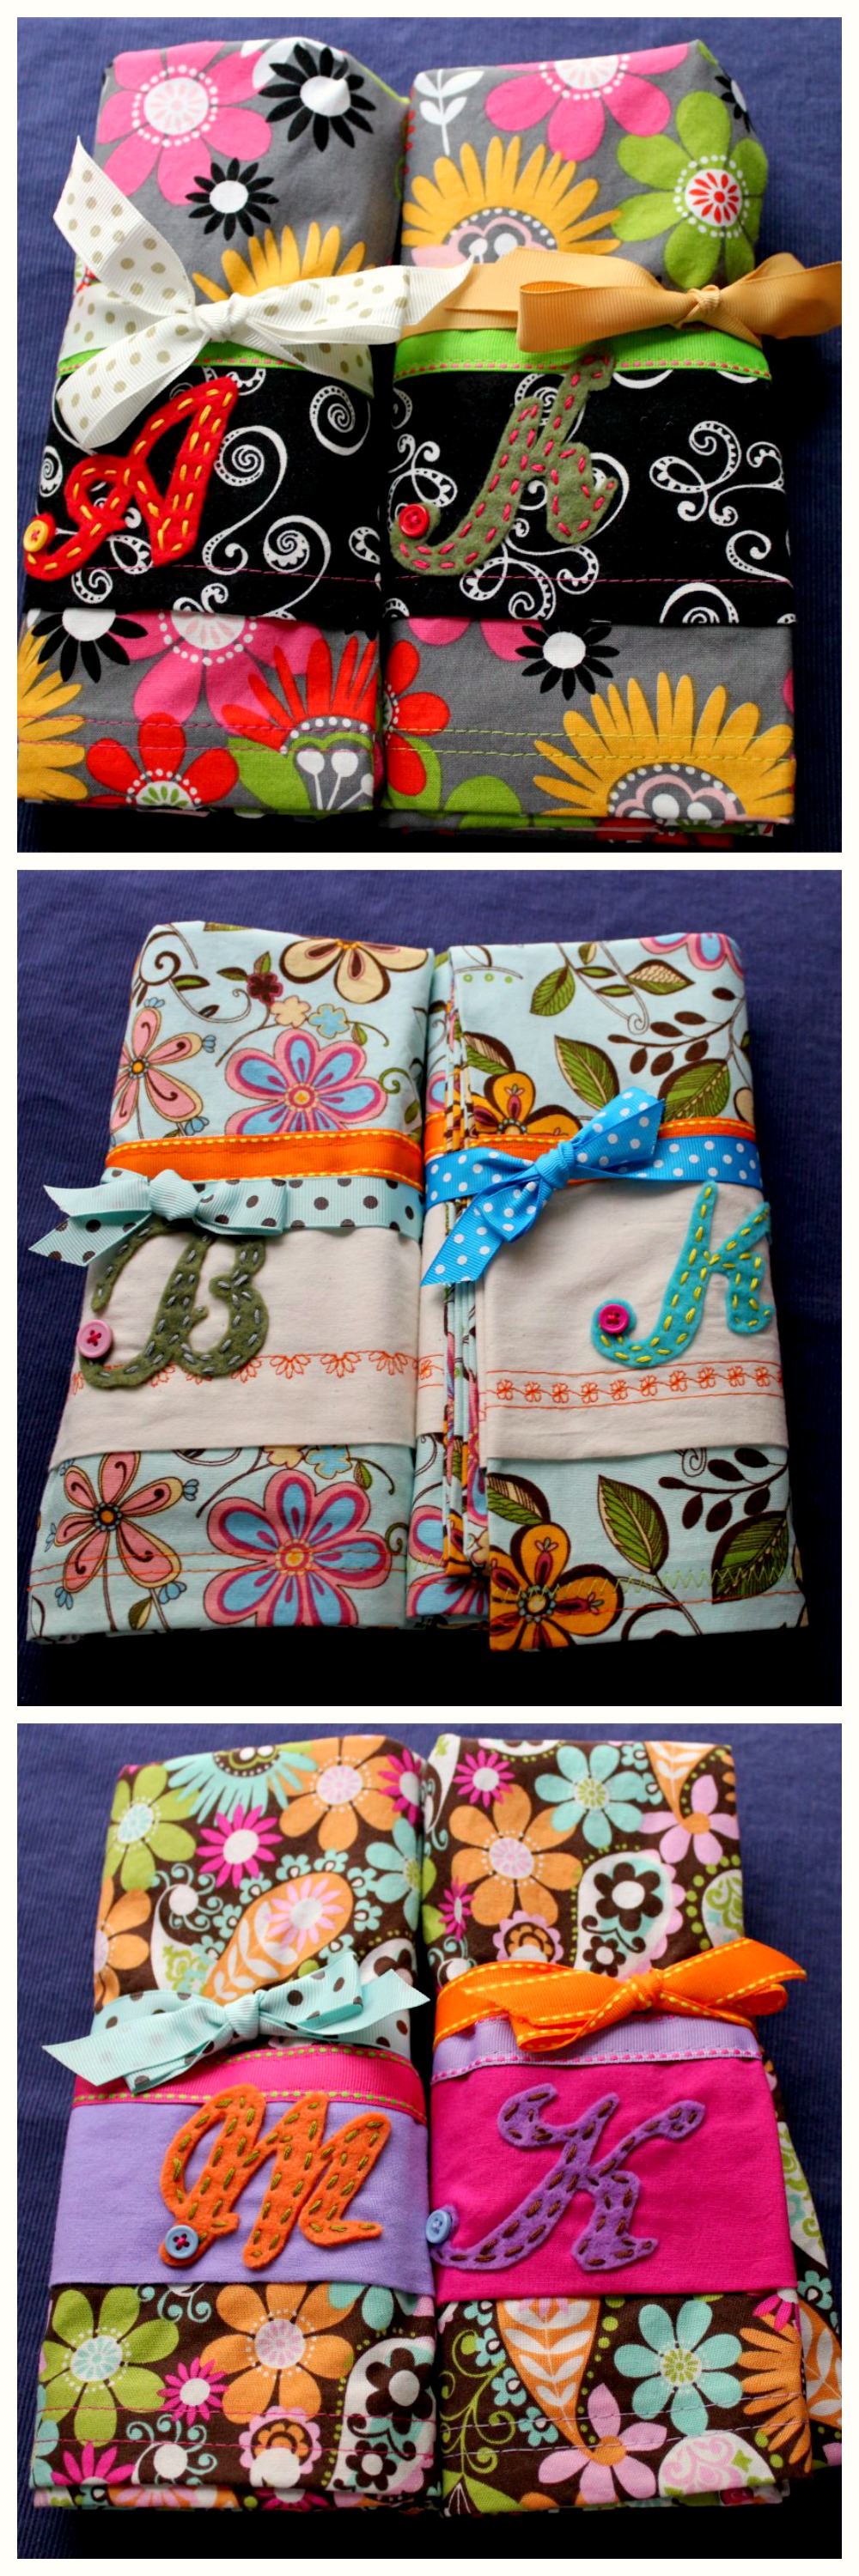
Before the girls arrived, I made two keepsake crafts for them – handmade monogrammed pillowcases and toast-themed coasters (aka Toasters). Pinterest – it’s where the magic begins.

OKMHHOU - Pillowcases

OKMHHOU - Toast Coasters

Kirsten of Comfortably Domestic was the first to arrive. This was actually her second visit; she came last May for a long weekend. We joke that we are Sisters From Other Misters. She came in from Michigan around noon. When she left that morning, her journey involved black ice on the highway and a night spent with family in another city to ensure she could get a plane out. Once here, it was sunny and 70F and we were dining on burgers on the patio at Good Company Taqueria. The Polar Vortex can bite it.

OKMHHOU - Kirsten @ Lunch

After lunch, we drove home to prep a Mexican fiesta banquet for the others because nothing says “Thanks for flying all day” like a fiesta and a pitcher of Mexican Martinis. This is where things got dicey. The remaining five of our group (Madelyn from La Petite Pancake, Megan from Country Cleaver, Beka from Kvetchin’ Kitchen, Allison from Decadent Philistines and Kat from Tenaciously Yours) were subjected to all kinds of drama. First, three of them were delayed in Denver due to high winds. It all worked out, though barely in Allison’s case, and they all 3 boarded the same plane from Denver to Houston. Kat came from the tundra of Minnesota where the roads were treacherous, but the airport was up and running. Let it be noted that Minnesota knows how to winter. Ice and 8′ of snow? They barely flinch. Madelyn, from the LA area, flew straight in. No sweat. Californians make everything look easy.

But wait – there’s more! After being blown away that they had scheduled all their flights to arrive within 30 minutes of each other, they gathered at baggage claim and made their way to the car rental shuttle. Our group had made a reservation for a 7-passenger Dodge Caravan minivan for the weekend. As soon as Madelyn stepped up to the counter to get the car, the entire building lost power. I’ll let the others explain what occurred since they were there in person, but let’s just say the rental company failed us. There was no car rented and the cab called by the rental company charged them $115 to drive them one-way to my house that night (which they were told would be reimbursed but still haven’t been). If ever a group of ladies deserved a pitcher of margaritas, this was it.

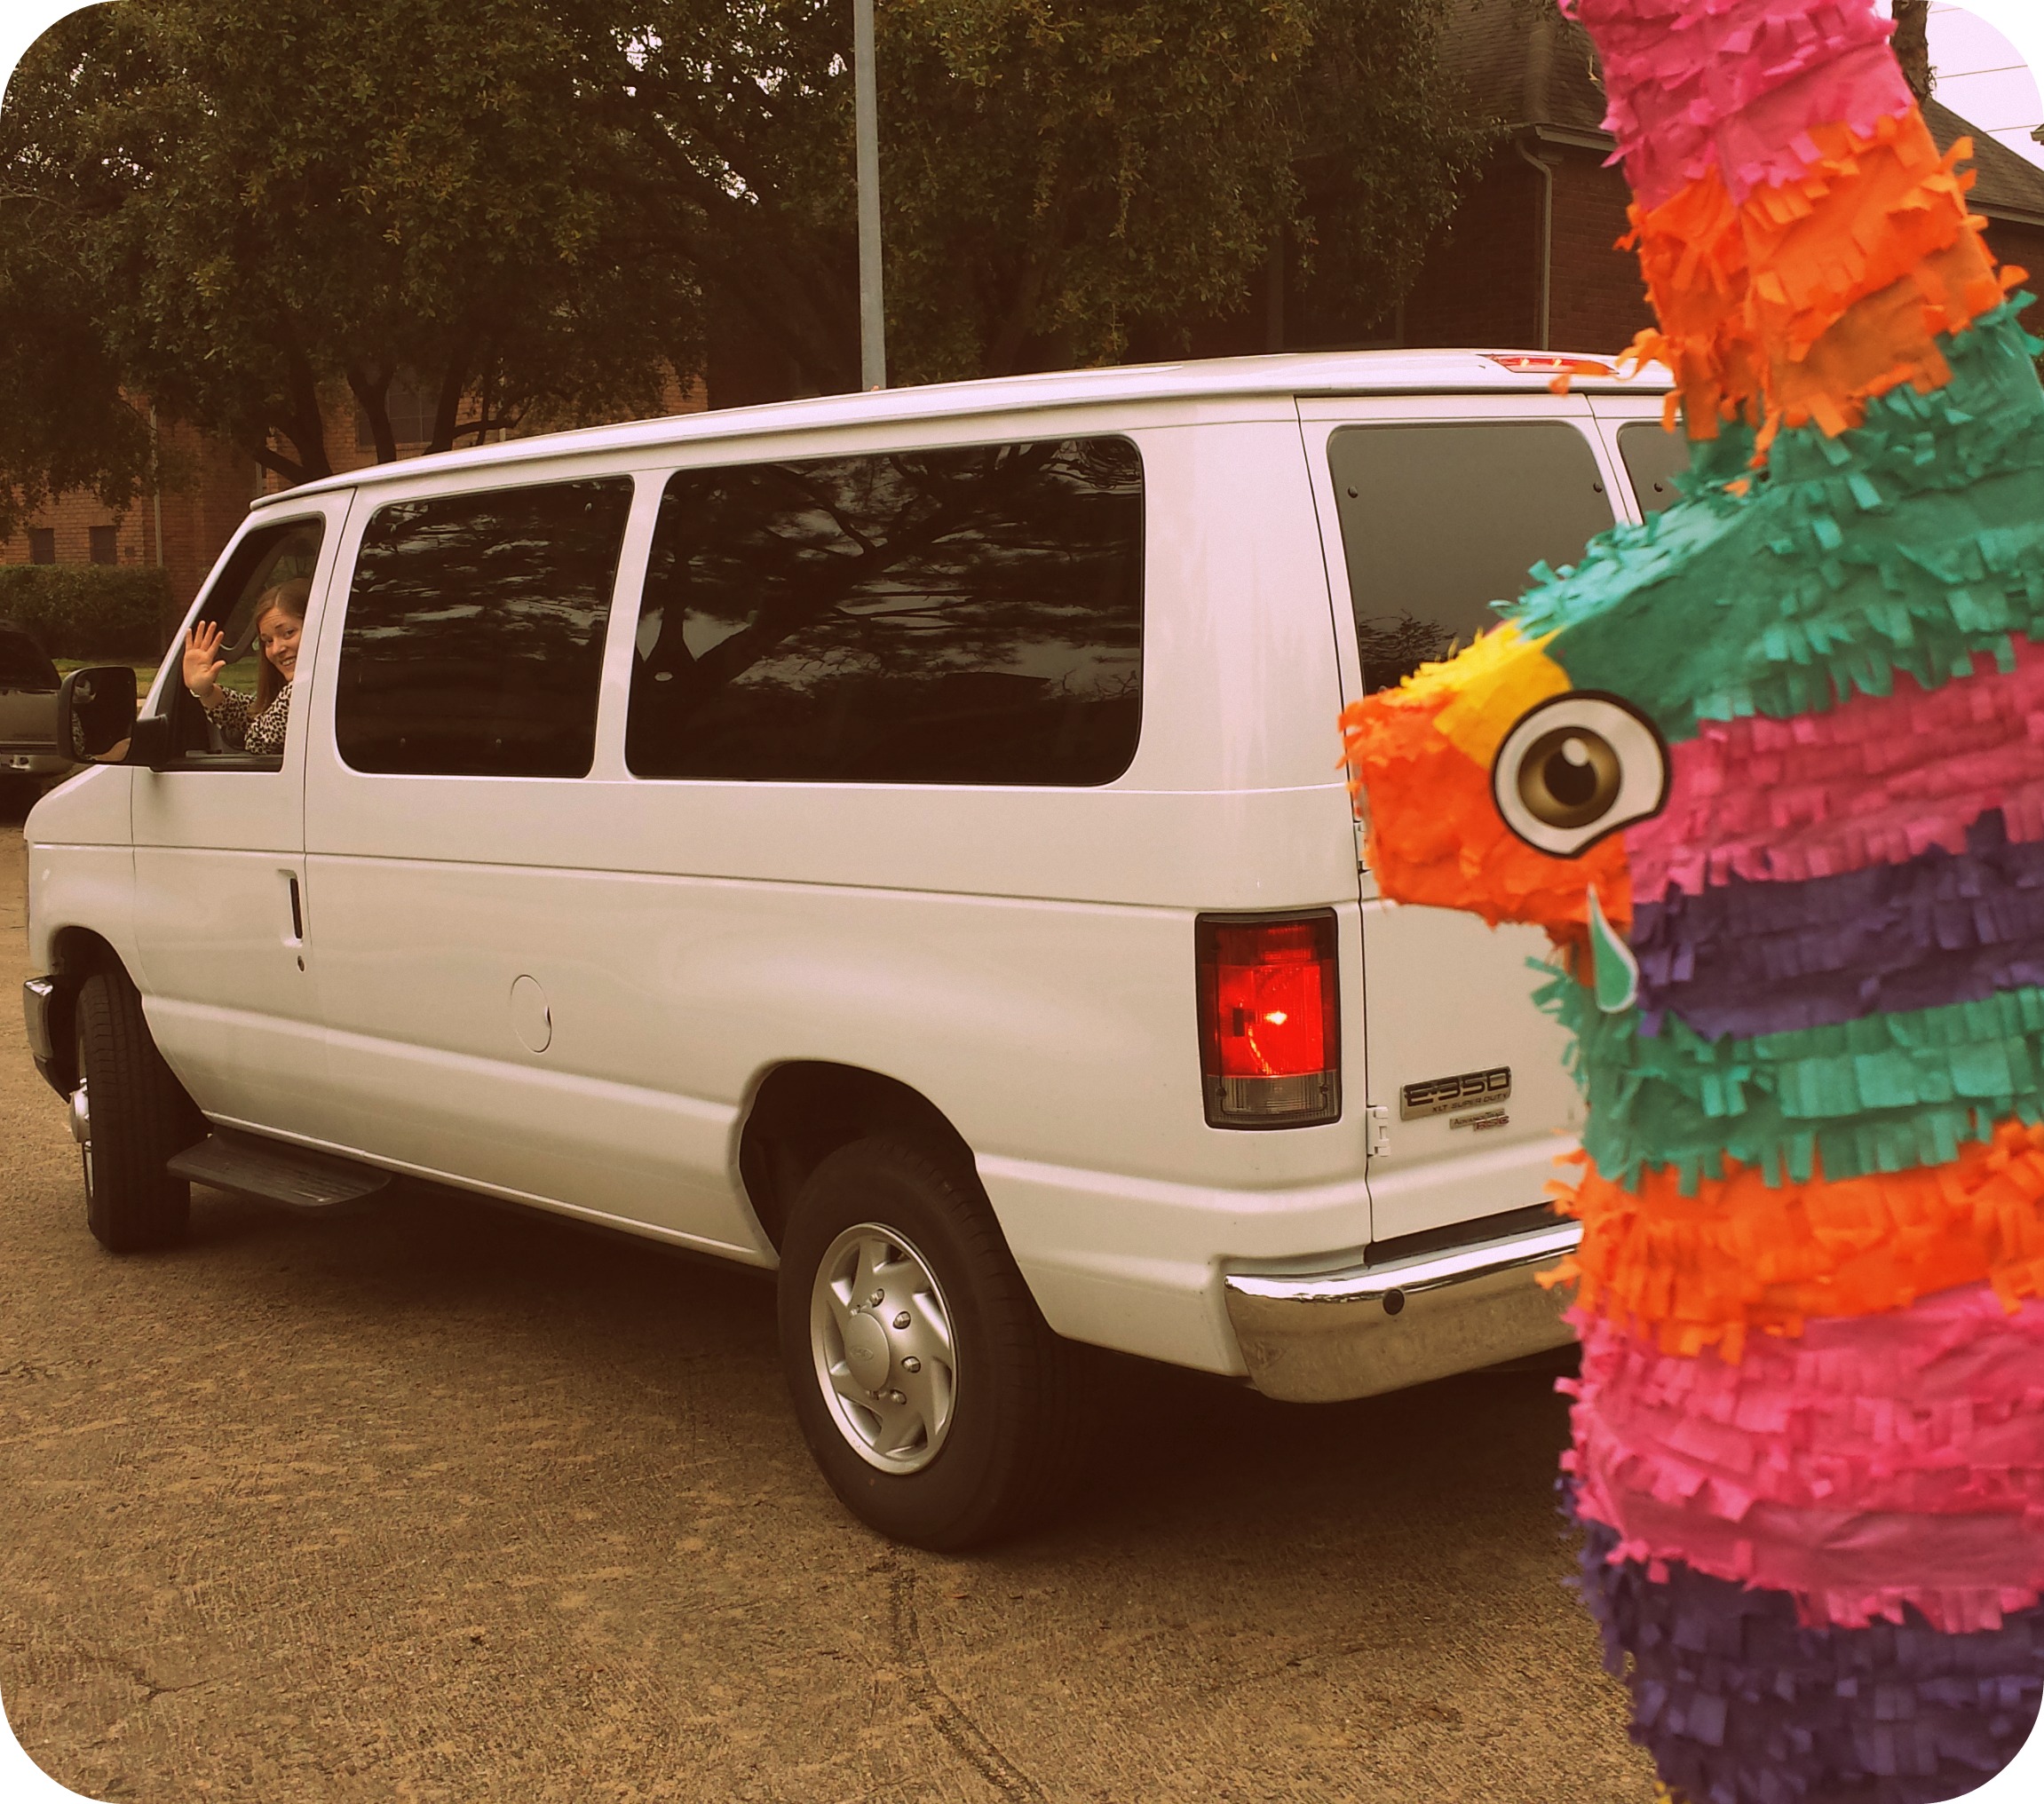
The next morning, Madelyn & Kat spent at least 2 hours on the phone with Customer Care only to be shifted from number to number, each time getting yet another disinterested service rep. After two hours, the bottom line was no rental van, a strong probability they would be forced to eat the cab fare, and no car to use for our planned day trip to Brenham. Finally, we resolved it by canceling the reservation from hell and calling another rental company near my home. It cost twice as much and ended up being a 10 passenger panel van, but hey… it was wheels and they were great to deal with. Thank you Walter at Avis! Of course, we took Kevin the Piñata Donkey with us everywhere.

OKMHHOU - Party Van Collage

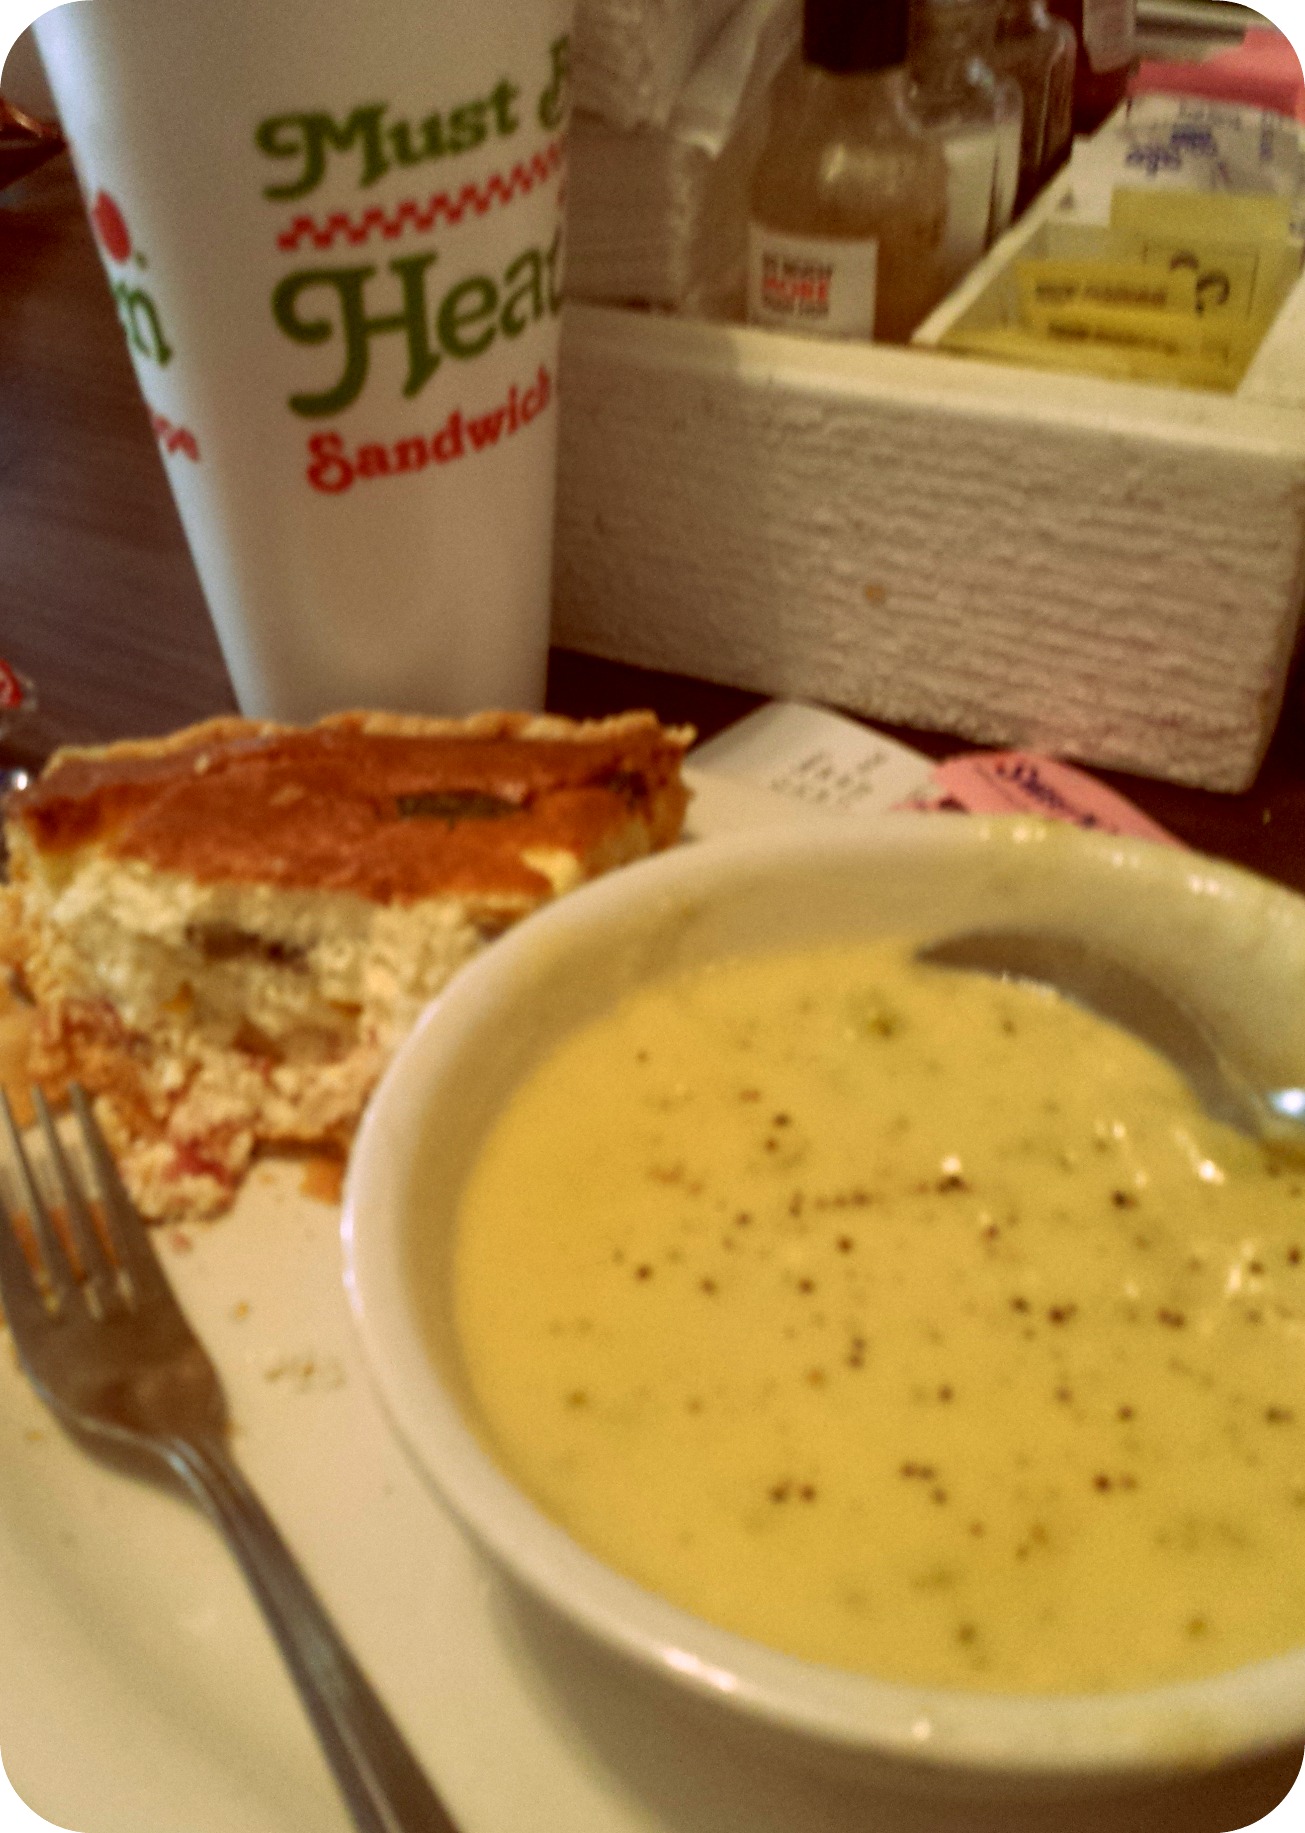
For our first full day together, we were off to the Hill Country and Brenham, Texas where we met up with Katie from The Hill Country Cook. We had so much fun! We hit a few antique shops and bought a few blog props, then hit Must Be Heaven for lunch. It’s a family owned sandwich shop that also has an old-fashioned ice cream counter and a case full of pies. What is not to love about that? I chose the daily special consisting of a slice of quiche (I chose the bacon, cheese & mushroom) and a bowl of soup (broccoli cheese).

OKMHHOU - Lunch at Must Be Heaven

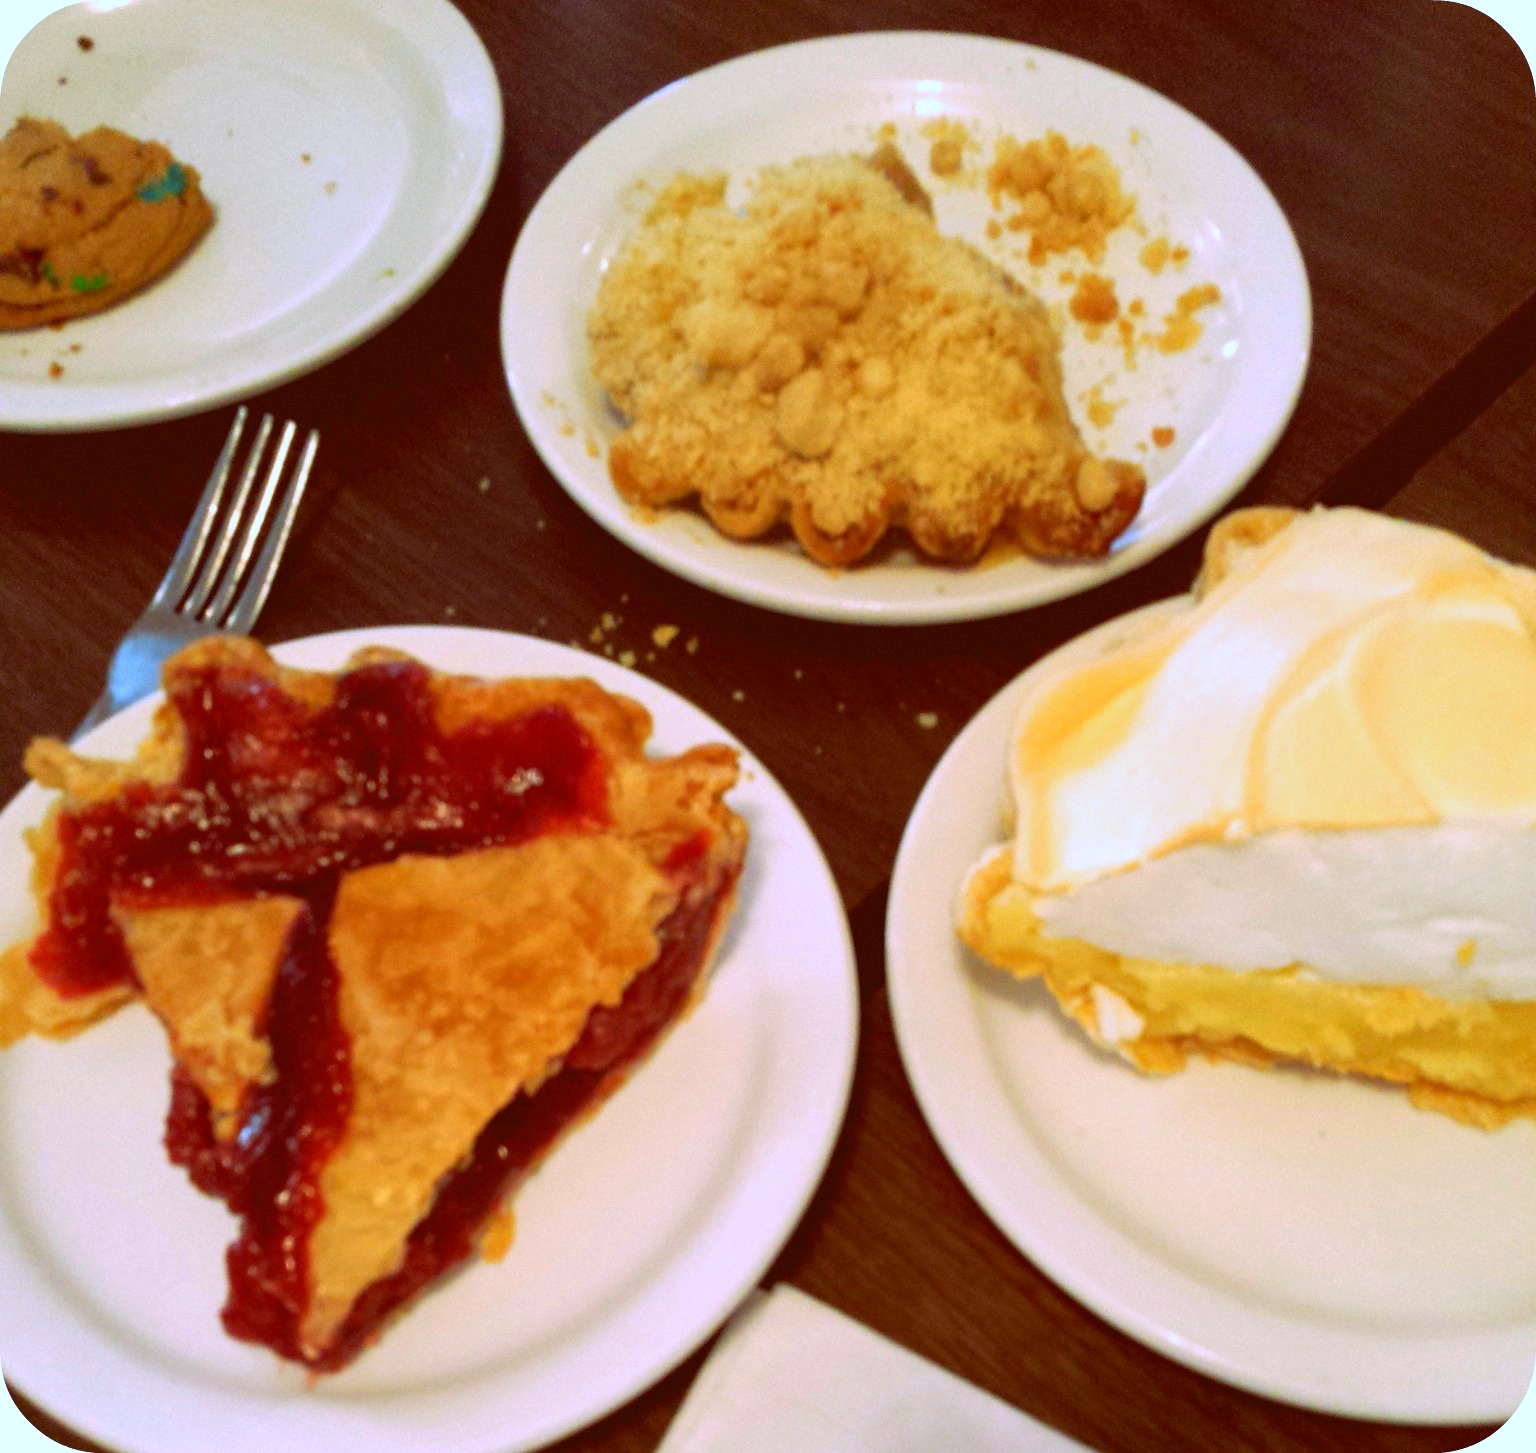
Then we dove into the pie case. Together, we tried the Dutch apple pie, the cherry, a lemon meringue and a slice of chess pie. Madelyn opted for an ice cream cone and although I don’t remember what it was called (something something Mexican cheesecake maybe?) I’ll never forget her face while she was eating it. When asked if it was vanilla, Mads said something like “It looks like vanilla, but it tastes like heaven in my mouth.” Ringing endorsement indeed. A cookie made it in there, too, but my focus was on the pie. I love pie.

OKMHHOU - Desserts at Must Be Heaven

After lunch, we had no choice but to walk it off with more shopping. Here in Texas, we love our state. Not just “Oh, it’s great here” but in a more rabid “Our state is the best. Long live the Republic!” way. As such, we hang lone stars and things shaped like Texas in the same way others hang family photos. Case in point – this wall hanging made from vintage Texas license plates. Because the only thing better than Texas stuff is Texas stuff layered on more Texas stuff.

OKMHHOU - License Plate State

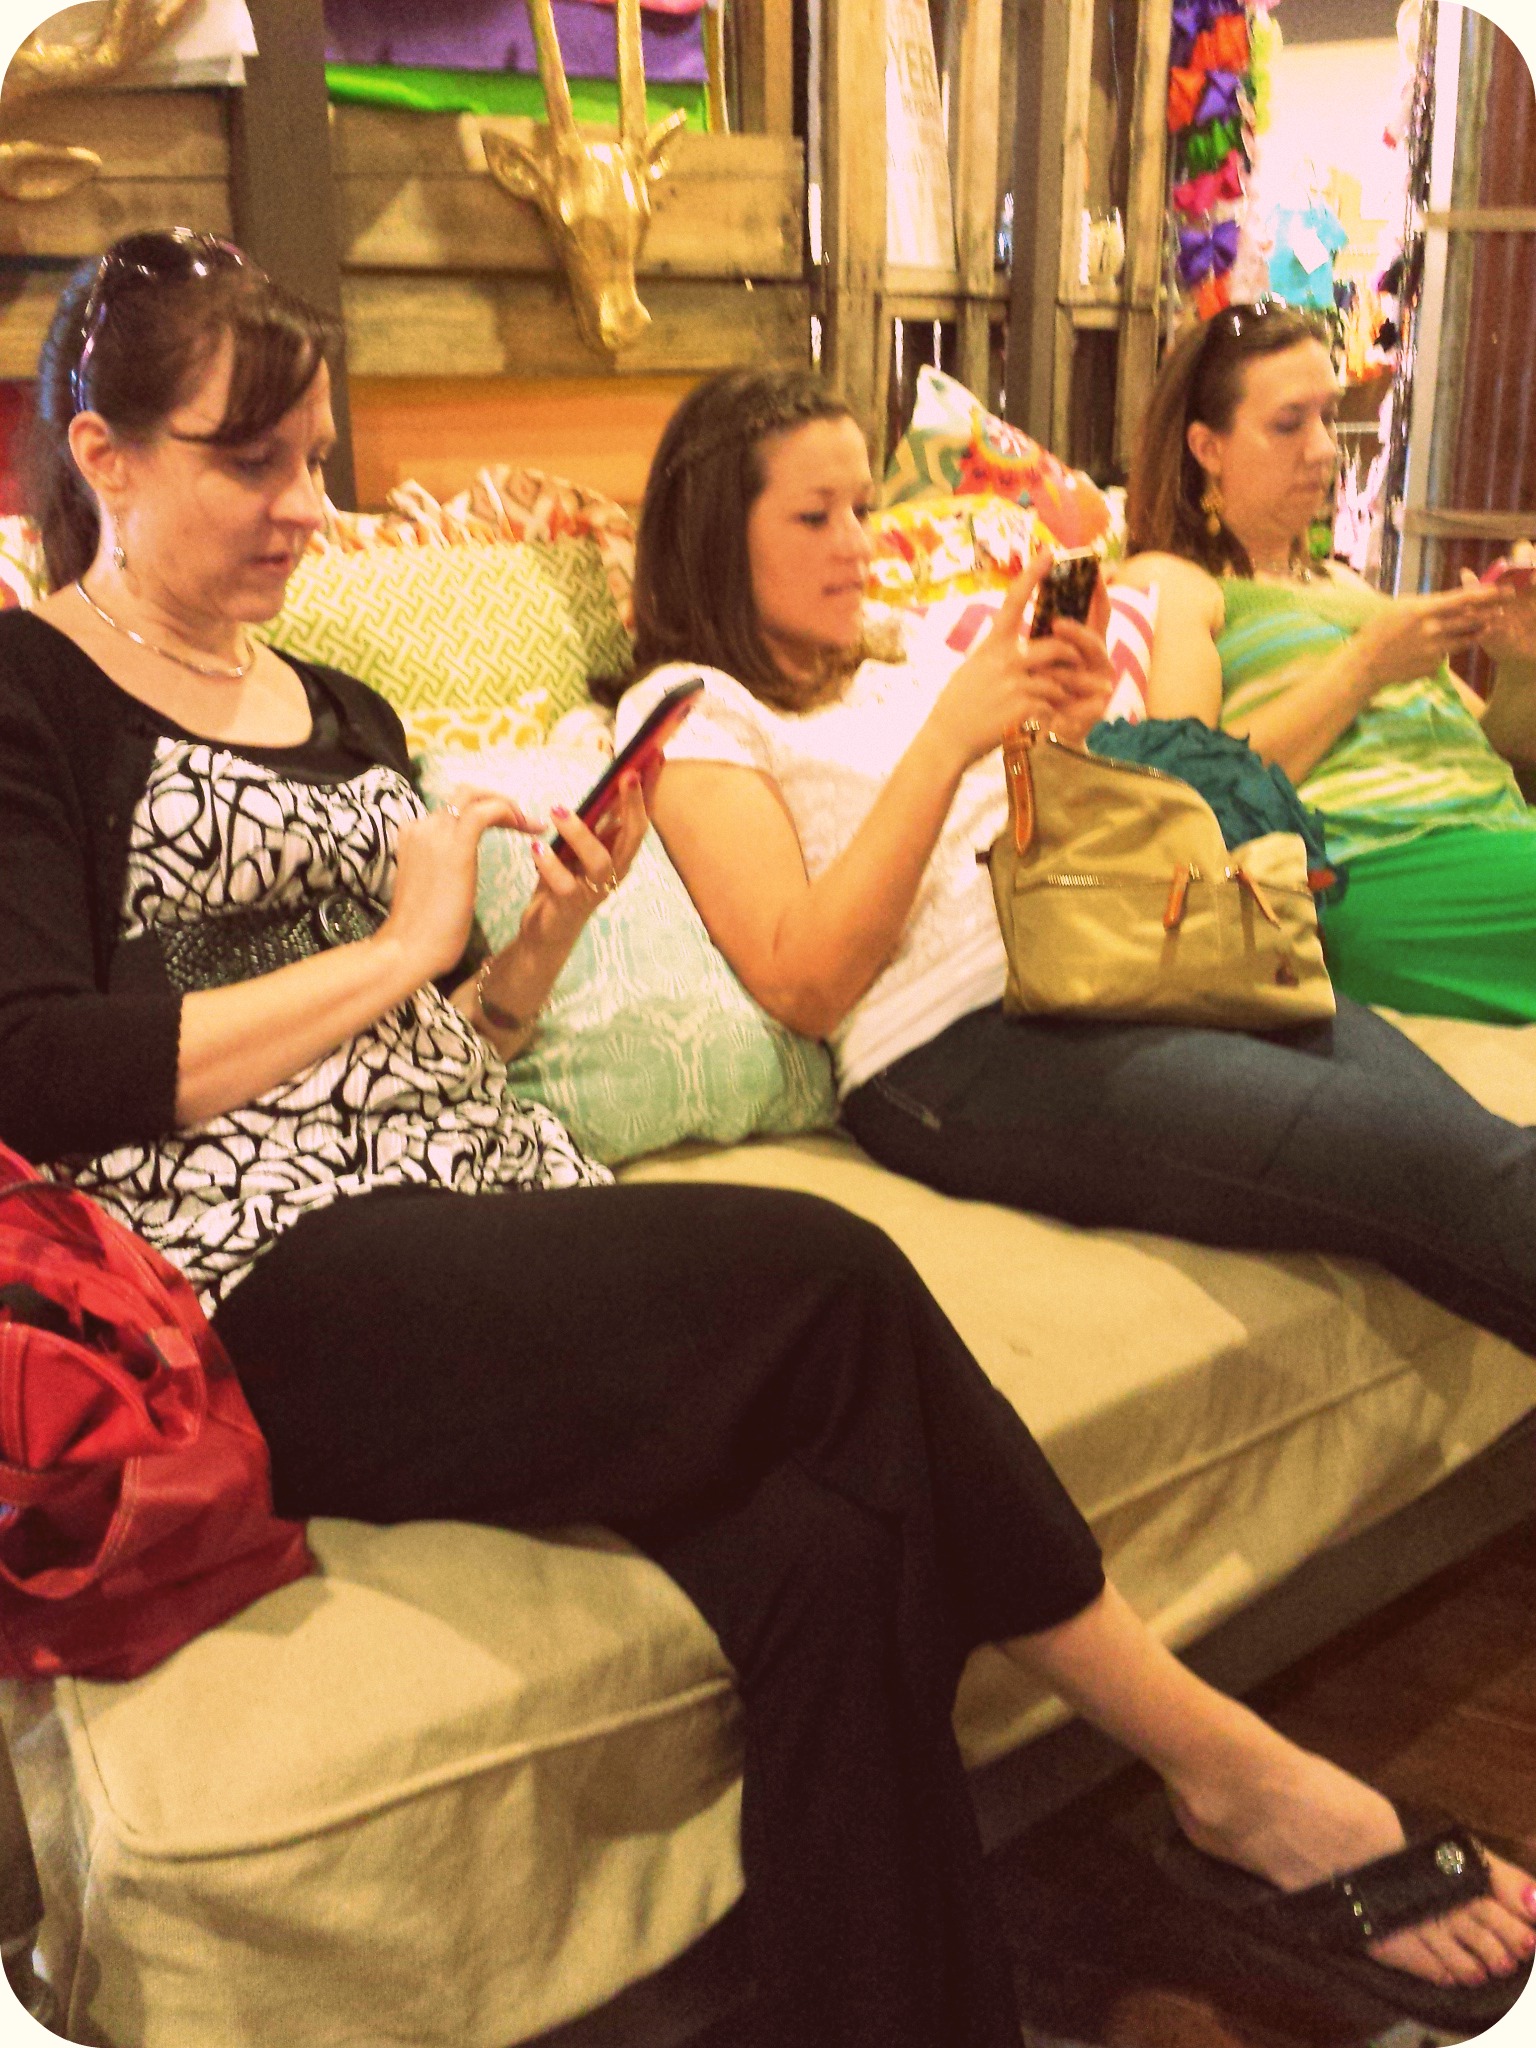
It wasn’t all antiques and rusty metal, though. There were hats, vintage clothing, baubles & beads, sandals & flip-flops and crocheted vests galore. Also food blog props, vintage literature and a handful of Christmas ornaments were involved. We stayed so busy shop-hopping that when we finally slowed down enough for a few of the ladies to try on clothes, the rest of us hit the sofas and took advantage of a Twitter & Instagram break. As we like to say, “Snaps or it didn’t happen!”

OKMHHOU - Twitter Break

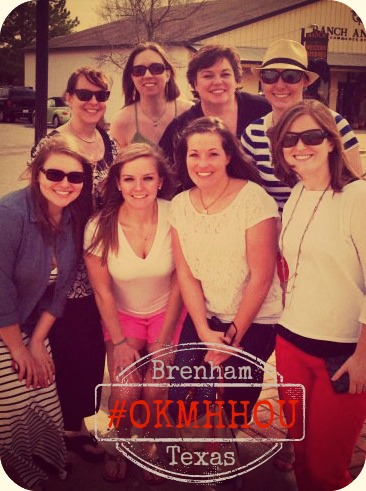
When we eventually noticed that the shops were closing and the streets were rolling up, we said a sad farewell to our buddy Katie. So happy she joined us! Top Row: Kirsten, Allison, Me & Beka. Bottom Row: Megan, Kat, Katie & Mads.

OKMHHOU - Group in Brenham

We waved goodbye and crawled back into the panel van to head home. On the way, we impulse stopped at Buc-ee’s – the greatest convenience store on earth. Why? 1) ladies’ restrooms with 30+ stalls featuring full wood doors, complete privacy, individual hand sanitizer dispensers and a full-time cleaning crew. 2) clothing department with beaver emblazoned t-shirts, cammo everything and beer koozies to match. 3) full-size BBQ grills, Lodge cast iron cookware and a cooking/cookbook area. 4) an entire aisle devoted to jerky. 5) Beaver Nuggets – both caramel corn & the nugget equivalent of Flaming Hot Cheetos. They’re seriously addictive. What’s truly hilarious is while we were in Buc-ee’s near Hempstead, Katie was simultaneously hitting Buc-ee’s on Highway 71.

One kitchen, many hearts. Many kitchens, one mind. It’s spooky, really.

OKMHHOU - Buc-ee's Stop

Back at the ranch, we feasted on TCP’s brisket, sausage, beans, slaw, and all the sauces & relish tray items you can imagine. If it could be pickled, it was probably there. We also cracked open the Shiner and assorted beers on ice. When we were filled to the brim and crying for mercy, The Complete Package broke out the homemade peach cobbler and Blue Bell vanilla ice cream. Lord, I love that man.

Sunday, we slept late and were treated to French toast waffles. The recipe isn’t on the blog yet, but it’s coming soon. After snarfing up waffles and enough bacon to make your eyes roll back in your head, we hit the road for Alvin, Texas. On the way, we stopped at Rustic Metal Works where we checked out the cute lawn art, wall hangings and assorted hardware. And since there was a taco truck right next door, we decided to stop for a snack that included one 5-piece taco plate with salsas, one lingua taco (tongue) and a chicharrón (pork rind) taco. Following the Blogger’s Rule, first we photographed and then we dug in.

OKMHHOU - Taco Truck Snacks

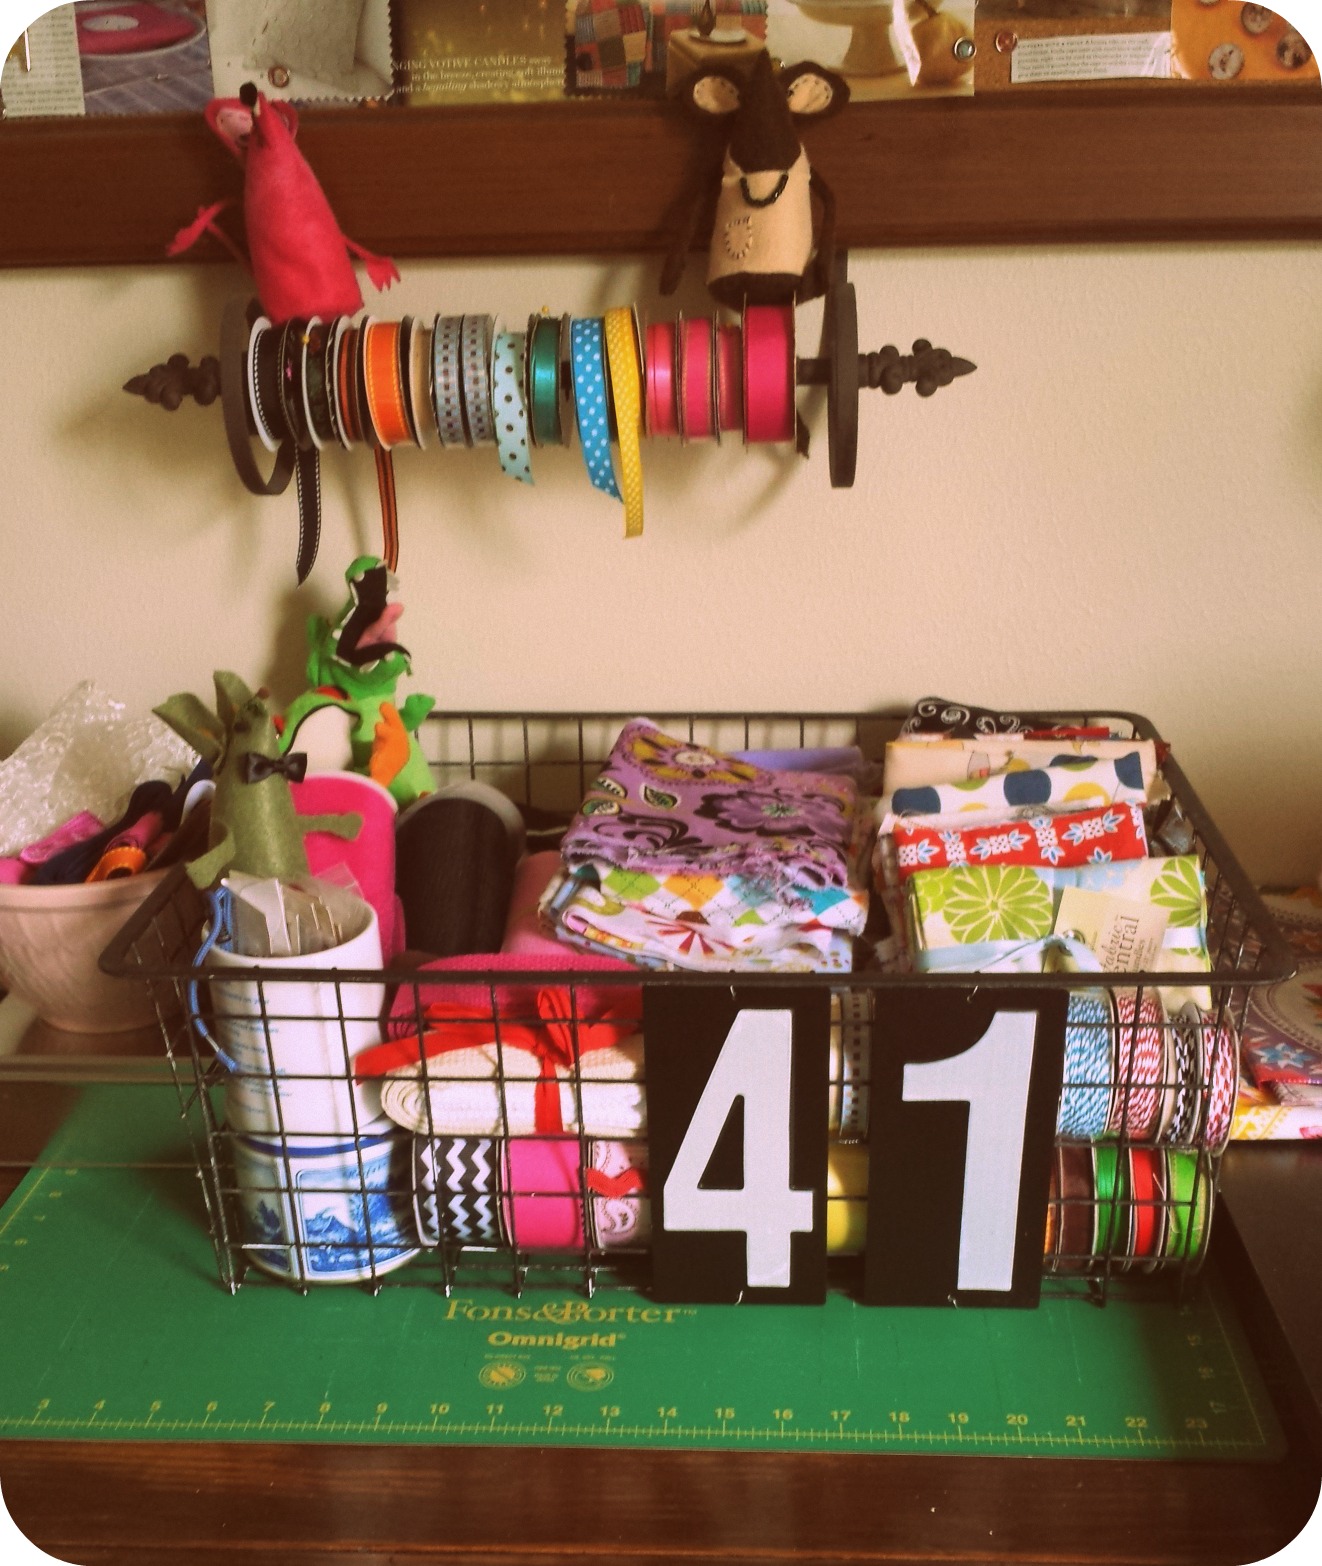
After passing the wet-wipes and blowing out a flip-flop, we made a quick pit stop at Walmart for replacement footwear and to take in the local color (read: topless woman in a pickup truck). From there, we hit the antique mall to shop for more blog props and household items we couldn’t live without. I found this vintage locker basket and fell in love. For $20, I couldn’t resist and now it’s on my sewing table holding fabric and ribbons. Love it!

OKMHHOU - Locker Basket for Fabric

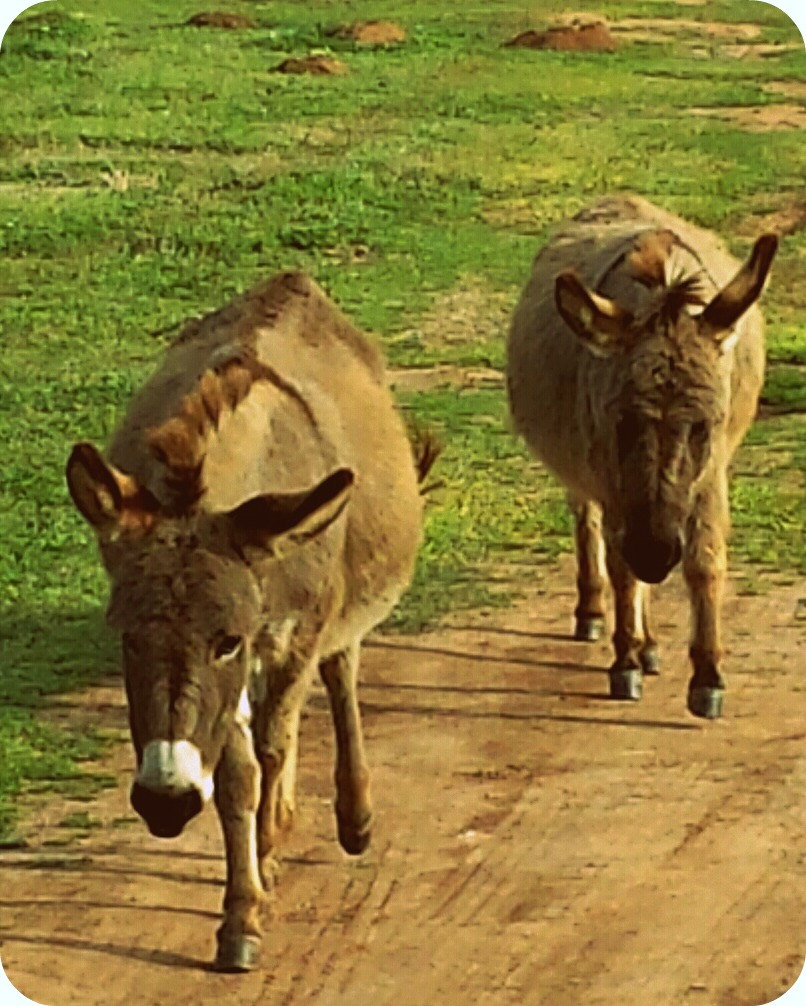
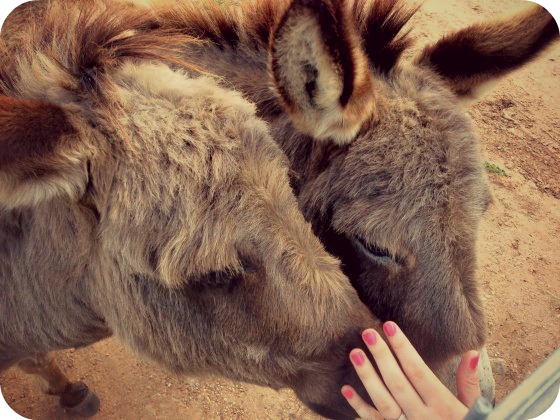
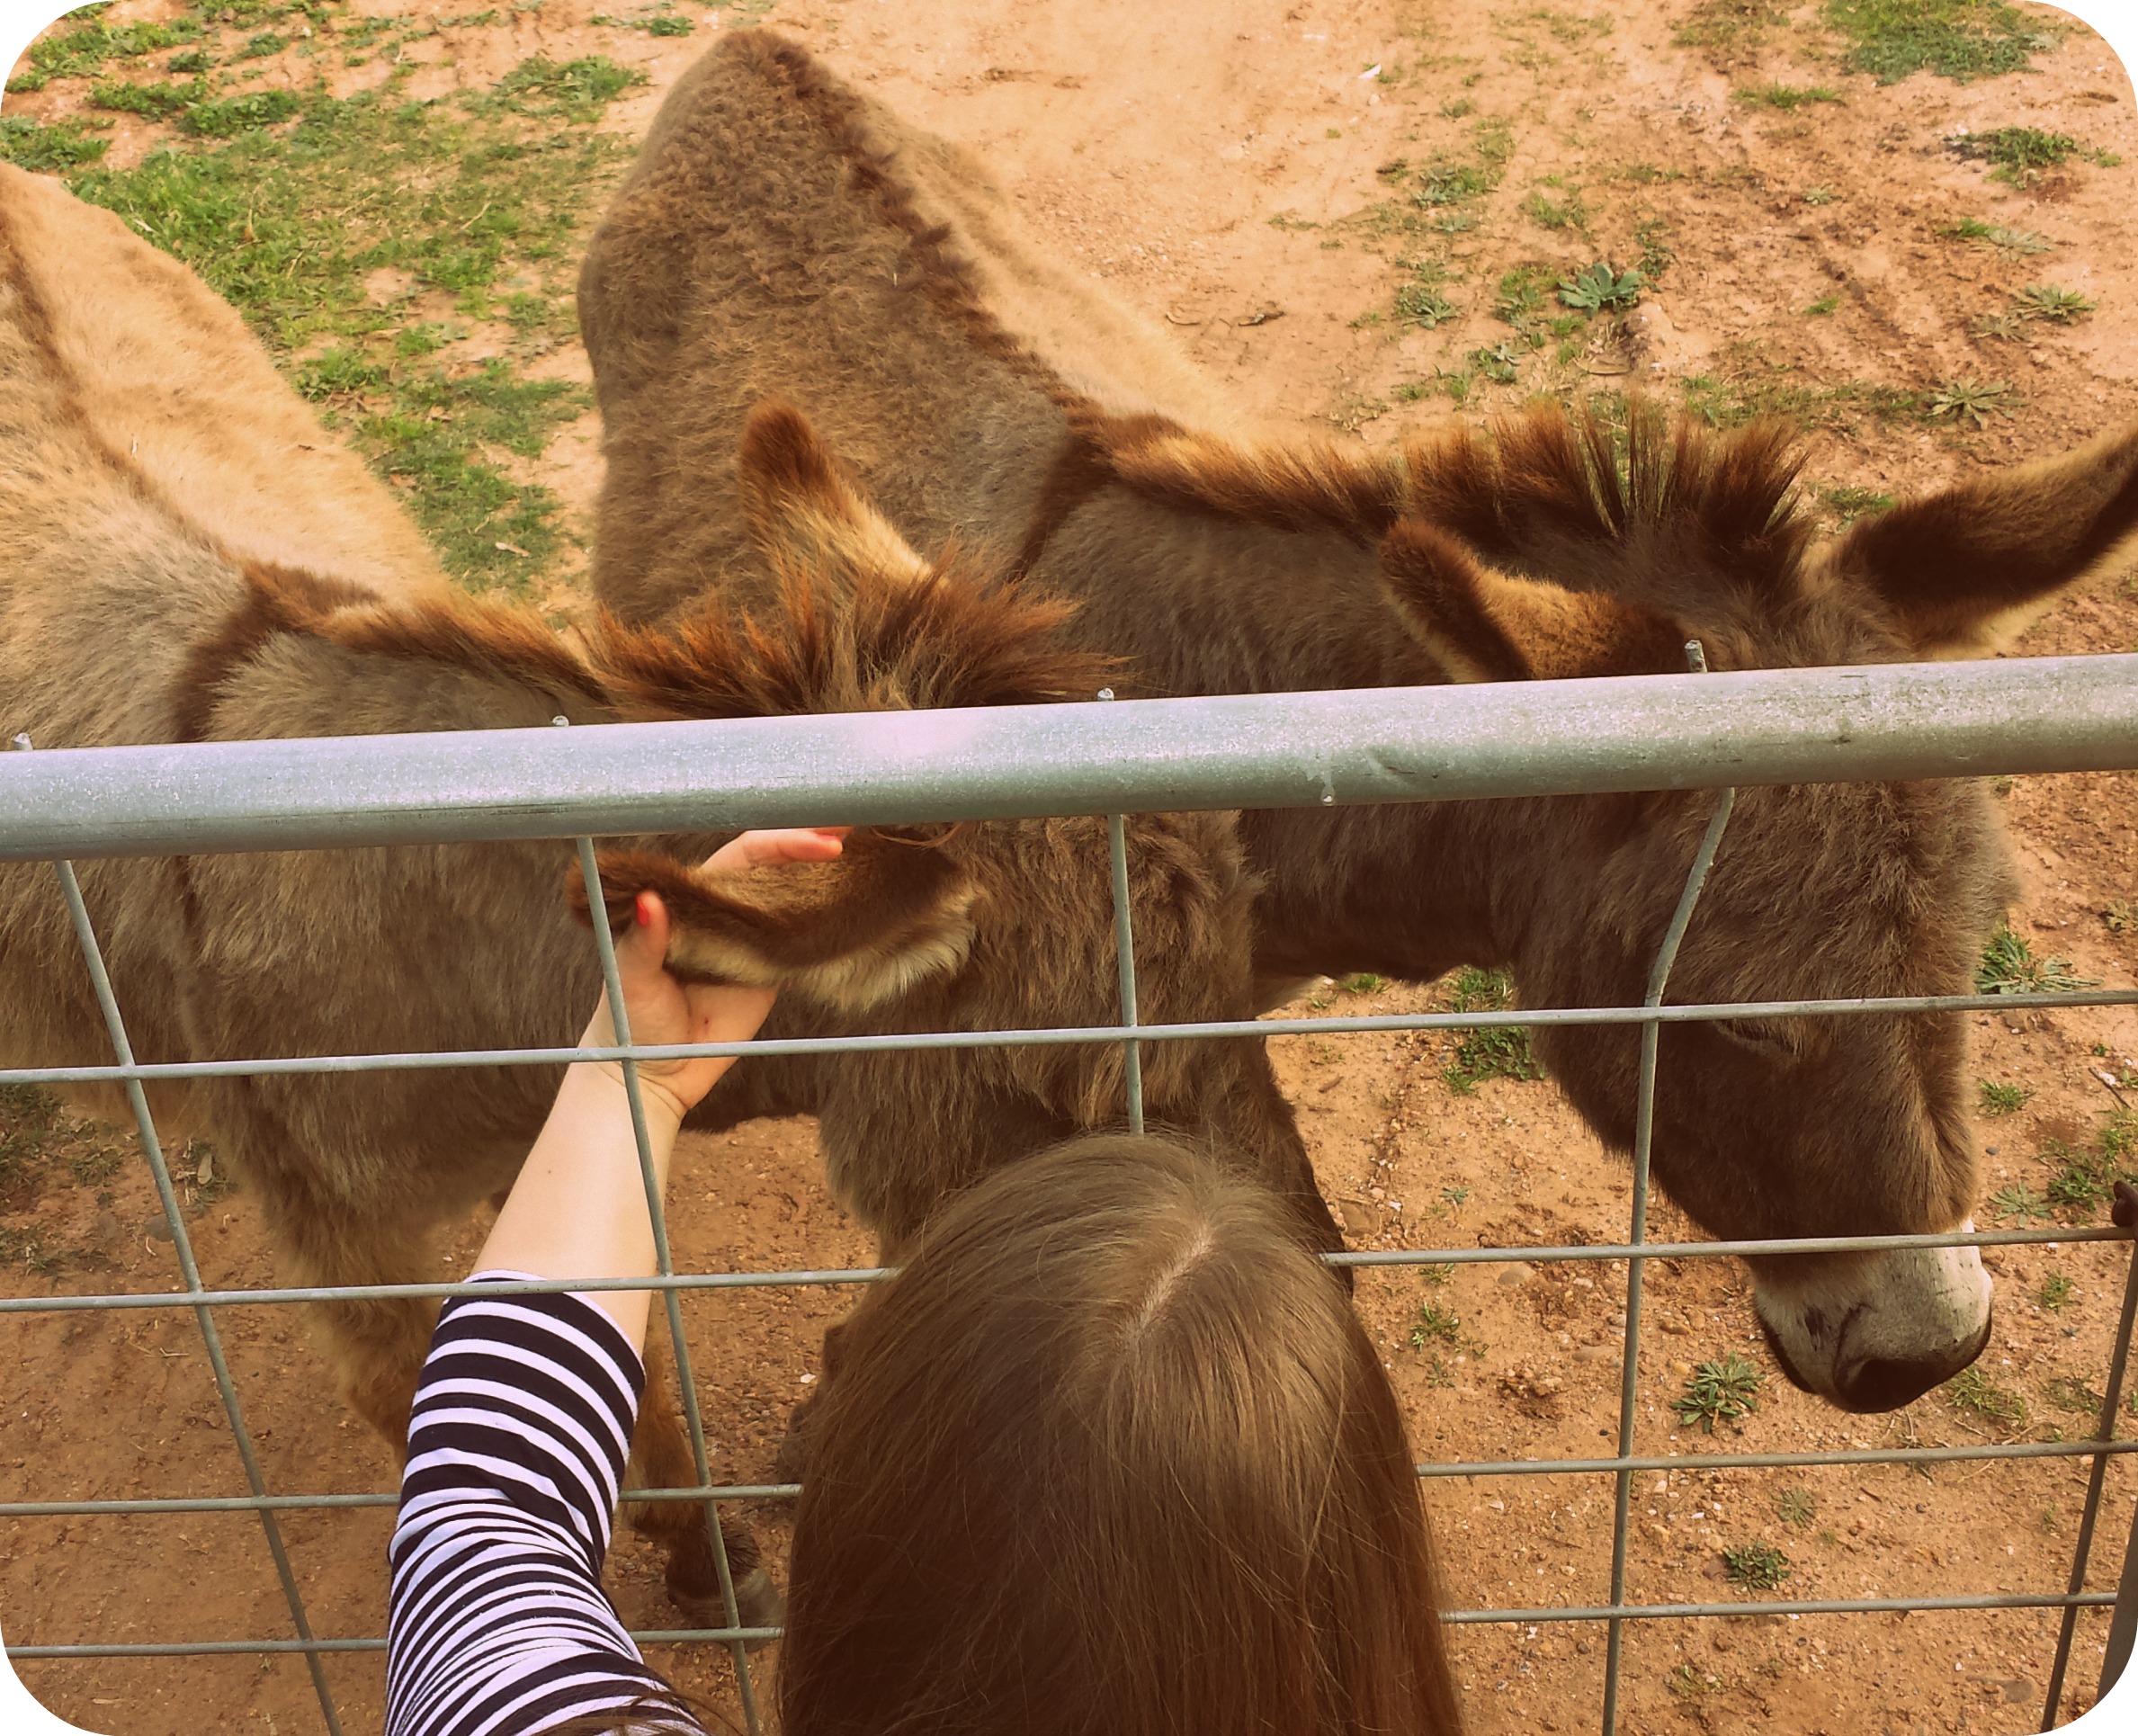
Since Kirsten’s visit last May, we have cooed over the miniature donkeys near my house more times than I can count, so of course we had to take the others to visit. Luckily, when we arrived they were in the meadow close to the road and we even got an up-close encounter with two of them. They are beyond adorable. Keep in mind when you view the photos – these donkeys are full-grown adults. The baby we saw last May was the size of a cocker spaniel. That’s right, people – the babies are practically pocket donkeys and I adore them.

OKMHHOU - Field of Miniature Donkeys

OKMHHOU - Miniature Donkeys Coming to Visit

OKMHHOU - Allison & Beka Pet the Donkeys

Mads & Megan - Petting Donkeys

OKMHHOU - Donkey Close-Up

OKMHHOU - Megan & the Donkeys

Two out of two tiny donkeys agree: ear scratches are the best.

Monday was another late start. Over many coffees and a few chai teas, we pulled together the breakfast we’d dreamed of while planning our weekend – The Biscuit Bar. We made a big tray of buttermilk biscuits, a pan of sausage gravy, and pulled all the jams & jellies out of the fridge. Oh, and there was more bacon. Of course.

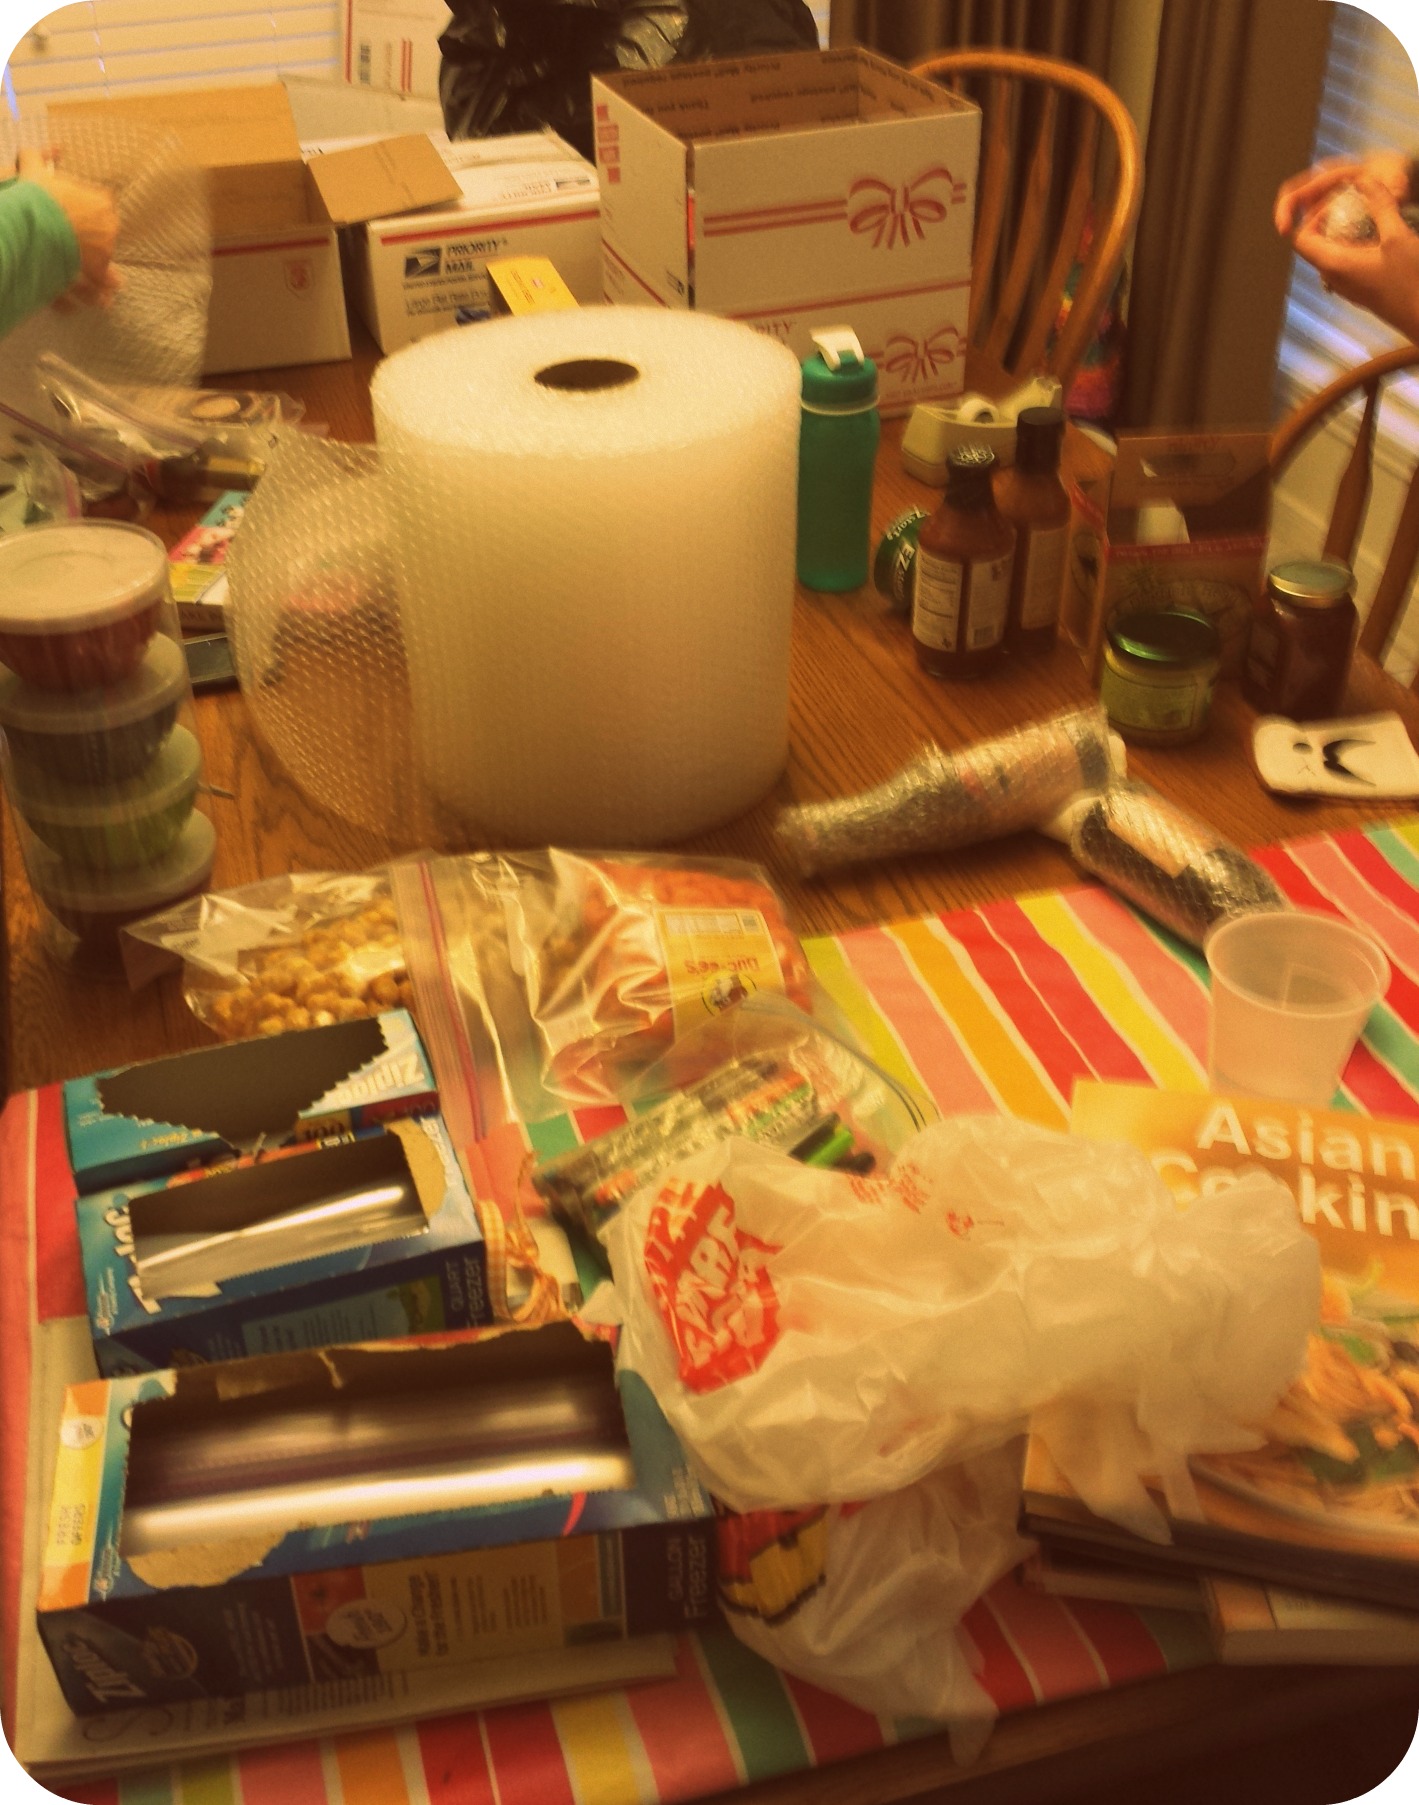
After breakfast, we broke out the packing supplies and the flat-rate boxes, and packed up everything that couldn’t or wouldn’t fit in suitcases. It was frantic. And hilarious. And Mads & I both scored a bag of Beaver Nuggets that wouldn’t pack. Hooray for Bonus Nugs!

OKMHHOU - Packing Suitcase Overruns

The only thing left was a return trip to Rustic Metal Works to rescue a flying pig. You see, Beka fell in love but talked herself out of it. Then we were distracted by street tacos, and it was decided that if she still woke up the next morning thinking of her new spirit animal, we would go back for him. Arriving to find the place locked up (closed Mondays) was like listening to air slowly released from a balloon. Luckily, if it fits it ships, so I agreed to go back later in the week and rescue a pig. Meet Al Porccino.

OKMHHOU - Al Porccino Comes Home

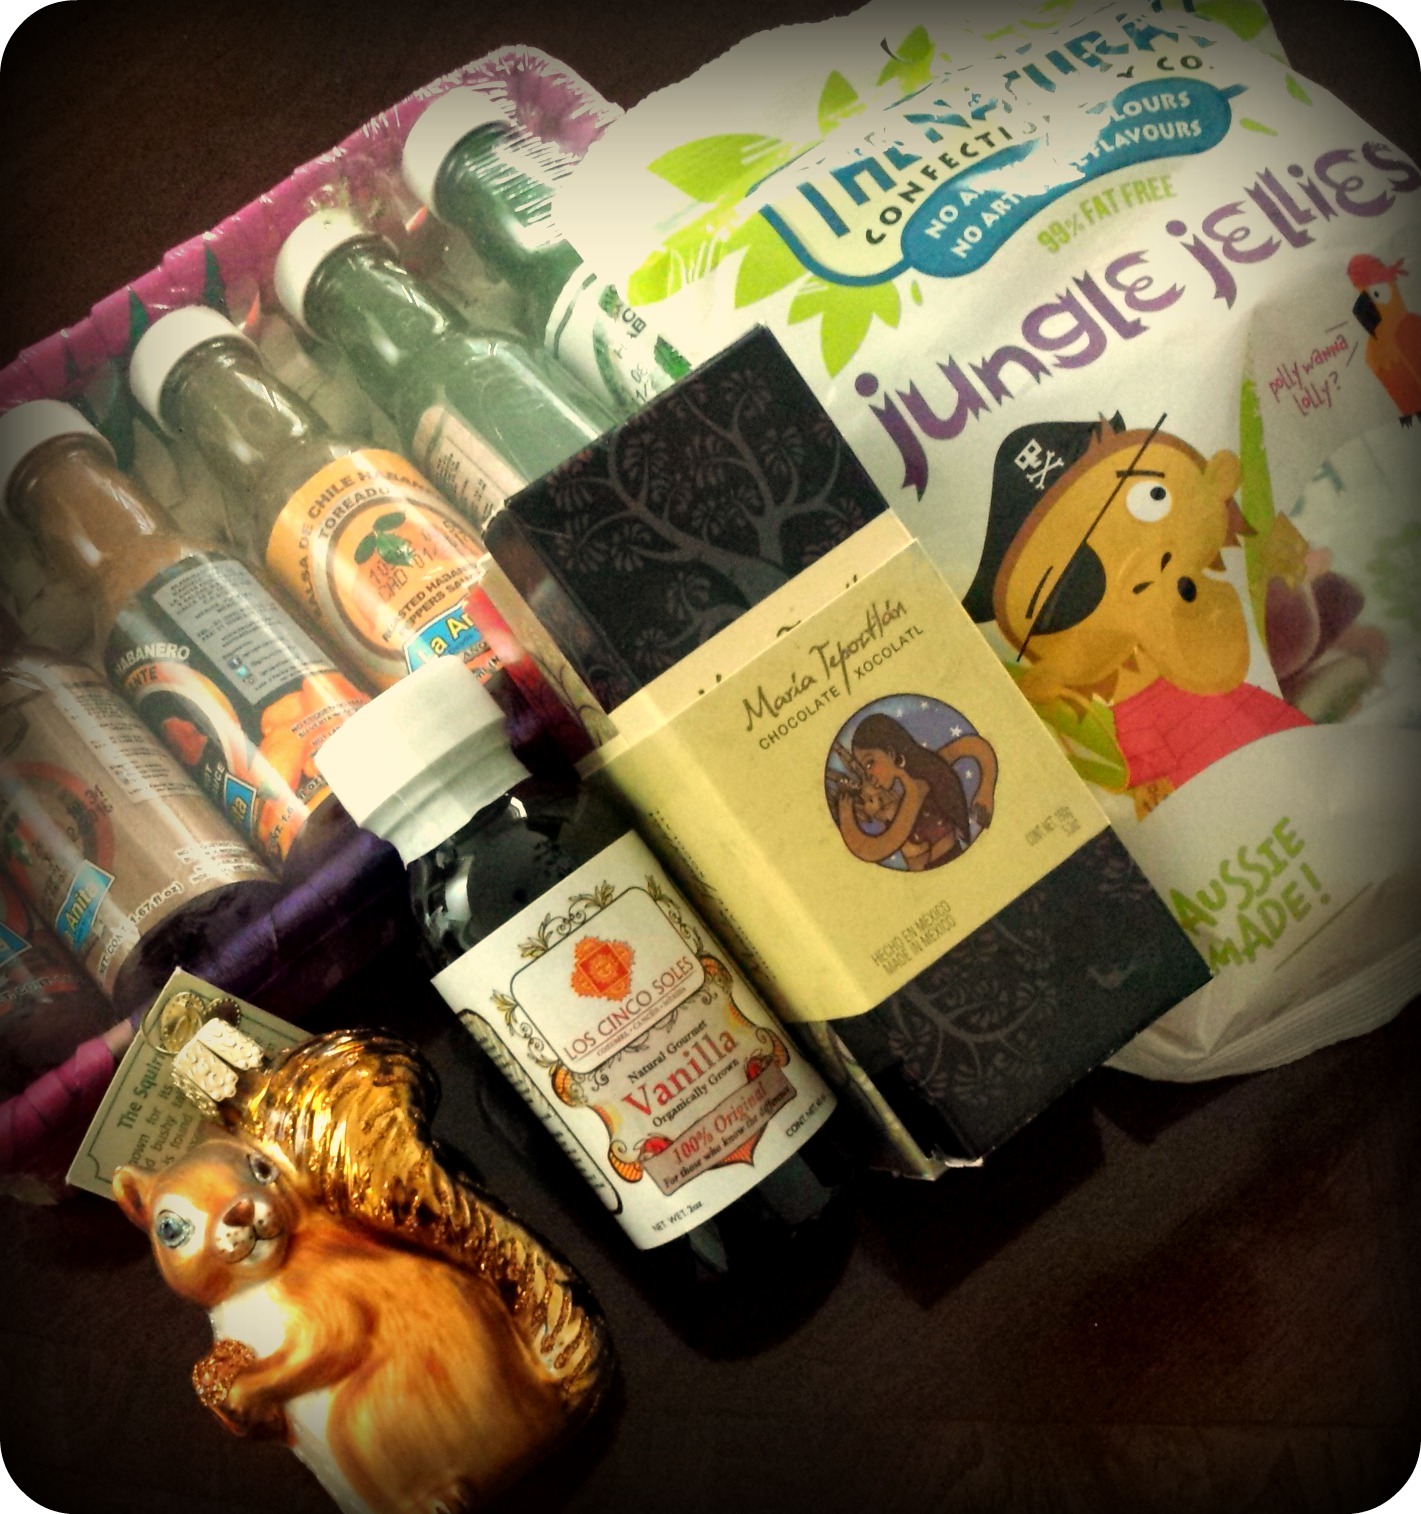
He’s adorable. And speaking of Beka, she had my name for our last OKMH box exchange. Check out my package. (Stop giggling.)

OKMHHOU - OKMH Box Items

That’s an assortment of hot sauces from her recent trip to Mexico, a bag of Australian Jungle Jellies, assorted bars of chocolates (not sharing), a bottle of Mexican vanilla, and a squirrel ornament from our day in Brenham. Perfect.

And so, after four days of endless chatter, late nights, very little sleep, way too much food and a few bottles of wine, beer and bubbles, our first live & in person One Kitchen Many Hearts weekend came to a close. It was fun. It was heartfelt. And it was way too short. Anyone who says friendships formed on the internet aren’t real are doing it wrong. These ladies are my friends, and I couldn’t love them more. We may be different shapes, ages and personalities, but that’s what makes us work as a group. We fill each others gaps. We support each other, both on our blogs and in our personal lives. It may have started with random comments on a website, but it has grown into so much more. I treasure these ladies, and it was really hard to watch that huge panel van drive away. If you don’t believe me, just ask Kevin.

OKMHHOU - Goodbye is Never Easy

I seriously can’t wait to do it again next year! I’ll bring Kevin.

OKMHHOU - The End

To see what the other ladies posted from our weekend, visit:
Megan at Country Cleaver
Kirsten at Comfortably Domestic
Beka at Kvetchin’ Kitchen
Allison at Decadent Philistines Save the World
Mads at La Petite Pancake
Kat at Tenaciously Yours

20 Comments

Filed under Blogger Collaborations, Things I Love, Travel Tales

DIY: Girly Decorative Pillowcases

DIY Pillowcase - Finished Collection Collage

Feeling crafty? I am! Our OKMH gang is getting together for a weekend in just 10 days, and I’m beyond excited. All seven of us under the same roof for the first time ever? It’s going to be epic! As a special treat, I made pillowcases for the girls – bright, colorful, girly pillowcases. What’s a girlfriends weekend for, after all, if not pampering, shopping, cocktails and flashy floral prints?

This is my simple DIY tutorial for decorative pillowcases.

For one queen-size pillowcase, you will need:
one yard of cotton quilting fabric (42″ wide x 36″ long)
one 6″ x 44″ piece of a coordinating solid
one 44″ piece of 1/2″ grosgrain ribbon
thread to match
felt & embroidery floss, to make a monogram (optional)
one tiny color-coordinated button (also optional)

Start by washing and ironing your yard of quilting fabric and the coordinating solid, then trim off any scraggly threads along the unfinished edges.

DIY Pillowcase - Loose Threads

Fold the yard of quilting fabric in half lengthwise with the good sides facing each other. Because quilting fabrics come from the factory with finished edges, this means your longer sides will already be ‘finished’ and only the top & bottom of the pillowcase will need to be edged to keep it from unraveling.

DIY Pillowcase - Factory Finished Edges

Pin the long side of your pillowcase and stitch it twice, so it’s extra sturdy. CAUTION: some fabrics have white edges and print along the finished edges. Be sure to stitch inside that line so this doesn’t show on your finished pillowcase. I’ll show you what I mean.

DIY Pillowcase - Double Stitched Edges

Here’s a simple trick for stitching the bottom of the pillowcase. Because the edges are ‘raw’ they can unravel when washed. I like to use bias tape to cover the raw edge. It helps create really sharp edges when the case is turned right-side out. Place your bias tape halfway beneath your unfinished edge, leaving at least 1/2″ of excess tape on each end. Fold the edges in so they’re flush with the edge of the fabric, then bend the bias tape in half to cover the entire edge and pin it into place. Double stitch all the way across to secure the tape. When done, trim off your thread tails and turn the case right sides out. Use a ruler to push your corners into a perfect right angle, and press your pillowcase.

DIY Pillowcase - Bias Tape Collage

Now we’re ready to tackle the opening and decorative trim. For the opening of the pillowcase, I turn the raw edge under 1/2″ and press, then turn under 1/2″ again and pin it in place. Again, double stitch for a more professional finish.

DIY Pillowcase - Finished Hem Collage

If you’re making a simple pillowcase, you can stop here. But if want to embellish, a simple ruffle with ribbon trim is a great way to go about it.

DIY Pillowcase - Ribbon Collage

1. Fold your solid trim fabric in half lengthwise and lay it on your finished case. I like to place the folded edge about 1″ from the finished opening of the case.

2. Lay out the ribbon, aligning it so that it just overlaps the cut edge. Pin the ribbon and ruffle into place so that the two edges meet at the side seam.

3. Stitch it all into place. I like use a ribbon with decorative stitching, and sew just along both sides of that stitching.

4. To join the two ends, fold one edge of the ruffle fabric in about 1/2″ and press it flat. Tuck the unfinished edge inside to hide it. Fold one end of the ribbon under 1/4″ or so and pin it to cover the other end of the ribbon. To finish, stitch across the folded edge of the trim to close it.

5. One last flourish – monogramming.

Do you have to monogram your pillowcases? No, but it does add a nice finishing touch and it’s easier than you think. Using your computer, open a Word document. Type in the initial you need and change the font until you find one you like. Play with the font size so that the finished letter fits easily on your solid border. Then hit ‘print’ and grab your paper off the printer. Roughly cut out a square around your letter and pin that square onto a piece of felt. Using sharp scissors, cut out the letter. When done, pin it to your solid ruffle and sew it on with your machine OR by using a simple stitch and a contrasting embroidery floss. (This one is machine-stitched. The others below are hand-stitched.)

DIY Pillowcase - Finished & Rolled

I took this one a step further with an iron-on flower and a small felt butterfly because this one is for the young daughter of a friend. I hope she’ll love her butterfly with pearls. For the ladies, I embroidered the monograms and finished them with a cute little button in a contrasting color.

When done, I folded the pillowcases and tied them shut with a coordinating ribbon. Here’s a look at some of the finished pillowcases for our first One Kitchen Many Hearts weekend. I just love how they turned out.

DIY Pillowcase - Finished Cases Collage

There’s so much joy in a handmade gift, and I admit I had a ball making these! Even better, the ladies will all have a keepsake from our first weekend together. Now I just need them to hurry up and get here. Not that we’re watching the clock or anything (we’re all totally watching the clock), but SHAKE A LEG, LADIES! We need to get this party started!

13 Comments

Filed under Craft Projects, Things I Love