Tag Archives: homemade gifts

DIY: Girly Decorative Pillowcases

DIY Pillowcase - Finished Collection Collage

Feeling crafty? I am! Our OKMH gang is getting together for a weekend in just 10 days, and I’m beyond excited. All seven of us under the same roof for the first time ever? It’s going to be epic! As a special treat, I made pillowcases for the girls – bright, colorful, girly pillowcases. What’s a girlfriends weekend for, after all, if not pampering, shopping, cocktails and flashy floral prints?

This is my simple DIY tutorial for decorative pillowcases.

For one queen-size pillowcase, you will need:
one yard of cotton quilting fabric (42″ wide x 36″ long)
one 6″ x 44″ piece of a coordinating solid
one 44″ piece of 1/2″ grosgrain ribbon
thread to match
felt & embroidery floss, to make a monogram (optional)
one tiny color-coordinated button (also optional)

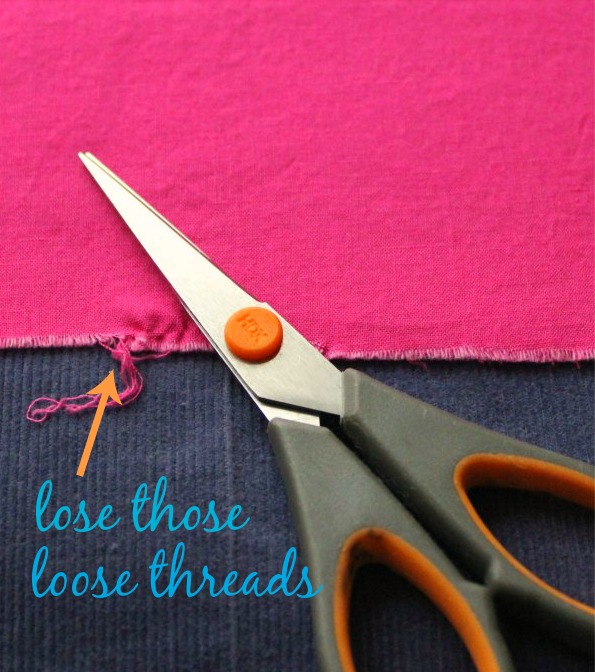
Start by washing and ironing your yard of quilting fabric and the coordinating solid, then trim off any scraggly threads along the unfinished edges.

DIY Pillowcase - Loose Threads

Fold the yard of quilting fabric in half lengthwise with the good sides facing each other. Because quilting fabrics come from the factory with finished edges, this means your longer sides will already be ‘finished’ and only the top & bottom of the pillowcase will need to be edged to keep it from unraveling.

DIY Pillowcase - Factory Finished Edges

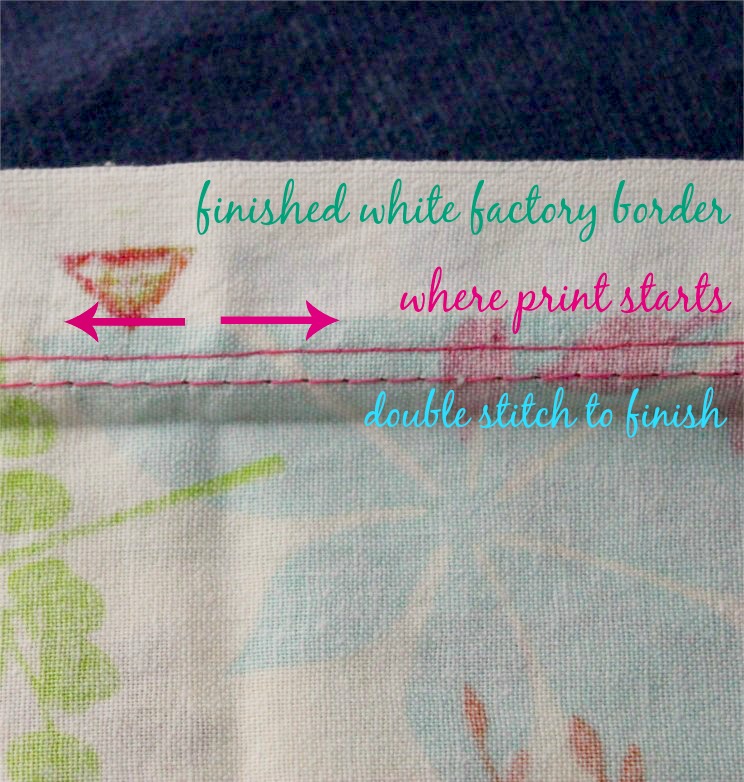
Pin the long side of your pillowcase and stitch it twice, so it’s extra sturdy. CAUTION: some fabrics have white edges and print along the finished edges. Be sure to stitch inside that line so this doesn’t show on your finished pillowcase. I’ll show you what I mean.

DIY Pillowcase - Double Stitched Edges

Here’s a simple trick for stitching the bottom of the pillowcase. Because the edges are ‘raw’ they can unravel when washed. I like to use bias tape to cover the raw edge. It helps create really sharp edges when the case is turned right-side out. Place your bias tape halfway beneath your unfinished edge, leaving at least 1/2″ of excess tape on each end. Fold the edges in so they’re flush with the edge of the fabric, then bend the bias tape in half to cover the entire edge and pin it into place. Double stitch all the way across to secure the tape. When done, trim off your thread tails and turn the case right sides out. Use a ruler to push your corners into a perfect right angle, and press your pillowcase.

DIY Pillowcase - Bias Tape Collage

Now we’re ready to tackle the opening and decorative trim. For the opening of the pillowcase, I turn the raw edge under 1/2″ and press, then turn under 1/2″ again and pin it in place. Again, double stitch for a more professional finish.

DIY Pillowcase - Finished Hem Collage

If you’re making a simple pillowcase, you can stop here. But if want to embellish, a simple ruffle with ribbon trim is a great way to go about it.

DIY Pillowcase - Ribbon Collage

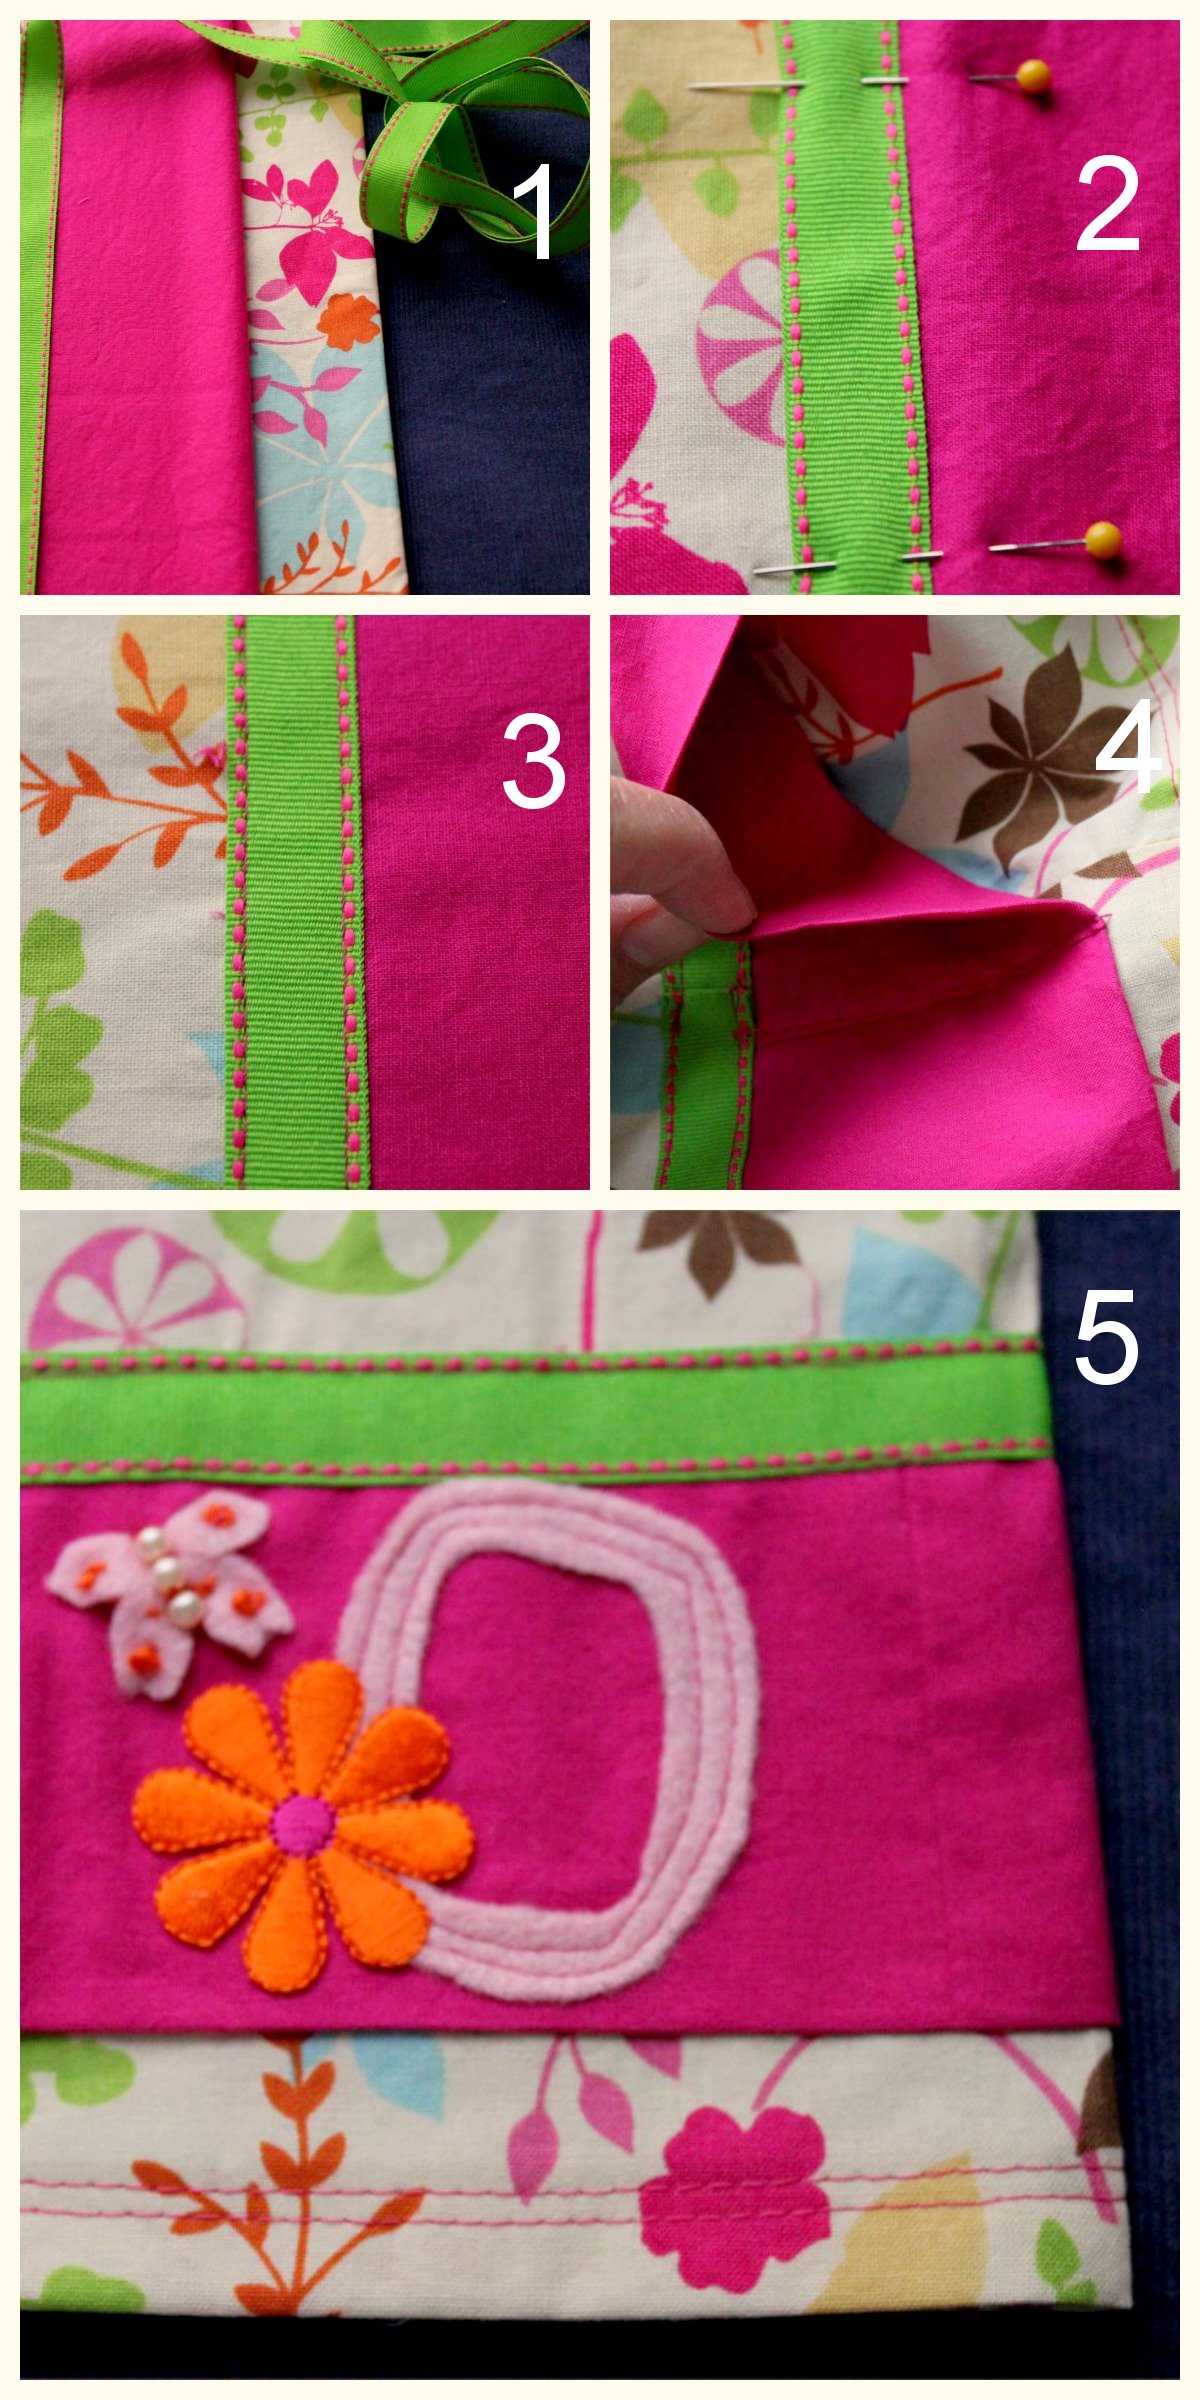
1. Fold your solid trim fabric in half lengthwise and lay it on your finished case. I like to place the folded edge about 1″ from the finished opening of the case.

2. Lay out the ribbon, aligning it so that it just overlaps the cut edge. Pin the ribbon and ruffle into place so that the two edges meet at the side seam.

3. Stitch it all into place. I like use a ribbon with decorative stitching, and sew just along both sides of that stitching.

4. To join the two ends, fold one edge of the ruffle fabric in about 1/2″ and press it flat. Tuck the unfinished edge inside to hide it. Fold one end of the ribbon under 1/4″ or so and pin it to cover the other end of the ribbon. To finish, stitch across the folded edge of the trim to close it.

5. One last flourish – monogramming.

Do you have to monogram your pillowcases? No, but it does add a nice finishing touch and it’s easier than you think. Using your computer, open a Word document. Type in the initial you need and change the font until you find one you like. Play with the font size so that the finished letter fits easily on your solid border. Then hit ‘print’ and grab your paper off the printer. Roughly cut out a square around your letter and pin that square onto a piece of felt. Using sharp scissors, cut out the letter. When done, pin it to your solid ruffle and sew it on with your machine OR by using a simple stitch and a contrasting embroidery floss. (This one is machine-stitched. The others below are hand-stitched.)

DIY Pillowcase - Finished & Rolled

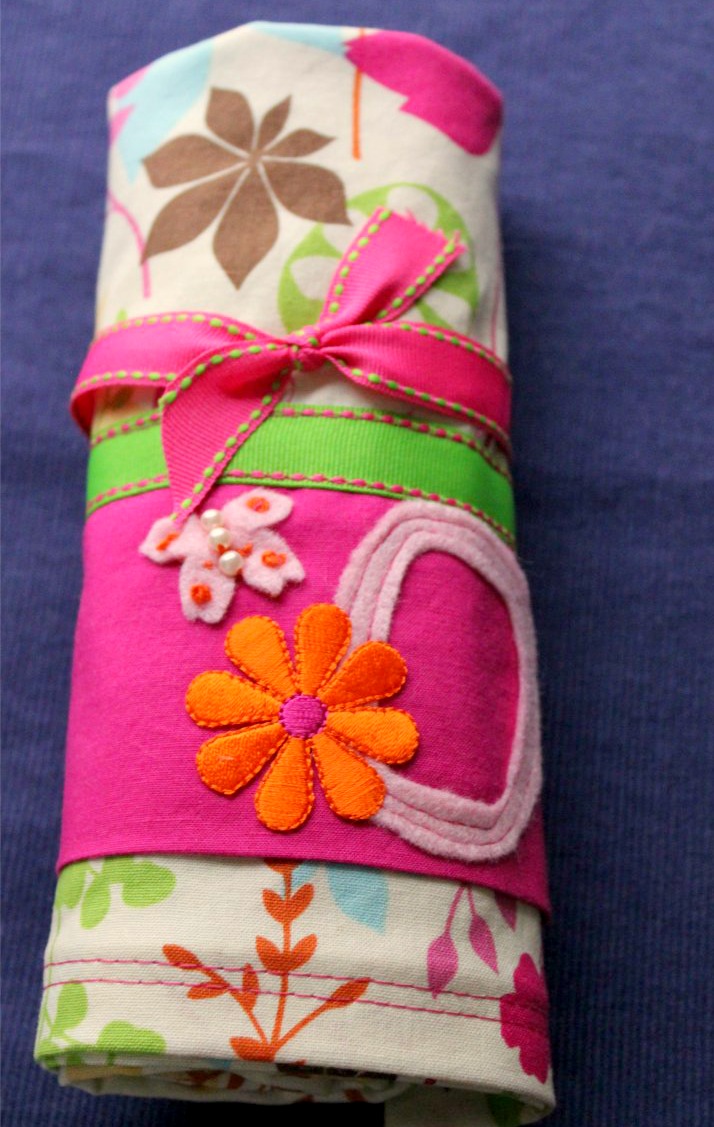
I took this one a step further with an iron-on flower and a small felt butterfly because this one is for the young daughter of a friend. I hope she’ll love her butterfly with pearls. For the ladies, I embroidered the monograms and finished them with a cute little button in a contrasting color.

When done, I folded the pillowcases and tied them shut with a coordinating ribbon. Here’s a look at some of the finished pillowcases for our first One Kitchen Many Hearts weekend. I just love how they turned out.

DIY Pillowcase - Finished Cases Collage

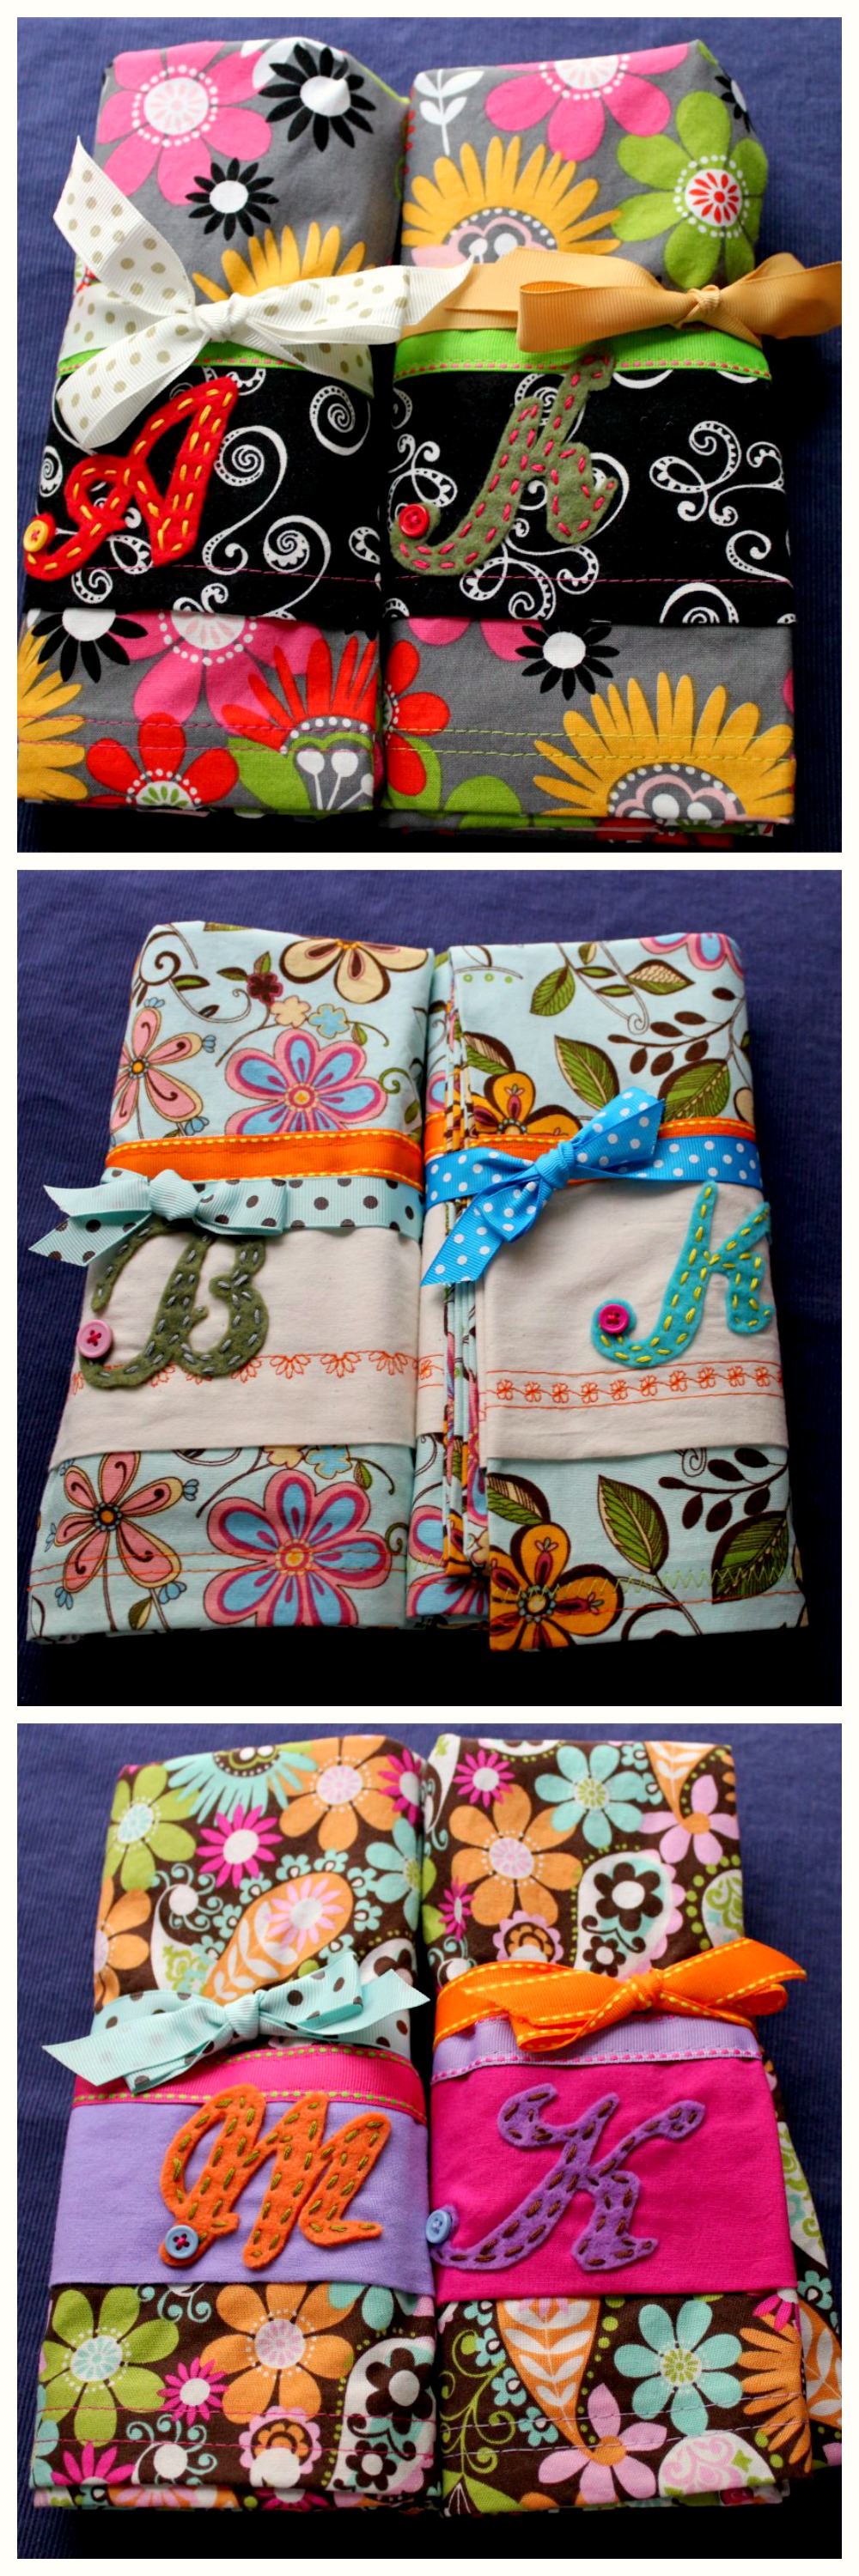
There’s so much joy in a handmade gift, and I admit I had a ball making these! Even better, the ladies will all have a keepsake from our first weekend together. Now I just need them to hurry up and get here. Not that we’re watching the clock or anything (we’re all totally watching the clock), but SHAKE A LEG, LADIES! We need to get this party started!

Advertisement

13 Comments

Filed under Craft Projects, Things I Love

DIY Craft: Zippered Cosmetic Bags

Tired of losing stuff? Need a new bag for your purse or for travel? Want to make a quick homemade gift for family or friends? Well, I have the perfect tutorial for you! Our annual “Ladies Only” family weekend is rapidly approaching so I made these for the ladies. If I can do it, so can you! Same bag; two fun patterns.

Colorful stripes or stylish black & white - both are fun!

Are you familiar with oilcloth? It’s that fabulous retro fabric used mainly to make tablecloths. It has a plastic-coated outer layer and a soft fleecy flannel lining, which makes it perfect for these little cosmetic bags. It’s durable and washable. And if you have a great fabric store in your area, you can potentially find fabulous prints, solids or stripes to work with. You will, of course, need a sewing machine with a zipper foot to create these at home but if you’ve got that, you’re half way there.

For each bag, you will need:

1 rectangle piece of oilcloth (8 1/2″ x 11″)
1 heavy-duty 7″ metal zipper in a coordinating color
thread in a coordinating color
1 6″ piece of ribbon in a coordinating color

To start, cut your oil cloth into a rectangle. I used a standard piece of printer paper as my template, since it measures 8 1/2″ x 11″.

Next, cut the rectangle in half to make two equal pieces that are 8 1/2″ x 5 1/2″. You’ll also need to cut two tabs (1.5″ x 1.5″ square) for the zipper.

Using those small squares, you’ll need to stitch them on each end of the zipper. First fold one side under 1/4″ to create a finished end. Place that end up against the end of the zipper and pin into place. You’ll want to do this on both ends of the zipper, then double stitch into place.

Next, grab a side and fold one long edge under 1/4″. With the zipper closed, center the folded edge along one side of the zipper and pin it into place.

Using the zipper foot, stitch along the folded edge making sure you sew off of both ends. Also note that once you get close to the zipper, you’ll need to remove a few of the pins you just sewed over, raise the zipper foot, and unzip the zipper so that you can get past the zipper head without messing up your stitching. Don’t worry. It’s not as scary as it sounds. The pins you’ll remove to unzip the zipper will be in the area you just stitched, so it’s all good. Once you’ve stitched all the way across one side, remove the pins and do the same on the second side.

Using the same method, sew the second side of the bag along the zipper. Once both sides are stitched on, it should look like this.

Now that your two sides are stitched onto your zipper, you’re almost ready to fold it up and sew it shut. One important tip – before you do, be sure to unzip the bag half way. Otherwise, you’ll stitch your bag shut and the zipper pull will be on the inside. Unzipping that bag is going to be really difficult if the zipper pull is on the inside and the bag is sewn shut. (Live & learn, kids. Live & learn.)

So, once you’ve unzipped the zipper half way, fold the bag in half so that the “good” sides are facing each other and pin it to keep it from slipping as you sew.

Here are close-ups of the zipper ends and how they’re pinned.

See that white peeking out of the ends of the zipper? That’s what those tabs we sewed onto the ends were for. They cover that gap in the zipper so you have a nice finished edge when we’re done. I’ll show you another close-up of that in a moment. For now, start at one end of the zipper and using a 1/4″ seam allowance, sew around the three open sides of the bag. If you want, you can stitch around it twice. I just use the “back up” button on my machine and go over those top edges and the bottom corners a couple of times to reinforce them.

Here’s a close-up of those reinforced corners. Snip that corner off before you turn the bag right-side-out to get a good, crisp finished corner.

Turn the bag inside out and using a chopstick or other bluntly pointed object, gently poke the corners (top & bottom) to pop them into place. This is where you’ll be really glad you unzipped that bag halfway. Here’s a closer look at how those corners at each end of the zipper should look. It’s also a good look at how those tabs we sewed on in the beginning come into play. They really do help give a cleaner edge to the finished bag.

One last finishing touch – a ribbon as a zipper pull. It’s not necessary, but it adds a decorative touch and it does come in handy. You’ll need one piece of ribbon in a coordinating color, about 5 or 6 inches long. Fold the ribbon in half to make a 3″ length, then roll the cut ends together and poke them through the little hole in the end of the zipper pull.

Here’s another great tip – use Fray Check to seal the ends of that ribbon and keep it from unraveling. You can find it at fabric stores, and it’s worth keeping around. It really does work. If you wash the bag, retouch with Fray Check.

That’s it! Here’s a look at the finished bag.

If you’re going to use a striped oilcloth, be sure to match stripes when you sew these together. It makes a big difference in how they look once finished.

Same goes for those little tabs you sew on each end of the zipper. If you take a moment to lay all this out before you start pinning, you can even line up the stripes on those end tabs so they match as well. It takes a few more minutes of planning, but it’s worth it in the end. Sometimes, it’s the little things.

One last helpful tip. If you’re going to be making multiple bags, it goes faster if you cut each bag and lay the parts for each bag together. I also stitched all of the tabs onto the zippers before I started sewing bags together. It saved time by allowing me to just grab a zipper and go when I was ready for the next bag.

I hope you’ll jump in and try these. They’re fun to make, and don’t really take a lot of effort or time. If you have any questions, feel free to leave a comment or shoot me an e-mail. If you make them and post pictures, let me know where I can see them. I’d love to see how yours turn out.

And to my mother, sisters, nieces, daughter, granddaughter and all the ladies who’ll be coming to visit next week – surprise! You’ll be getting one of these. Feel free to call dibs on your favorite – stripes or print. They’ll be filled with swag, and they’re going to go fast.

PS – Do I need to apologize for that nail polish color? It is kind of a spastic, groady green. Sorry you had to see that. I was experimenting for St Patty’s Day. Don’t worry… it’s coming off. It’s true what they say. It’s not easy being green.

27 Comments

Filed under Craft Projects, Hoegarden Weekends

When opportunity knocks…you should like totally make a super-cute tote bag!

JoAnn’s Fabrics is one of my regular haunts. I like to pop in there often to see what I can dig up. I just found out my local JoAnn’s store is moving, and they’re clearing everything out of the old store. Last week, I found upholstery samples on the clearance rack for $1 each. Now you may be thinking, “NanaBread, why on earth do you need upholstery fabric samples, even for $1 each?” Well, I’m proud to say that I was blessed with my mother’s “artsy fartsy” gene, so I’ll tell you exactly what I was thinking:

• Upholstery fabric samples are pre-cut into 18” squares
• All 4 edges of the squares are already finished (serged)
• Upholstery fabrics are usually a heavier grade of fabric
• There are usually multiple samples of the same fabric
• If I can find 2 of the same fabric, I can make a tote bag
• Two squares for each tote bag = $2 per tote bag

With the addition of some woven belting in coordinating colors to use as handles, I was off to the races. I found at least 8 matching pairs of fabric samples, which means I can make 8 tote bags. I picked up another yard of upholstery fabric so I can make a total of 10 bags. I’m planning to give them as gifts for our annual Hoegarden Weekend in March, so I’ll need 10 bags. If you’re not familiar with Hoegarden, it’s our “girls only” family gathering named after a beer and held each March. It’s 3 glorious days of shopping, eating, board games, make-overs, one-handed croquet, chocolate and cocktails. Sorry, mom, sisters, nieces and granddaughters – if you’re reading this, the gift cat’s out of the bag. The tote bag! Get it? Hello? Anybody there? {crickets chirping}. Ahem….so back to the tote bags. Here’s how easy it is to make an upholstery sample tote bag, just in case you find a good clearance sale in your area:

1. Start by ironing your fabric squares
2. Turn the 2 squares with the “good sides” facing each other & pin 3 sides
3. Stitch the 3 pinned sides together; I like to go around twice for extra strength

4. Turn your bag right sides out and press the side seams to flatten them

5. Lay your bag down flat and cut off the top 2” (the unsewn side is at the top)
6. Turn the 2” piece inside out and pin it to the bag so the right sides are facing each other and the cut edges are at the top of the bag; pin them together, matching them at the outside seams
7. Cut the woven belting into two 22” straps and pin them into the edges of the bag for the handles, making sure the handles are between the 2 pieces of fabric
8. Stitch around the entire top of the bag

9. Turn the top edge of the bag out and iron to flatten the seams
10. Turn the edging inside and pin into place

11. Hem the top of the bag to hold the edging and handles in place (I like to use 2 hems, ¼” apart)

12. Fold the bottom corners up 1” and pin them to the sides of the bag, matching the side seams again; stitch the corners in a triangle to create a wider, flatter bottom to your bag; press the entire bag one last time to finish

That’s it! Each bag took approximately 30 minutes to complete. If you have your woven belting pre-cut into 22” straps, your iron on and ready to go, and you’re using the same color thread for each bag, you can do it in 20 minutes. For a bonus, stitch a coordinating colored ribbon to the inside edge of your bag and attach a metal swivel hook to hold your keys. They’re super handy and only $1.50 at Home Depot, which STILL keeps your cost under $5.00 per bag.

To re-cap: that’s 2 upholstery fabric samples for $1 each, woven belting for $1.50, a key hook for $1.50, thread I already had in my sewing room, and 20-30 minutes to stitch up each bag. And just like that, you have a one-of-a-kind heavy-duty super-cute tote bag for only $4 … a tote bag that would easily sell for $20 in stores. Now that’s my kind of crafting. I’ve said it before, and I’ll say it again… I absolutely love it when I can be creative and cheap at the same time. And I must be on to something, because I’ve laid this out and described the process to at least 5 other women at JoAnn’s since I started this project, and each time I do, they take off running for the upholstery fabric sample racks. Sometimes the best projects just fall into your lap. Like I said, when opportunity knocks…

21 Comments

Filed under Craft Projects