Tag Archives: Hoegarden Weekends

Sew Busy: Embroidered Tote Bags

Sometimes when I start on a craft project, I have a hard time stopping. Pacing is not really my thing. A few weeks ago, Big Sis came down for a weekend and I dragged out a handful of embroidery ideas I’d found on Pinterest, along with a few fabrics to pair them to. Once we gathered the supplies to pull it all together, I became obsessed. Like nine bags in a week obsessed. Intervention, anyone?

Now I’m not crazy. There is a story behind my stitching. These lined shopping totes are intended for our annual Hoegarden Weekend, that magical time when the females in our family gather to shop, antique, play board games, cook, snack and break out the croquet mallets. Here’s a peek at what I’ve been up to, and who’s already claimed what.

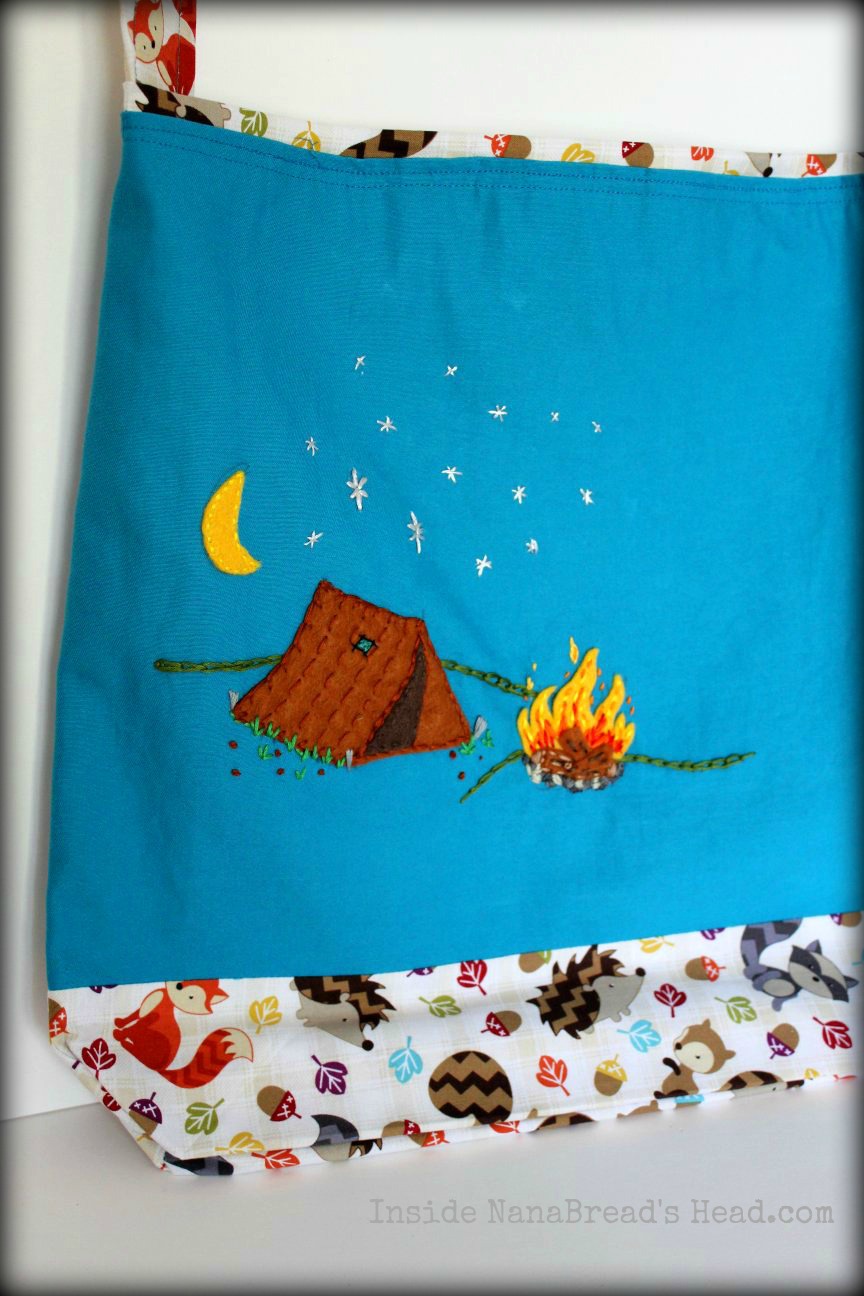
The “How I Roll” Camper Bag
Camper Bag

Camper Bag close-up

Sister #3 has already laid claim to this one, sight unseen. She has a thing for campers and as soon as she heard it was in the works, she called dibs. I love the colors – so whimsical and fun.

The “Runs With Scissors” Bag
Runs With Scissors Bag

Runs With Scissors Bag Detail

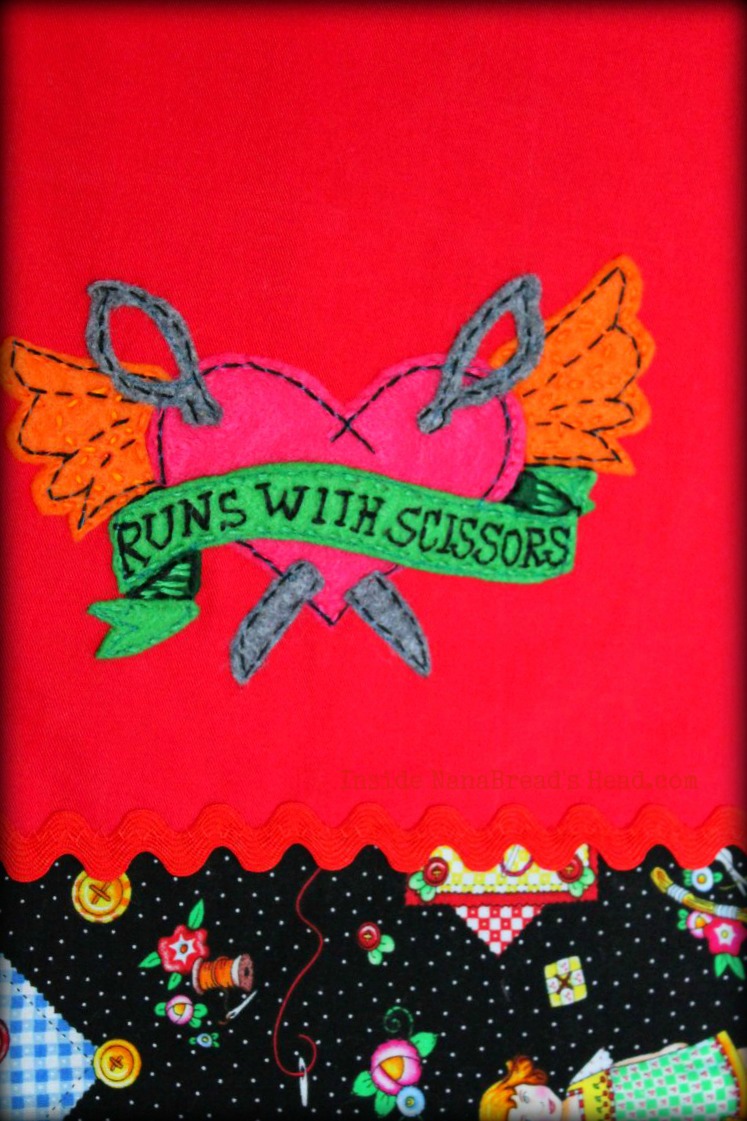
I made this one with Mom in mind. As a life-long quilter and seamstress, it suits her to a T. She has spent a lifetime teaching the five of us every type of craft – from knitting to sewing to embroidery to, well you name it. Red is her color, and this fun bag will be perfect for transporting supplies back & forth to her Cozy Quilters meetings each Wednesday. Hope she likes it!

The “Make A Wish” Dandelion Bag
Dandelion Bag

Dandelion Bag close-up

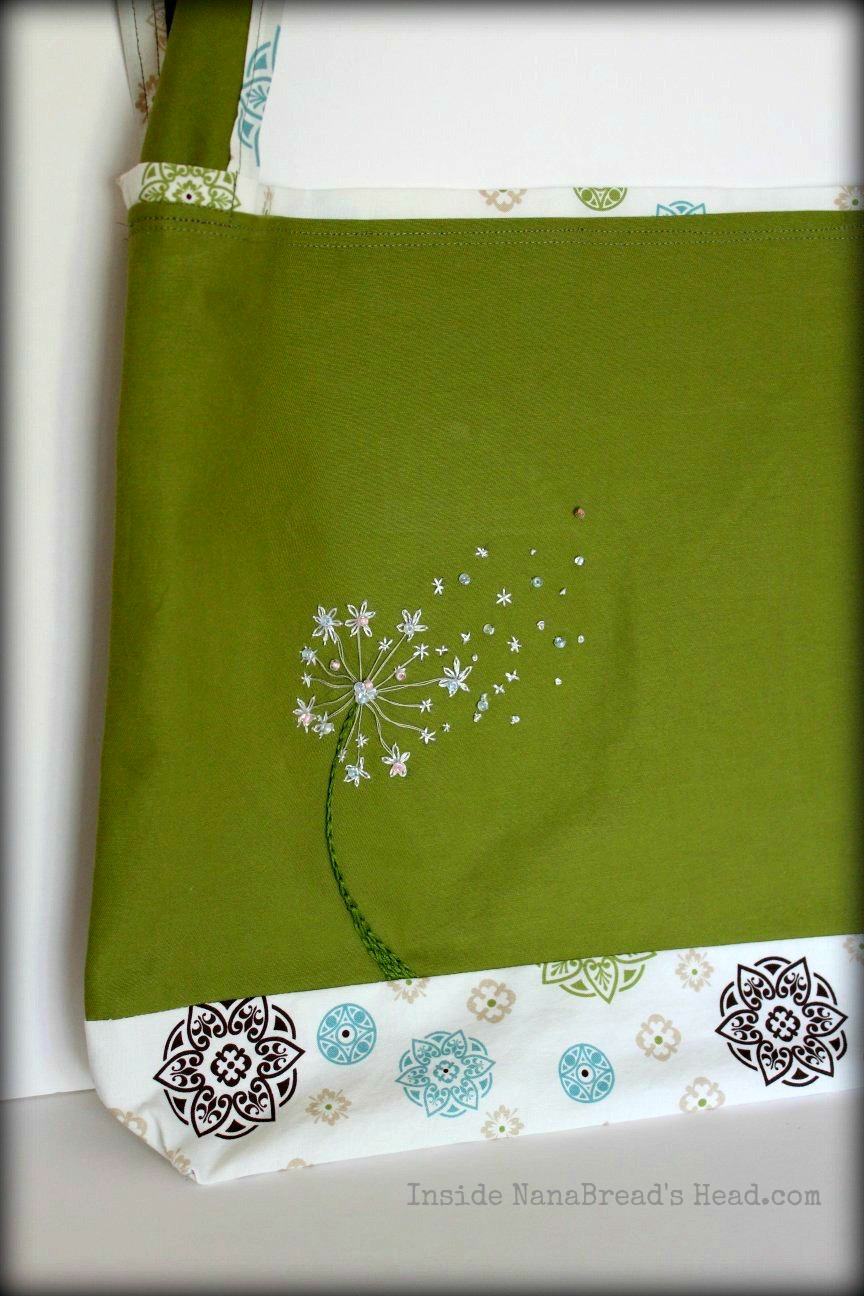
This one is mine. I love the color & patterns in the print, but most of all I love the simplicity of it. I’m not letting this one go, no matter how hard they wish.

The “Nerdy Hooter” Tote
Owl Bag

Owl Close-Up

I didn’t name this one, my daughter did when she laid claim to this bag. She fell in love with this cute, sassy owl. The bag is lined in a cute owl print, as well. As a first grade teacher, her class will love it. And it’s large, which makes it perfect for bringing her work home each night.

The “Sleep Under the Stars” Bag
Camping Under the Stars Bag

Camping Under the Stars close-up

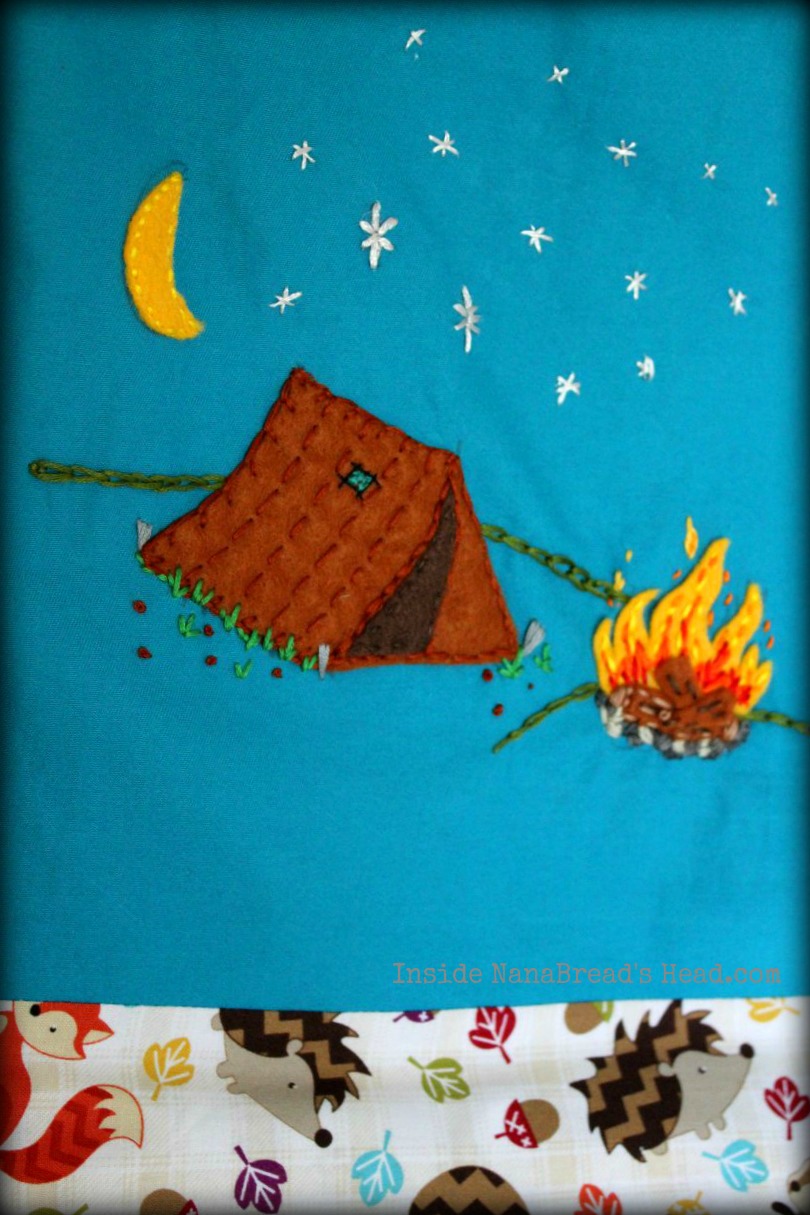
I made this one with our Baby Sister in mind. She’s always loved camping, and with her son in Boy Scouts, they get the chance to practice their camping skills often. I especially love the animal print. Check out their cute chevron tails! If The Baby wants this one, she’d better mark her territory quickly.

The “French Knot Flowers” Bag
French Knot Flowers Bag

French Knot Flowers Detail

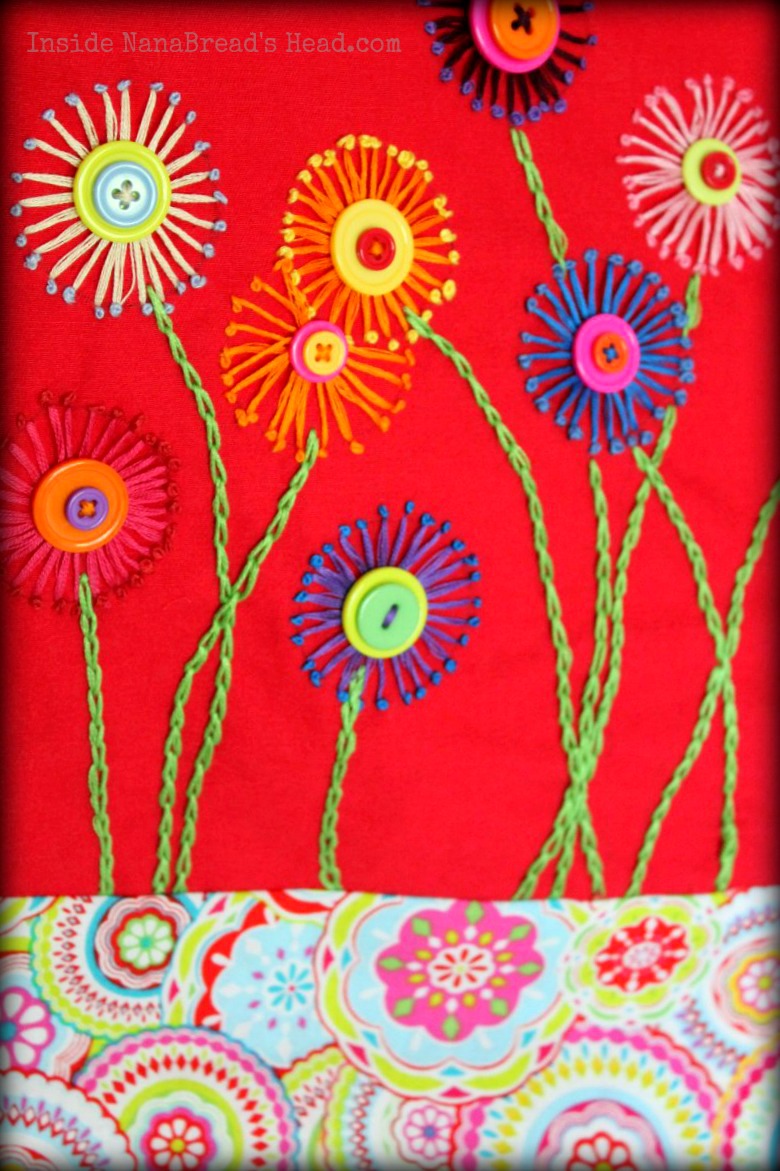
So…many…knots! But I love how the flowers turned out. I like to think of them as firework flowers. As a button enthusiast, this one makes me happy. The bright colors of the bag and lining are so cheerful.

The “Bee Happy” Bag
Bee Happy Bag

Bee Happy Detail

Speaking of happy…this cute bee was one of the first bags I tackled. To make the wings stand out, I painted a thin layer of iridescent opal fabric paint before stitching on the details. Extra layers of thread on the bee body make it slightly 3-dimensional and the colorful floral print seemed a natural choice.

The “Don’t Bug Me” Bag
Chevron Bug Bag

Chevron Bug Bag close-up

Bees don’t have all the fun. This little chevron cutie is paired with a vine & flower print and was inspired by the tiny bugs in the print. The eyes are vintage gemstone buttons scored at an estate sale this summer. Too cute.

The “Let’s Get Swept Away” Bag
Swept Away Bag

Swept Away Close-Up

And last, but certainly not least, this adorable ‘swept away’ bag was made with my niece (K) in mind. Big Sis thought her baby would love it. There’s so much promise in the design, and so many opportunities in life to get swept up in. It’s not just a bag, it’s a motto. No pressure, K. You can choose another bag if it speaks to you (even though she’s blonde & adorable like you).

Swept Away Detail

I got totally swept up in this project, and I’m not quite done yet. Big Sis is working on her own embroidered front panel featuring a vintage bicycle, and once she’s done she’ll send it back so I can finish it to match the others. There are also plans to make small bags for our two littlest girls (both 5 years old). Four generations of crafty females in our family make me so proud to be a part of it.

What was the last craft project you got swept up in? -jeanne

Advertisement

24 Comments

Filed under Craft Projects, Family Stuff

Apple Pie Moonshine

Apple Pie Moonshine - Inside NanaBread's Head

Sounds good, right? And it is. This was yet another gift from our recent Hoegarden weekend. I had bookmarked a recipe for Apple Pie Moonshine months ago with the hope of trying it some day. When we picked our ‘Lowdown Hoedown’ theme for this year’s shenanigans, it seemed like perfect timing so I fired off an e-mail to my Big Sis with the short & simple message “We should totally make this for Hoegarden!”

One of the many things I love about having four sisters is that we never have to twist arms to get someone to participate in things like this. Big Sis was all in. She agreed to source some vintage jars from Mom’s barn and take on the role of Head Moonshiner. I would act as Chief Brainstormer, equal financial partner and creative director (which put me in charge of packaging & tags).

Somewhere our relatives are nodding and saying “See, Hank… I told you they were hillbillies.”

This recipe made a lot of hooch – 7 quarts in all. Big Sis packaged it into Mason jars and I whipped up some cute tags in honor of our theme. Every good hillbilly knows the only appropriate wrapping for a jar of hooch is a brown paper bag, so we went there because our Momma taught us not to half-ass anything. Here’s how the finished jars turned out.

Apple Pie Moonshine - Packaged - Inside NanaBread's Head

This is not your typical moonshine that doubles as paint stripper. First of all, it’s not nearly as strong as traditional moonshine. Because of the cider and fruit juice, this version is slightly sweet, incredibly smooth and resembles spiked apple cider much more than paint solvent. And it is good. Really, really good.

Big Sis’s “Make Ya’ Holler” Apple Pie Moonshine
1 gallon of spiced apple cider
1 gallon of apple juice
8-10 cinnamon sticks
1 1/2 cups granulated sugar
1 1/2 cups brown sugar
1 large bottle (750ml) of good vodka*
7 quart-size Mason jars with new lids

In a large stock pot, combine all ingredients EXCEPT for the vodka. Cook over medium-high heat, stirring often, until the mixture comes to a boil. Shut off the heat and allow the mixture to cool completely. Once cooled to room temperature, stir in the vodka and ladle it into sterilized canning jars. Drop one of those used cinnamon sticks into each jar, wipe the rim of the jar with a clean damp cloth and top with a sterile canning lid & ring.

Caution: Big Sis says this stuff will knock your head off if you try it right away, and no one wants that. Instead, seal it up and let it sit for 3-4 weeks to mellow. You’ll be glad you did. When we cracked that first quart at Hoegarden, you could sip it straight from the jar it was so smooth. I think Big Sis could have a brilliant future as a moonshiner if she wanted.

Apple Pie Moonshine can be served hot or cold, as a mixer or straight up. Since it was chilly for Hoegarden and Sister #4 built a glorious fire in the fire pit, we chose to add a quart of it to a half-gallon of apple cider and serve it hot like a toddy. And it rocked that toddy. If it had been sweltering, I could picture this stirred into a pitcher of freshly brewed iced tea with fresh sliced apples. Yum.

Apple Pie Moonshine - Finished - Inside NanaBread's Head

Disclosure: Full credit for this recipe goes to Mallory Jane of Hayseed Homemakin’ blog. Mallory Jane makes hers with *everclear* (pure grain alcohol at 190 proof), which can be really expensive and hard to find. We substituted a good quality vodka, which worked really well and significantly lowered the alcohol content (to 80 proof). To see the Hayseed Homemakin’ version, click rat-cheer. Thank you, Mallory Jane, for sharing your recipe and putting the hooch in our hoedown.

39 Comments

Filed under Food & Recipes, Hoegarden Weekends

Fun With Felt: Roadkill Rice Bags

Last weekend was our annual “ladies only” family gathering we call Hoegarden. Since it was held at my sister’s new place in the country, we decided to go with a “Lowdown Hoedown” theme. Food for the weekend included fried chicken, a pancake breakfast, fried pies and waaaay too many snacks. But my favorite thing was the gifts we all pulled together. There was Bacon Grease hand cream, Apple Pie Moonshine and Trailer Trash snack mix. Let’s just say we took full advantage of this year’s theme.

Here’s a look at one of the gifts I made. I hope you’ll take it in the spirit of fun with which it was intended. {I’m talking to you, PETA.}

Road Kill Rice Bags - Tabled

I mean, if you’ve got a boo-boo and you need a hot or cold pack, why not make them fun? Can you imagine the excitement these could cause when someone opens your freezer to find a dead cat or dog? Each is crafted from felt and filled with raw rice. They can be thrown in the freezer when you’re in need of an ice pack OR heated in the microwave for 2 minutes when you need a heating pad.

Road Kill Rice Bags - Turtle & Cat
The turtle went to Sister #5 (The Baby). She was always dragging critters home when she was little. I’m allergic to most cats, so this one is perfect for me.

Road Kill Rice Bags - Rabbit & Mole with Cactus
The mole & cactus is for Sister #4. She has a Loggerheaded Shrike (bird) in her neighborhood that’s famous for impaling moles on top of prickly pear cactus. It has been a running gag since we found the first one last Thanksgiving. Now none of us can drive through her neighborhood without slowing down at the cactus to see if the shrike has been there. Morbid, but fascinating.

Road Kill Rice Bags - Dog, Armadillo, Owl & Pig
That dog was for Sister #1 (Big Sis). Her husband won’t let them have a dog, so I took care of that for her. The armadillo was for my niece, and the little pig & owl were for the grandbabies in the group. They’ll be exposed to our twisted sense of humor soon enough, but for now they get the cute stuff.

Road Kill Rice Bags - Cardinal & Fox
My mother got this cardinal; she’s big on birds. And I love how the fox for My Baby turned out. He’s adorable, even with tire marks.

Speaking of, the tire tread marks were created with a Magic Eraser sponge. I cut three channels lengthwise to create the tire grooves, then went back with scissors and cut little notches along each channel to make them look like tire treads. From there, I dipped the sponge into a charcoal gray fabric paint and painted tire tracks across each animal’s tummy. I’m not going to lie – I could not stop laughing while I was making these.

To package them, I put a toe tag on each critter and placed them into a small black trash bag. Each bag was sealed with a twist-tie and a gift tag.

Road Kill Rice Bags - Tags

The only thing more fun than making these was the squeals and laughter when they were opened. It was hysterical. Yes, we’re kind of weird, but we also really know how to make each other laugh. Roadkill Rice Bags may not be a traditional gift, but they are all kinds of hilarious fun.

NOTE: No actual animals were harmed in the making of this roadkill.

27 Comments

Filed under Craft Projects, Hoegarden Weekends

Flourless Dark Chocolate Peanut Butter Biscoff Cookies {that’s a mouthful!}

Peanut Butter Cocoa & Biscoff Cookies - Inside NanaBread's Head

Try saying that three times fast. It’s a mouthful of title, but it’s also a mouthful of cookie. I thought about naming them “Pantry Cleaner Cookies” because that’s what I was doing when I thought of these. I found a half-empty jar of peanut butter and half a jar of Biscoff. Could they be combined? Is that legal? After a quick tweet to my Biscoff guru Megan, I decided to go for it. And if you’re going to combine peanut butter with Biscoff, why not throw in some dark chocolate because that’s how my mind works. And because more is… MORE!

For these cookies you will need:
1 1/4 cups creamy peanut butter
1 1/4 cups Biscoff cookie butter
1 3/4 cups brown sugar, packed
1 package (5 ozs.) vanilla instant pudding mix
3 large eggs
1 1/2 tablespoons vanilla extract
1 1/2 cups Hershey’s Special Dark cocoa powder
2 teaspoons baking soda
1/8 teaspoon salt

The vanilla pudding mix may seem odd, but my friend Beka put it in her peanut butter cookies for Sweets Week and they looked amazing, so I went for it. Using the paddle attachment (if you have a stand mixer), combine the peanut butter, cookie butter, brown sugar, dry pudding mix, eggs and vanilla extract until incorporated. Stop and scrape down the bowl, then turn the mixer to medium high and beat for 5 minutes more, or until the brown sugar is no longer gritty.

Stop the mixer; add the cocoa, baking soda & salt. Beat until all dry ingredients are thoroughly blended. Stop the mixer and check your cookie batter. It may seem a little dry, but should hold together when you pinch it into a ball.

Remove the beater and pour the dough out onto your work surface. I dumped mine onto a sheet of waxed paper, forming a line of dough about 18″ long. Using your hands, smash the cookie dough into an even log and wrap it in the waxed paper. Secure each end by twisting; you can secure it with a chip clip or rubber band. Once wrapped, roll the cookie dough log as if it’s a rolling-pin, making sure the entire roll is uniform in circumference. Pop the roll of cookie dough into the fridge for 1 hour or freezer for 30 minutes to make it easier to slice.

Once chilled, remove from the fridge or freezer and pre-heat your oven to 350F. Using a sharp knife, cut the roll of dough into 1/2″ slices. Note: I like my cookies thick and chewy. If you like yours thin & crispy, slice them thinner. If you intend to glaze yours like I did, leave them in smooth slices. If you’d like to skip the glaze and eat them plain, you can use a fork to make traditional hash marks on the top of each cookie. To glaze or not to glaze? That is the question.

PBCB Cookies - Slice & Bake - Inside NanaBread's Head

Lining your cookie sheets with parchment or Silpat mats; place cookies 1″ apart. Pop them into the oven while the dough is still very cold and bake for 10-14 minutes depending on how crispy you want them to be. As I said, I like mine thick & chewy, so I baked each batch for 12 minutes. They were still soft in the center and just beginning to crack around the edges like so. If you like them thin & crispy, watch them starting at 10 minutes, and check often so they don’t burn.

PBCB Cookies - Baked to a Crackle - Inside NanaBread's Head

Can I just take a minute to say that one of my favorite things about baking cookies is when I have them all out on the counter, in all stages of ‘in progress’. There’s something about seeing them out there, with all the steps visible, that makes me feel like I’m accomplishing something.

PBCB Cookies - Cookie Station - Inside NanaBread's Head

Remove from the oven and allow to cool on the cookie sheets for at least 5-10 minutes before moving them onto sheets of parchment to cool completely. Because these are flourless, they are more fragile when warm. Move them too soon, and they may crumble. Now – glaze or no glaze? I vote glaze!

Dark Chocolate Peanut Butter Glaze:
1/2 cup creamy peanut butter
1/2 cup powdered sugar
4-6 tablespoons Hershey’s Special Dark chocolate syrup
2-3 tablespoons milk

Place the peanut butter in a microwave safe bowl and heat on high power for 30 seconds to soften it. Sift in the powdered sugar and whisk until incorporated; add the chocolate syrup and whisk until smooth. If it gets too thick too quickly, pop it back in the microwave for another 30 seconds. At this point, it will be too thick to pipe, so add 1 tablespoon of milk at a time until the mixture is glossy and the texture of a thick caramel sauce.

I like to put a quart freezer bag into a drinking glass (folding the top over the edge of the glass) and scrape the glaze into the bag using a spatula. To glaze the cookies, press the air out of the bag and twist the bag to press the glaze into one corner. Snip the tip off the corner and pipe immediately onto the cookies.

PBCB Cookies - Inside NanaBread's Head

I push mine close together and use a straight line motion, moving back & forth over each row. But if you’re feeling frisky, you can always:

PBCB Cookies - Swirled Glaze - Inside NanaBread's Head

Allow them to sit for 1-2 hours, until the glaze is firm to the touch. Store in airtight containers. Kept in the fridge, they should last up to 2 weeks; un-refrigerated, they should be good for 5-6 days (if they last that long). If you’ve got a cup of coffee or a glass of milk, these will be all kinds of dangerous.

PBCB Cookies - Finished - Inside NanaBread's Head

PS: These are for our annual ‘ladies only’ spring fling weekend, Hoegarden. I’ll get back to you next week and let you know how these went over, if I survive it. Want to find out more? Click on ‘Hoegarden Weekends’ on the right sidebar under Tidbits You Can Choose From. We are THAT family. No apologies. None.

PPS: If peanut butter is a no-no in your house due to allergies, you might try swapping Sun Butter for peanut butter. My friend Kisten does it often, and she swears by it. And I would give Kirsten a kidney, so if I can trust her so can you.

PPSS: I don’t really have a third one; I just wondered if you’d keep reading. :D

23 Comments

Filed under Food & Recipes

DIY Craft: Zippered Cosmetic Bags

Tired of losing stuff? Need a new bag for your purse or for travel? Want to make a quick homemade gift for family or friends? Well, I have the perfect tutorial for you! Our annual “Ladies Only” family weekend is rapidly approaching so I made these for the ladies. If I can do it, so can you! Same bag; two fun patterns.

Colorful stripes or stylish black & white - both are fun!

Are you familiar with oilcloth? It’s that fabulous retro fabric used mainly to make tablecloths. It has a plastic-coated outer layer and a soft fleecy flannel lining, which makes it perfect for these little cosmetic bags. It’s durable and washable. And if you have a great fabric store in your area, you can potentially find fabulous prints, solids or stripes to work with. You will, of course, need a sewing machine with a zipper foot to create these at home but if you’ve got that, you’re half way there.

For each bag, you will need:

1 rectangle piece of oilcloth (8 1/2″ x 11″)
1 heavy-duty 7″ metal zipper in a coordinating color
thread in a coordinating color
1 6″ piece of ribbon in a coordinating color

To start, cut your oil cloth into a rectangle. I used a standard piece of printer paper as my template, since it measures 8 1/2″ x 11″.

Next, cut the rectangle in half to make two equal pieces that are 8 1/2″ x 5 1/2″. You’ll also need to cut two tabs (1.5″ x 1.5″ square) for the zipper.

Using those small squares, you’ll need to stitch them on each end of the zipper. First fold one side under 1/4″ to create a finished end. Place that end up against the end of the zipper and pin into place. You’ll want to do this on both ends of the zipper, then double stitch into place.

Next, grab a side and fold one long edge under 1/4″. With the zipper closed, center the folded edge along one side of the zipper and pin it into place.

Using the zipper foot, stitch along the folded edge making sure you sew off of both ends. Also note that once you get close to the zipper, you’ll need to remove a few of the pins you just sewed over, raise the zipper foot, and unzip the zipper so that you can get past the zipper head without messing up your stitching. Don’t worry. It’s not as scary as it sounds. The pins you’ll remove to unzip the zipper will be in the area you just stitched, so it’s all good. Once you’ve stitched all the way across one side, remove the pins and do the same on the second side.

Using the same method, sew the second side of the bag along the zipper. Once both sides are stitched on, it should look like this.

Now that your two sides are stitched onto your zipper, you’re almost ready to fold it up and sew it shut. One important tip – before you do, be sure to unzip the bag half way. Otherwise, you’ll stitch your bag shut and the zipper pull will be on the inside. Unzipping that bag is going to be really difficult if the zipper pull is on the inside and the bag is sewn shut. (Live & learn, kids. Live & learn.)

So, once you’ve unzipped the zipper half way, fold the bag in half so that the “good” sides are facing each other and pin it to keep it from slipping as you sew.

Here are close-ups of the zipper ends and how they’re pinned.

See that white peeking out of the ends of the zipper? That’s what those tabs we sewed onto the ends were for. They cover that gap in the zipper so you have a nice finished edge when we’re done. I’ll show you another close-up of that in a moment. For now, start at one end of the zipper and using a 1/4″ seam allowance, sew around the three open sides of the bag. If you want, you can stitch around it twice. I just use the “back up” button on my machine and go over those top edges and the bottom corners a couple of times to reinforce them.

Here’s a close-up of those reinforced corners. Snip that corner off before you turn the bag right-side-out to get a good, crisp finished corner.

Turn the bag inside out and using a chopstick or other bluntly pointed object, gently poke the corners (top & bottom) to pop them into place. This is where you’ll be really glad you unzipped that bag halfway. Here’s a closer look at how those corners at each end of the zipper should look. It’s also a good look at how those tabs we sewed on in the beginning come into play. They really do help give a cleaner edge to the finished bag.

One last finishing touch – a ribbon as a zipper pull. It’s not necessary, but it adds a decorative touch and it does come in handy. You’ll need one piece of ribbon in a coordinating color, about 5 or 6 inches long. Fold the ribbon in half to make a 3″ length, then roll the cut ends together and poke them through the little hole in the end of the zipper pull.

Here’s another great tip – use Fray Check to seal the ends of that ribbon and keep it from unraveling. You can find it at fabric stores, and it’s worth keeping around. It really does work. If you wash the bag, retouch with Fray Check.

That’s it! Here’s a look at the finished bag.

If you’re going to use a striped oilcloth, be sure to match stripes when you sew these together. It makes a big difference in how they look once finished.

Same goes for those little tabs you sew on each end of the zipper. If you take a moment to lay all this out before you start pinning, you can even line up the stripes on those end tabs so they match as well. It takes a few more minutes of planning, but it’s worth it in the end. Sometimes, it’s the little things.

One last helpful tip. If you’re going to be making multiple bags, it goes faster if you cut each bag and lay the parts for each bag together. I also stitched all of the tabs onto the zippers before I started sewing bags together. It saved time by allowing me to just grab a zipper and go when I was ready for the next bag.

I hope you’ll jump in and try these. They’re fun to make, and don’t really take a lot of effort or time. If you have any questions, feel free to leave a comment or shoot me an e-mail. If you make them and post pictures, let me know where I can see them. I’d love to see how yours turn out.

And to my mother, sisters, nieces, daughter, granddaughter and all the ladies who’ll be coming to visit next week – surprise! You’ll be getting one of these. Feel free to call dibs on your favorite – stripes or print. They’ll be filled with swag, and they’re going to go fast.

PS – Do I need to apologize for that nail polish color? It is kind of a spastic, groady green. Sorry you had to see that. I was experimenting for St Patty’s Day. Don’t worry… it’s coming off. It’s true what they say. It’s not easy being green.

27 Comments

Filed under Craft Projects, Hoegarden Weekends

From Fail to Fabulous

I made homemade tortillas to go with fajitas last night. The flour tortillas turned out great. The corn tortillas were an abomination. They were too dry. Too thick. Too awful. C’mon! It’s corn masa, salt & warm water. How hard can this be? I was tempted to throw them away, but I didn’t. As a corn tortilla lover, I was totally bummed. So bummed, I didn’t even make margaritas. That’s how bummed I was. Those of you who know me well are now probably saying, “Ahh, HELL no! She did NOT skip the margaritas!” I know! I know.

Homemade Corn Tortillas - great taste; terrible texture

The Complete Package is working from home today, so for lunch I took my short stack of awful corn tortillas and I fried them up in a little canola oil. Presto… homemade tostadas! My issues with texture went away when these little beauties crisped up in hot oil. With toppings like leftover grilled fajita beef, slow-cooked refried beans, grilled poblano peppers and homemade pico de gallo and guacamole, we turned drab into fab. I wish you could have been here. These puppies were fabulous! I think they will be going on our Hoegarden Weekend menu this spring (am I right, ladies?). I could eat these every day.

Homemade tostadas - holy cow, these were awesome!

Lessons learned:
1. never give up
2. be creative
3. there is nothing wrong with leftovers; not one little thing
4. when life gives you crummy corn tortillas, make tostadas!

On a scale of 1 to 10 (as my friend Kat likes to say), these were clearly 11/10. Thanks, Kat. You are SO right.

16 Comments

Filed under Food & Recipes

Hoegarden 2011: That’s a wrap!

I learned something important at this year’s Hoegarden. I didn’t take nearly enough photos. I have no one to blame but myself. I had my camera, I just didn’t pull it out often enough. I got caught up in all the fun. For instance, we ate really well over the weekend, but I didn’t capture most of the food. I did get this photo of Friday night’s pulled pork sandwiches with Asian coleslaw and a dreamy baked potato casserole. Oh, those potatoes! It was a fabulous Friday dinner.

This little piggy went wee wee wee, all the way...well, let's not go there.

Did you notice the sandwich? It’s on a little piggy bun! Our mother made those. From scratch. They were delicious and adorable. Until BBQ sauce started oozing out of their eyes. Then it got a little horror showish. But they were still delicious! We also had a tropical couscous dish for dinner Saturday. It was a mixture of pearl couscous, grilled peppers and pineapple tossed with The Pioneer Woman’s “Aunt Trish’s Salad Dressing“. I told you I’d find another use for it! We topped the couscous with grilled shrimp and chicken, and used the rest of the dressing on a green salad with grilled halloumi cheese. Didn’t get a photo of that, either.

Rainbow Tie-Dyed Cupcakes: photo courtesy of Andrea at http://www.canyoustayfordinner.com

The biggest food photo loss, in my opinion, was getting so wrapped up in Big Sis’s tie-dyed cupcakes that all thought went out the window – except to stuff one in my face. They were rockin’ and they were gorgeous. Easily the prettiest cupcake I’ve ever eaten, and it tasted even better. Also fabulous was Mom’s coconut pound cake with pineapple and macadamia nuts. I fully intend to share that recipe with you in the near future. It’s unbelievably moist and fabulous!

To add to your disappointment, there was no one-handed croquet this year. Between the food, the board games and the manicures, we just never made it outside for croquet. It’s not like us to pass up an opportunity to play, but it never came up. For the uninitiated, we have a long-standing family tradition of setting up an extreme obstacle course croquet field, then making everyone play with a drink in one hand and their mallet in the other. If you spill your drink or get caught with an empty glass or bottle, you lose a turn. One round can take hours. It’s hysterical, especially if you’re NOT the one with the empty glass.

Here’s some of what we did manage to capture from the weekend:

There were manicures & nail polish. Lots of nail polish. Photo courtesy of Sister #3.

We played board games. Lots of board games. Ever played Dirty Minds?

The older girls got to spend time with the younger girls.

And the youngest girls got to know each other better.

Yes - we had a boy join us this year, but we didn't scar him too badly. I hope.

Most of all, we just enjoyed hanging out together.

Although I should have taken more photos, at least we had beautiful weather, great food, fruity tropical beverages, and three glorious days of quality time together. It’s not often that 12 members of any family can get together and have this much fun. It’s why I look forward to this weekend all year. Time with four generations of the girls is a rare and wonderful gift. One I truly appreciate. And now that this post is done, I’m ready to start planning Hoegarden 2012. Wahoo!

14 Comments

Filed under Hoegarden Weekends

Hoegarden 2011: The Shopping

Well, it’s over. I can’t believe it went by so quickly! This past weekend, four generations of family females gathered for our sixth annual Hoegarden weekend. As usual, it was three fabulous days of food, fun, mani/pedis, board games, shopping and fruity umbrella cocktails. Last year, we had snow and freezing temps as a freak storm crashed the party. This year, it was gorgeous with temps in the low 80’s, a good stiff breeze and beautiful, sunny skies. What a difference a year makes. As is our custom, we spent Saturday shopping. This year, we descended on downtown McKinney, Texas with 12 family members in a 3-car caravan. Our group included our mother, myself and my four sisters, three granddaughters and one young grandson (he was a good sport) and two toddler great-grandaughters. Our mom spawned a large brood, and we took McKinney by storm. It was a blast. Here’s a peek. Click on any photo to enlarge.

Plum Creek Primatives is loaded with antiques, gifts and unique treasures.

Friendliest shop was the Loco Cowpoke; favorite browsing goes to the antique shops.

Happiness is Quilting - it's a great fabric store, and I love this cute owl purse!

Favorite purchase: the antique typesetting drawer I hung in my sewing room

McKinney's downtown square & the family (or most of us, anyway)

To learn more about McKinney’s Main Street, visit their website at: http://www3.mckinneytexas.org/www/mainstreetdefault.aspx

Special thanks to our waiter, Ryan, at Rick’s Chophouse. Lunch was fabulous!http://www.rickschophouse.com/

9 Comments

Filed under Hoegarden Weekends

Hoegarden is here! Hoegarden is here!

That’s right. It’s time to pack up the board games, nail polish and booze and head to north Texas for our annual “girls only” estrogen festival known as Hoegarden. Four generations of females will descend on Sister #1’s house for three days of mani/pedis, chick flicks, board games, antiquing, shameless snacking, fruity umbrella cocktails and one-handed croquet. If you’re in the area and are overrun by a large herd of boisterous females, I apologize in advance. We may be loud, but we’re a lot of fun and completely harmless. Our snark is worse than our bite, I promise. I’m out until Monday doing my girlie thang. Have a great weekend, everyone. Photos and stories to come next week, so stay tuned!

Sisters + Wax Lips + Aprons = Flo & Nadine with their daily blue plate special.

5 Comments

Filed under Hoegarden Weekends

It’s not easy being green…

Ladies, I’d like your opinion. On a scale of 1 to 10, how obnoxious is my new nail polish? It’s totally not me, but I couldn’t resist it…like a jelly donut when you KNOW you don’t need it. I found it at the grocery store, and picked it up for St. Patrick’s Day and our annual Hoegarden “girls only” estrogen-filled weekend coming up in March. So tell the truth…does it make you nauseous, or does it scream “wow, she’s a fun girl” or does it inspire you to put on a pair of short shorts and go outside? Does it make you think of Kermit the Frog or the split-pea soup fiasco of The Exorcist? Do you want to hurl your Thin Mints, or does your heart sing with a sense of reckless abandonment? I really want to know. Before you vote, however, I should also tell you that I bought a vibrant turquoise color to go with it. Couldn’t stop myself. Blue and green are my favorite colors. As you can tell from this second photo, the green alone was not enough for me. At The Complete Package’s urging, I painted turquoise spots onto my neon lime nails. Why not? As long as there’s nail polish remover in the cabinet and cotton balls in the drawer, why NOT go nuts once in a while. Party like a rock star. Lose your mind. Free your soul. Act like a 14 year old girl. Live life on the edge. Over dramatize the fact that you painted your normally nude nails. You only live once, right? Here’s your chance to put in your 2 cents. Tell the truth, ladies…what do YOU think?

Note: The nail polish I purchased is Sally Hansen’s Insta-Dri Fast Dry Nail Color in #450 Lickety-Split Lime and #430 Brisk Blue. They’re wild, they’re wonderful, and they dry within minutes. What’s not to love about that?

22 Comments

Filed under Miscellaneous Thoughts