Category Archives: Craft Projects

I converted my daughter’s room into a sewing room when she got married. Now it’s my refuge for sewing, crafting, quilting and all things creative.

Gettin’ Snappy with OXO

I know.  I know.  It has been a while, but I’m still here.  Since we last spoke, we’ve settled into our new home in Austin, done a little sightseeing to get acclimated, and decided we love it here. We love our home in the hills. We love Austin and all that it offers. We love our new neighbors and friends. And we love being closer to our daughter and grandkids.

We never did get around to sharing pictures of the new house, so I’ll work on that next, I promise. Not to make excuses, but it has been really hopping around here. Because of that, I’ve been focusing more on quick & easy meals. Not just those that can be thrown together quickly like a grilled cheese and tomato soup, because who doesn’t love a grilled cheese with tomato soup, but those that can be prepped in advance and put on the table quickly.

This weekend, this new OXO 14-piece glass baking set made meal prep a snap. I’ve talked about this before, but OXO’s Blogger Outreach Program has allowed me the opportunity to try new products at no cost to me when I’ve been lucky enough to be selected to participate. All that’s required is an honest opinion.  I love that, and I love their commitment to clever, thoughtful design.

OXO Bakeware Set - INBHblog

Case in point – this OXO 14-piece glass bakeware with snap-on lids. This stuff is heavy-duty. It also appears to be tough as nails. I took mine for a spin with a quick and easy Shrimp & Grits and a super snappy pumpkin snack cake for dessert. I had planned to post a big Texas-style cookout, but it will NOT. STOP. RAINING. HERE. So instead, I’ll share this supper in a snap.

I used the round bowls to prep my dinner ingredients in advance. It took about 15 minutes to dice, clean and prep everything I’d need for dinner.

MisEnPlace - Shrimp Ingredients - INBHblog

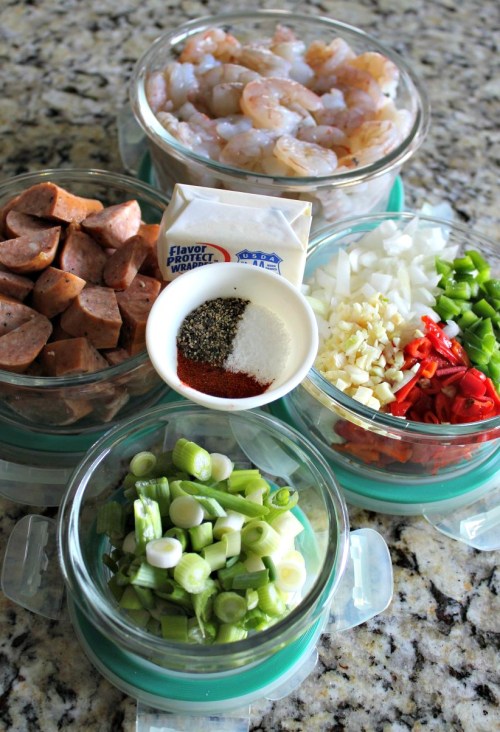
Smoked sausage, shrimp, peppers, onions & garlic, a handful of green onions, and salt, pepper and cayenne pepper. Oh, and half a stick of butter. I love butter. Butter, butter, butter. I butter everything.

Once I had it prepped, I snapped on the lids and made a tower of dinner. Literally.

OXO Bakeware Prep Bowls Ready & Stacked - INBHblog

That tower went straight into my fridge and I went on with my day.

OXO Bakeware Prep Bowls in Fridge - INBHblog

Later, when we were getting rumbly, I grabbed my goodies and took them to the stove. I grabbed my favorite non-stick skillet and this is where the magic happened.

MisEnPlace - Ready to Start - INBHblog

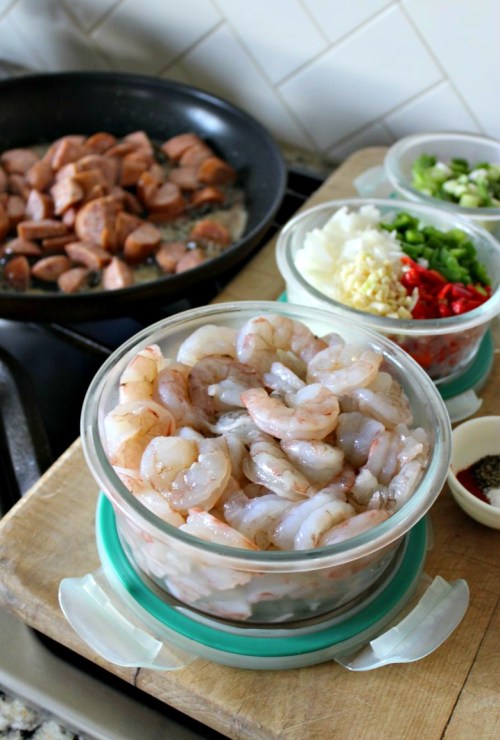
I threw a tablespoon of olive oil and half a stick of butter (butter, butter, butter – I always say it three times) and turned it up to high. The sausage went in first, until it took on a little color, then the shrimp went in just until they curled and turned pink. Then the meat came out and the veg went in.  Like adult swim.

OXO Bakeware - Cooking Veg - INBHblog

I left those until they got good and gooey brown. Look how pretty. Pretty, pretty, pretty.

OXO Bakeware - Browned Veg - INBHblog

Then I tossed the sausages and shrimp back in, splashed in a squeeze of lemon juice and a splash of white wine, and let it simmer just long enough to make a little pan sauce.

OXO Bakeware - Shrimp & Grits Cooking

What do you do with all of this? Glad you asked. You serve it on cheese grits.

For those, you just need stone-ground grits, half-n-half or cream, water, salt, pepper and cayenne, and butter (butter, butter).

MIsEnPlace - Grits Ingredients - INBHblog

In a heavy saucepan, I combine water, half-n-half (or milk or cream), the seasonings, and… well, you know what (3x). Once that comes to a simmer over medium heat, I slowly whisk in the grits and keep whisking until it really starts to thicken up and come together. If it gets too thick, like wall paper paste thick, just add more water or milk. Once they’re done, stir in a good handful of grated parmesan cheese. Other than lumps, you really can’t screw this up.  Look at those gorgeous cheese grits. Grits, grits, grits. Greee-uts.

Parmesan Grits - INBHblog

Put a big creamy spoonful of this in a bowl, then ladle on that pretty sausage and shrimp mixture. Top with a big spoonful of that pan sauce. It makes those grits sing.

OXO Bakeware - Finished Shrimp & Grits - INBHblog

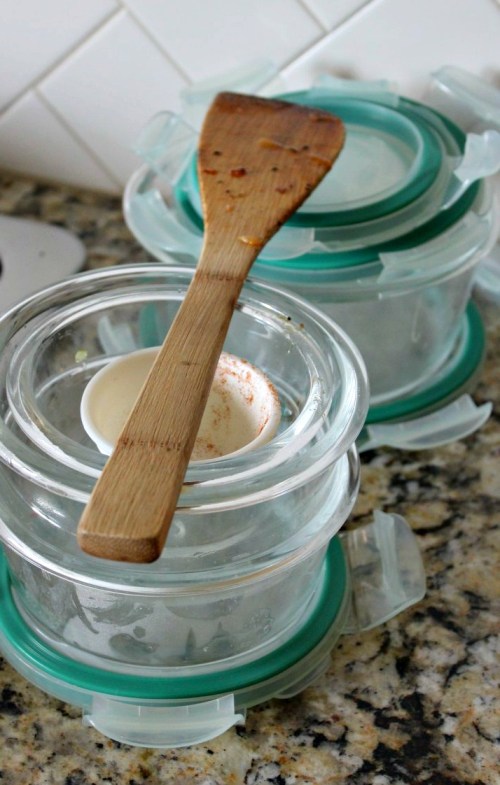
Mmm, mmm, mmm…. I wish you could smell this. It’s amazing how simple some foods can be. And even better, you should see how easy clean-up was.  One skillet, one wooden spatula, and this. For real, yo. Bowls & lids. Super easy.

OXO Bakeware - Easy CleanUp - INBHblog

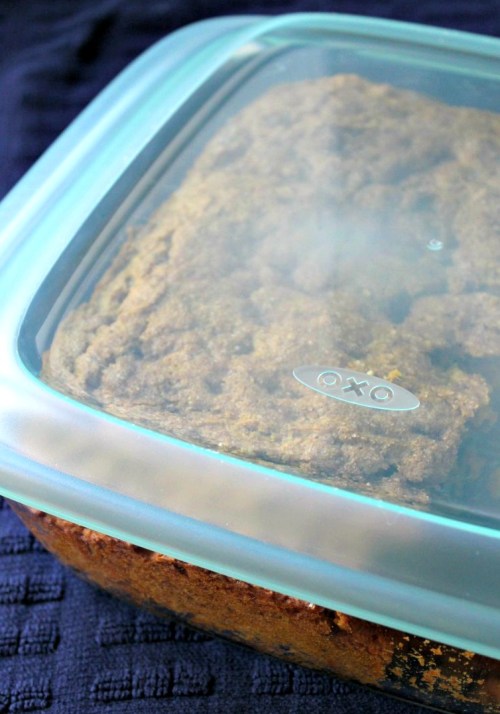
I know OXO says this set is dishwasher safe, but I baby things I love. It’s an obsession. For example, every time I use my stand mixer, I detail it with Clorox wipes and toothpicks before I put it away. Yes, it’s ridiculous, but that puppy looks brand new and I’ve been abusing it for years. In this case, I hand washed my lids and bowls. I can foresee a day when I may put them in the dishwasher. I am willing to consider it. And maybe the freezer, because they say I can right there on the box and I trust them. I really do.

Whats Included Box Label - INBHblog

Because you can’t read the entire box from there, here’s what you need to know:

Both Glass Bakeware and SNAP Glass Food Storage are made of thermal shock resistant borosilicate glass, which means the Bakeware can go from freezer to oven or microwave without cracking – both lines can withstand up to 250 degrees Fahrenheit of temperature change

  • Glass Bakeware
    • Raised, slosh-proof lid for easy transportation and storage without squishing your baked goods 
    • Convenient, easy-to-read size markings on the container
    • Wide, comfortable handles that work with oven mitts
  • SNAP Glass Food Storage
    • Lids are interchangeable between SNAP Glass line and SNAP Plastic line 
    • Stackable and nestable
    • Microwave safe (lid is too, just undo the tabs first!)
    • Leak-proof seal

I can attest to the leak-proof seal. I made a fresh tomato & cucumber salad with a vinaigrette dressing in the larger bowl last week. Every 30 minutes, I flipped the bowl to make sure everything marinated. Like I literally turned it upside down and set it lid side down for 30 minutes, then flipped it again and again for 3-4 hours. It never leaked. Not a drop. But back to today’s meal.

I’m also sharing another quick and easy favorite. One that’s embarrassingly easy and super that-word-that-rhymes-with-hoist. Like dump cake easy, but I’m not calling it that because gross.  It’s a one-bowl pumpkin nut cake and it’s perfect for the square baking dish. The only prep for this one is spraying the pan lightly with cooking spray and grabbing a bowl & whisk.

OXO Bakeware - Pumpkin Cake LineUp - INBHblog

In a bowl, combine a yellow cake mix, a can of pumpkin (not pumpkin pie filling but plain canned pumpkin), a handful of chopped pecans (optional), and half a stick of butter (confess: did you say it three times just now?) melted first. I also throw in some ground cinnamon, but you can also use pumpkin pie spice if you have it in your pantry. Whisk this up. It will be a little thick and it will smell delicious, but you have to bake it first.

OXO Bakeware - Pumpkin Cake Batter - INBHblog

Spread this in a square baking dish and smooth it out into the corners like this. Then sprinkle it with a combination of raw sugar and ground cinnamon. This is where my pumpkin spice candle obsession comes from. I’m sure of it.

OXO Bakeware - Pumpkin Cake Ready to Bake - INBHblog

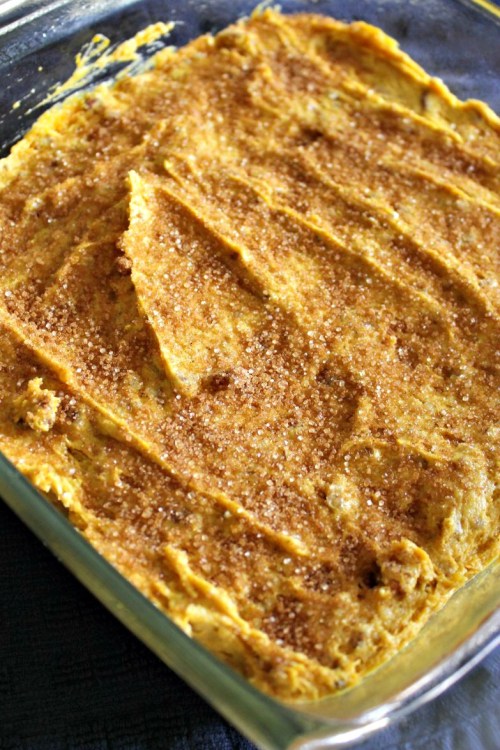
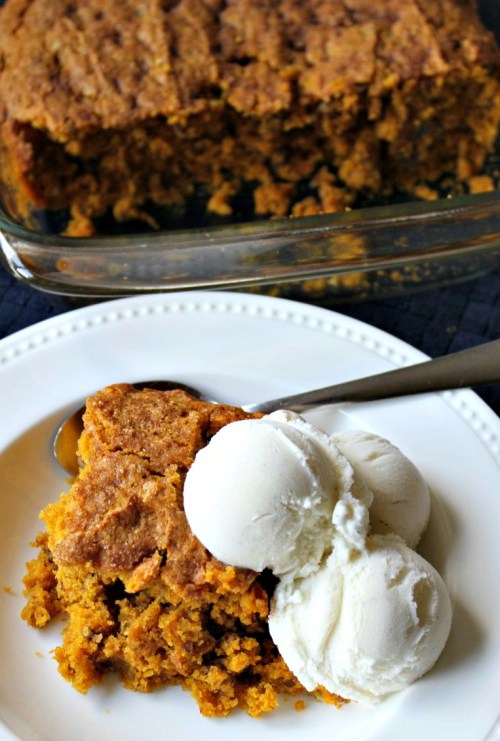
Bake at 350F for 25-30 minutes, or until a toothpick comes out clean. Let it cool for a good half hour or so, if you can stand it, then cut it into squares and serve it warm with vanilla ice cream. You can thank me later.

OXO Bakeware - Pumpkin Cake a la Mode - INBHblog

You’re welcome. (;

And guess what?  The square and rectangle baking dishes come with snap-on lids, too.

OXO Bakeware - Square with SnapOn Lid - INBHblog

This set makes cooking just about anything a snap. And that’s one of the reasons I love OXO. They really do think of everything. I’m giving the OXO 14-piece glass bakeware set with snap-on lids two thumbs up. And if I had more thumbs, I’d put those up, too. I’d use my big toes, but that’s gross.

Please Note: As a member of the OXO Blogger Outreach Program, I am occasionally selected to participate in campaigns featuring new products. These products are sent to participating bloggers at no cost to them. They are asked only to share their honest opinion of said products. Everything you read in this post is my honest opinion. If you’d also like to participate, visit the OXO Blogger Outreach homepage for more information.


16 Comments

Filed under Craft Projects

Sew Busy: Embroidered Tote Bags

Sometimes when I start on a craft project, I have a hard time stopping. Pacing is not really my thing. A few weeks ago, Big Sis came down for a weekend and I dragged out a handful of embroidery ideas I’d found on Pinterest, along with a few fabrics to pair them to. Once we gathered the supplies to pull it all together, I became obsessed. Like nine bags in a week obsessed. Intervention, anyone?

Now I’m not crazy. There is a story behind my stitching. These lined shopping totes are intended for our annual Hoegarden Weekend, that magical time when the females in our family gather to shop, antique, play board games, cook, snack and break out the croquet mallets. Here’s a peek at what I’ve been up to, and who’s already claimed what.

The “How I Roll” Camper Bag
Camper Bag

Camper Bag close-up

Sister #3 has already laid claim to this one, sight unseen. She has a thing for campers and as soon as she heard it was in the works, she called dibs. I love the colors – so whimsical and fun.

The “Runs With Scissors” Bag
Runs With Scissors Bag

Runs With Scissors Bag Detail

I made this one with Mom in mind. As a life-long quilter and seamstress, it suits her to a T. She has spent a lifetime teaching the five of us every type of craft – from knitting to sewing to embroidery to, well you name it. Red is her color, and this fun bag will be perfect for transporting supplies back & forth to her Cozy Quilters meetings each Wednesday. Hope she likes it!

The “Make A Wish” Dandelion Bag
Dandelion Bag

Dandelion Bag close-up

This one is mine. I love the color & patterns in the print, but most of all I love the simplicity of it. I’m not letting this one go, no matter how hard they wish.

The “Nerdy Hooter” Tote
Owl Bag

Owl Close-Up

I didn’t name this one, my daughter did when she laid claim to this bag. She fell in love with this cute, sassy owl. The bag is lined in a cute owl print, as well. As a first grade teacher, her class will love it. And it’s large, which makes it perfect for bringing her work home each night.

The “Sleep Under the Stars” Bag
Camping Under the Stars Bag

Camping Under the Stars close-up

I made this one with our Baby Sister in mind. She’s always loved camping, and with her son in Boy Scouts, they get the chance to practice their camping skills often. I especially love the animal print. Check out their cute chevron tails! If The Baby wants this one, she’d better mark her territory quickly.

The “French Knot Flowers” Bag
French Knot Flowers Bag

French Knot Flowers Detail

So…many…knots! But I love how the flowers turned out. I like to think of them as firework flowers. As a button enthusiast, this one makes me happy. The bright colors of the bag and lining are so cheerful.

The “Bee Happy” Bag
Bee Happy Bag

Bee Happy Detail

Speaking of happy…this cute bee was one of the first bags I tackled. To make the wings stand out, I painted a thin layer of iridescent opal fabric paint before stitching on the details. Extra layers of thread on the bee body make it slightly 3-dimensional and the colorful floral print seemed a natural choice.

The “Don’t Bug Me” Bag
Chevron Bug Bag

Chevron Bug Bag close-up

Bees don’t have all the fun. This little chevron cutie is paired with a vine & flower print and was inspired by the tiny bugs in the print. The eyes are vintage gemstone buttons scored at an estate sale this summer. Too cute.

The “Let’s Get Swept Away” Bag
Swept Away Bag

Swept Away Close-Up

And last, but certainly not least, this adorable ‘swept away’ bag was made with my niece (K) in mind. Big Sis thought her baby would love it. There’s so much promise in the design, and so many opportunities in life to get swept up in. It’s not just a bag, it’s a motto. No pressure, K. You can choose another bag if it speaks to you (even though she’s blonde & adorable like you).

Swept Away Detail

I got totally swept up in this project, and I’m not quite done yet. Big Sis is working on her own embroidered front panel featuring a vintage bicycle, and once she’s done she’ll send it back so I can finish it to match the others. There are also plans to make small bags for our two littlest girls (both 5 years old). Four generations of crafty females in our family make me so proud to be a part of it.

What was the last craft project you got swept up in? -jeanne

24 Comments

Filed under Craft Projects, Family Stuff

Getting Crafty with Pin Cushions

There’s a bee in my bonnet – Lori Holt’s Bee In My Bonnet blog. It’s spectacular. I often drool over her beautiful website with its plethora of quilts, her line of custom-designed fabrics and patterns, and adorable craft tutorials.

Pin Cushion Crafts - Finished Lawn Chair Pin Cushion

This lawn chair pin cushion tutorial is one of my favorites. It starts with a metal lawn chair candle holder sourced from the dollar store. Mine is a vibrant shade of teal. From there, you just need a few basic items from the craft store.

Not pictured - loose quilt batting (a.k.a. fluffy stuff).

Not pictured – loose quilt batting (a.k.a. the fluffy stuff).

I love this bright argyle print. It’s perfect for my tiny teal chair. To start, I measured the width and length of the chair. Stitching around three sides, I then turned it right-side-out and stuffed the ‘seat’ with batting. A quick stitch across the width of the cushion helped divide the seat from the back. The seat gets twice as much batting so the pins have something in which to rest. The back of the cushion gets a light stuffing and then the top is stitched shut.

Pin Cushion Crafts - Lawn Chair Pin Cushion - Overview

To keep the cushion in place, I opted to stitch a color-coordinated ribbon to the back of the cushion and tie it to the chair. It can be hot-glued into place, but I opted for a ribbon so I can use it as a candle holder or blog prop at any time.

Pin Cushion Crafts - Lawn Chair Pin Cushion Collage

The last small detail, and I do mean small, is the button tufting on the cushion. Using tiny white buttons from the craft department at Hobby Lobby, I used embroidery thread to attach them at intersecting lines on the argyle print. Pulling the buttons tightly and stitching them down at the back creates that cute tufted cushion detail. And you don’t have to worry about the stitching showing on the back because the metal covers it. Perfect!

Pin Cushion Crafts - Button Detail Close-Up

Okay, before I let you go I have to show you one more cute pin cushion idea I saw on Lori’s Instagram feed. She made a tiny travel-size pin cushion out of plastic Easter eggs. For real! They could not be cuter, so of course I had to try it. Tis the season, after all. Here’s how mine turned out.

Pin Cushion Crafts - Easter Egg Pin Cushion Collage

Those glittery Easter eggs are from WalMart. I love the colors and texture. The fabrics are remnants from my fabric basket. This one it just too easy. To make, cut a 4″ circle of a color-coordinated fabric for each egg. Stuff it with quilt batting and pin or tie it into a ball. Use a glue gun or quick-drying craft glue to glue it into the bottom of the egg and allow it to dry completely. Once dry, add pins and presto! A tiny portable pin cushion you can pop in your pocket.

Pin Cushion Crafts - Easter Egg Travel Sewing Kit

I went a step further and added a few safety pins and two needles pre-threaded with tan and black thread to convert it to a portable sewing kit. I can toss this little gem into my cosmetic bag for travel and never have to worry about losing a button again. Even better, these would make perfect gifts for a Ladies Only weekend. Thanks for the inspiration and tutorials, Lori!

Pin Cushion Crafts - Easter Egg Pin Cushions - Dozen

If you love to get crafty or just appreciate true creative genius, visit Lori Holt’s Bee In My Bonnet blog. The links to these tutorials are imbedded above, or can be found by clicking here:

Lawn Chair Pin Cushion Tutorial at Bee In My Bonnet Co.
Apron Water Bottle Cover – Bee In My Bonnet Blog
Easter Egg Pin Cushion – photo on Lori Holt’s Instagram feed

4 Comments

Filed under Craft Projects, Things I Love

DIY: Girly Decorative Pillowcases

DIY Pillowcase - Finished Collection Collage

Feeling crafty? I am! Our OKMH gang is getting together for a weekend in just 10 days, and I’m beyond excited. All seven of us under the same roof for the first time ever? It’s going to be epic! As a special treat, I made pillowcases for the girls – bright, colorful, girly pillowcases. What’s a girlfriends weekend for, after all, if not pampering, shopping, cocktails and flashy floral prints?

This is my simple DIY tutorial for decorative pillowcases.

For one queen-size pillowcase, you will need:
one yard of cotton quilting fabric (42″ wide x 36″ long)
one 6″ x 44″ piece of a coordinating solid
one 44″ piece of 1/2″ grosgrain ribbon
thread to match
felt & embroidery floss, to make a monogram (optional)
one tiny color-coordinated button (also optional)

Start by washing and ironing your yard of quilting fabric and the coordinating solid, then trim off any scraggly threads along the unfinished edges.

DIY Pillowcase - Loose Threads

Fold the yard of quilting fabric in half lengthwise with the good sides facing each other. Because quilting fabrics come from the factory with finished edges, this means your longer sides will already be ‘finished’ and only the top & bottom of the pillowcase will need to be edged to keep it from unraveling.

DIY Pillowcase - Factory Finished Edges

Pin the long side of your pillowcase and stitch it twice, so it’s extra sturdy. CAUTION: some fabrics have white edges and print along the finished edges. Be sure to stitch inside that line so this doesn’t show on your finished pillowcase. I’ll show you what I mean.

DIY Pillowcase - Double Stitched Edges

Here’s a simple trick for stitching the bottom of the pillowcase. Because the edges are ‘raw’ they can unravel when washed. I like to use bias tape to cover the raw edge. It helps create really sharp edges when the case is turned right-side out. Place your bias tape halfway beneath your unfinished edge, leaving at least 1/2″ of excess tape on each end. Fold the edges in so they’re flush with the edge of the fabric, then bend the bias tape in half to cover the entire edge and pin it into place. Double stitch all the way across to secure the tape. When done, trim off your thread tails and turn the case right sides out. Use a ruler to push your corners into a perfect right angle, and press your pillowcase.

DIY Pillowcase - Bias Tape Collage

Now we’re ready to tackle the opening and decorative trim. For the opening of the pillowcase, I turn the raw edge under 1/2″ and press, then turn under 1/2″ again and pin it in place. Again, double stitch for a more professional finish.

DIY Pillowcase - Finished Hem Collage

If you’re making a simple pillowcase, you can stop here. But if want to embellish, a simple ruffle with ribbon trim is a great way to go about it.

DIY Pillowcase - Ribbon Collage

1. Fold your solid trim fabric in half lengthwise and lay it on your finished case. I like to place the folded edge about 1″ from the finished opening of the case.

2. Lay out the ribbon, aligning it so that it just overlaps the cut edge. Pin the ribbon and ruffle into place so that the two edges meet at the side seam.

3. Stitch it all into place. I like use a ribbon with decorative stitching, and sew just along both sides of that stitching.

4. To join the two ends, fold one edge of the ruffle fabric in about 1/2″ and press it flat. Tuck the unfinished edge inside to hide it. Fold one end of the ribbon under 1/4″ or so and pin it to cover the other end of the ribbon. To finish, stitch across the folded edge of the trim to close it.

5. One last flourish – monogramming.

Do you have to monogram your pillowcases? No, but it does add a nice finishing touch and it’s easier than you think. Using your computer, open a Word document. Type in the initial you need and change the font until you find one you like. Play with the font size so that the finished letter fits easily on your solid border. Then hit ‘print’ and grab your paper off the printer. Roughly cut out a square around your letter and pin that square onto a piece of felt. Using sharp scissors, cut out the letter. When done, pin it to your solid ruffle and sew it on with your machine OR by using a simple stitch and a contrasting embroidery floss. (This one is machine-stitched. The others below are hand-stitched.)

DIY Pillowcase - Finished & Rolled

I took this one a step further with an iron-on flower and a small felt butterfly because this one is for the young daughter of a friend. I hope she’ll love her butterfly with pearls. For the ladies, I embroidered the monograms and finished them with a cute little button in a contrasting color.

When done, I folded the pillowcases and tied them shut with a coordinating ribbon. Here’s a look at some of the finished pillowcases for our first One Kitchen Many Hearts weekend. I just love how they turned out.

DIY Pillowcase - Finished Cases Collage

There’s so much joy in a handmade gift, and I admit I had a ball making these! Even better, the ladies will all have a keepsake from our first weekend together. Now I just need them to hurry up and get here. Not that we’re watching the clock or anything (we’re all totally watching the clock), but SHAKE A LEG, LADIES! We need to get this party started!

13 Comments

Filed under Craft Projects, Things I Love

DIY: A Pink Ombre TuTuTorial

Lilly Bug, our sweet spunky granddaughter, just turned four. FOUR! Can you believe it? We can’t. To celebrate her big day and her inner ballerina, I whipped up an easy pink ombre tutu inspired by Pinterest and just in time for her first ever dance classes. The best part – it only takes a few items from the store and about an hour of your time.

It starts with a specific type of stretchy headband. I found a set of 5 in various colors for only $3 at my local HEB (grocery) store. Two were pinks. Bonus!

Lilly's Tutu - headband starter
Next, you’ll need three shades of pink tulle, sold in 6″ wide rolls. I purchased a pale pink, medium pink and deep raspberry pink. To cut it into even lengths, I used a piece of cardboard that was 8 1/2″ x 11″ (or you can grab a picture frame off your shelf). Wrap the tulle around the 8 1/2″ side of the frame multiple times, then cut along both edges to create a handful of 8 1/2″ lengths of tulle. Start with 40 pieces in each shade, but be prepared to cut a few more, if needed.

I love how easily this comes together – NO SEWING! It’s all hand tied.

Tutu Collage1

1. Place the headband around a roll of paper towels to hold it in place.
2. See the gaps? We’ll be looping tulle through them, starting at the top.
3. Fold one piece of tulle in half and bunch it together at the fold.
4. Working along the top row, stick the fold through & make a 1″ loop.

Tutu Collage2

5. Grab both loose ends and pull them through the loop.
6. Gently pull the ends until it is firmly knotted.
7. Skipping one hole, start the process again.
8. Work around the headband until you have one row of the lightest pink, then repeat the process in the middle of the headband with the medium pink, and then around the bottom edge with the deepest pink. If your tulle is cut in advance, it will take approximately 30-45 minutes to complete the tutu. So easy!

This is how it looks on the inside of the headband when you’re done. Clean, simple, with no loose ends and plenty of stretch left in the headband.

Lilly's Tutu - Tied On

This is how it looks on the outside. I love the ombre effect!

Lilly's Tutu - Finished

Lilly's Tutu - Ombre Detail

If you have any tulle sticking out in odd places, simply trim them with a pair of scissors until all of the tulle is uniform in length. That’s it! Easy peasy tutu breezy. Because it was for Lilly Bug’s birthday, I tied it to the top of her other presents and put a flower on it to create a big fluffy bow.

Lilly's Tutu - Flower On Top

Lilly's Tutu - As Gift Topper

She really had no idea it was a tutu until she untied it to open her packages. It was so much fun. And here’s our little ballerina showing it off.

Lilly's Tutu Collage

Oh, Lilly Bug. You really are too sassy & cute for words, girlfriend!

21 Comments

Filed under Craft Projects, Family Stuff

Fun With Felt: Roadkill Rice Bags

Last weekend was our annual “ladies only” family gathering we call Hoegarden. Since it was held at my sister’s new place in the country, we decided to go with a “Lowdown Hoedown” theme. Food for the weekend included fried chicken, a pancake breakfast, fried pies and waaaay too many snacks. But my favorite thing was the gifts we all pulled together. There was Bacon Grease hand cream, Apple Pie Moonshine and Trailer Trash snack mix. Let’s just say we took full advantage of this year’s theme.

Here’s a look at one of the gifts I made. I hope you’ll take it in the spirit of fun with which it was intended. {I’m talking to you, PETA.}

Road Kill Rice Bags - Tabled

I mean, if you’ve got a boo-boo and you need a hot or cold pack, why not make them fun? Can you imagine the excitement these could cause when someone opens your freezer to find a dead cat or dog? Each is crafted from felt and filled with raw rice. They can be thrown in the freezer when you’re in need of an ice pack OR heated in the microwave for 2 minutes when you need a heating pad.

Road Kill Rice Bags - Turtle & Cat
The turtle went to Sister #5 (The Baby). She was always dragging critters home when she was little. I’m allergic to most cats, so this one is perfect for me.

Road Kill Rice Bags - Rabbit & Mole with Cactus
The mole & cactus is for Sister #4. She has a Loggerheaded Shrike (bird) in her neighborhood that’s famous for impaling moles on top of prickly pear cactus. It has been a running gag since we found the first one last Thanksgiving. Now none of us can drive through her neighborhood without slowing down at the cactus to see if the shrike has been there. Morbid, but fascinating.

Road Kill Rice Bags - Dog, Armadillo, Owl & Pig
That dog was for Sister #1 (Big Sis). Her husband won’t let them have a dog, so I took care of that for her. The armadillo was for my niece, and the little pig & owl were for the grandbabies in the group. They’ll be exposed to our twisted sense of humor soon enough, but for now they get the cute stuff.

Road Kill Rice Bags - Cardinal & Fox
My mother got this cardinal; she’s big on birds. And I love how the fox for My Baby turned out. He’s adorable, even with tire marks.

Speaking of, the tire tread marks were created with a Magic Eraser sponge. I cut three channels lengthwise to create the tire grooves, then went back with scissors and cut little notches along each channel to make them look like tire treads. From there, I dipped the sponge into a charcoal gray fabric paint and painted tire tracks across each animal’s tummy. I’m not going to lie – I could not stop laughing while I was making these.

To package them, I put a toe tag on each critter and placed them into a small black trash bag. Each bag was sealed with a twist-tie and a gift tag.

Road Kill Rice Bags - Tags

The only thing more fun than making these was the squeals and laughter when they were opened. It was hysterical. Yes, we’re kind of weird, but we also really know how to make each other laugh. Roadkill Rice Bags may not be a traditional gift, but they are all kinds of hilarious fun.

NOTE: No actual animals were harmed in the making of this roadkill.

27 Comments

Filed under Craft Projects, Hoegarden Weekends

The Mouse Project

You guys… I thought the 50th birthday shenanigans ended on Thursday when my blogging besties threw me a virtual birthday party, but no. They upped the ante with what has been known on Twitter as #TMPWatch2013. When it first popped up in my Twitter feed, I admit – I ignored it. I have goofy friends and there’s always some kind of ‘watch of the week’ going on. But when they started mentioning crafts, injuries, cat-tastrophes and swearing, it got my attention. Eventually, I wailed “I WANT IN!” Bet that got a laugh.

Kat stepped up and explained that it was a craft project. A “stitch & bitch” of sorts. She even produced a photo of an apron she was working on. There was embroidery of cilantro. (Yes, cilantro.) But she was a deceiver because that apron was distraction bait. They were scheming behind my back. My suspicions were confirmed when six boxes arrived, all with the same taunt written across the outside – “DO NOT OPEN UNTIL ALL PACKAGES ARRIVE”.

Three days I waited. There was a lot of tweeting back & forth. I kept saying “I can’t stand it!” and they kept saying “Don’t you dare touch them until they’re all there!” When the final box arrived last night, it was on like Donkey Kong. I did my best to live tweet as each box was opened, but I couldn’t help but wish they were all perched in my living room drinking margaritas with me.

Side Note: Now I know why my Felt Mouse Tutorial got so many hits last month.

Here’s a photo line-up of The Mouse Project. I still can’t stopped laughing.

Collage - Kirsten
So many wonderful things in Kirsten’s box. The mice are hilarious. Old MouseDonald comes with a pig that oinks (and the eyes light up). The Ranger Mouse was a joint project with her oldest son. He sent a book to go along with it. There’s Laverne & Squirrely, a travel mouse, a pie baker, Jeanne Cash (dressed in black & an inside joke with TCP), and an adorable garden gnome mouse complete with shears. Bonus swag: Danish chocolate & girly bling. Hey, Kirsten… I think this birthday brought both Freaked Out and peeing my pants a little.

Collage - Allison
Allison’s mice are a perfect blend of sweet, touching and hilarious. Examples:
Duchess Emouska – who look a little like Cruella DeVille; she rocks zebra print
Mousy Gras – raise your hand if you know how she got all those beads
Dr. Pellet – the mousetroenterologist reminding us to help prevent colon cancer
Havarti Marti – she’s here for the party; we’re gonna get along fine

Allison always keeps me in stitches. Even her card made me laugh out loud.

Collage - Carrie
I don’t know who to feel sorrier for – Carrie or her Vlad the Impaler mouse. She had the week from hell and yet still made time to make these mice. There’s a lady mouse in pearls, a gentleman mouse in a bowtie, Little Willie who sings Texas classics on his guitar, and the mouse that was obviously the last straw. Yes – those are real sewing needles protruding from his body, and yes – she shipped it that way. I’d love to know what her post office thought. Not just for the voodoo-like use of needles, but for the toddler meltdown that went with shipping it. Despite it all, her mice are testimony to her perseverance. Thank you for hanging in there, Carrie. I am completely charmed.

Collage - Megan
Sweet Megan. She writes the blog Country Cleaver. In her blog archives, you’ll find the story about how she chose the name for her blog. It involved a photo shoot in which she did her best June Cleaver impersonation. She channeled her Country Cleaver persona into this sweet little mouse, complete with a stylish apron and pearls. I’m guessing she loves Nutella and salmon, although not at the same time. I’m also pretty sure she’s addicted to Downton Abbey and all things Royal. Her dream man can wield an ax and wear flannel like a boss. She’s lovely and has her act together, just like Megan.

Collage - Monica
Meet Leilani. She is the Spirit of Aloha, and she traveled the furthest to be here. She is sporting the latest in swimwear from the great state of Hawaii and bears the traditional greeting of a lei. This cutie is the creation of Monica, the Grommom, who shares her life homeschooling four adorable surfer dudes (groms) without seeming to rub our noses in the fact that she lives in paradise. Her tropical flair brings sunshine into our lives and her iPhone shots of sunsets and beaches inspire us. Monica is a doll, and so is her sweet mouse.

Collage - Beka
Beka of Kvetchin’ Kitchen is many things – smart, funny, strong – but I had no idea she was a crafter. She is responsible for most uses of the hashtag #AllTheSwears on Twitter while #TMP2013 was being chatted about. Girlfriend has hidden talents, and felt mice is one of them. Who knew? Beka made five mice, but one got ripped to shreds by her cats. Such a shame. We could have created a killer Walking Dead diorama for him. But let’s celebrate the survivors – a mustached gentleman with an engagement ring at the ready, a sweetie holding a pink rose who I suspect is about to say “Yes!”, a Mouscasso portrait (very creative) and The Birthday Queen, complete with royal crown & scepter.

Collage - Katie
I think it takes a fellow Texan to understand why a tie-dyed “Keep Austin Weird” mouse named Leslie would make me furiously happy, and Katie from The Hill Country Cook is just that Texan. Her mice are so reflective of her personality – fun & fabulous. There is a polka dot “Surprise!” mouse, a little sweetie hugging a birthday candle, and a trademarked Peace, Love & Baking mouse. Those symbols on the bottom of the blue mouse are a peace sign, a heart and a whisk. Peace, Love & Baking is how Katie ends each blog post, so it’s only fitting that one of her mice bears her emblem. Also stashed in Katie’s box – a mylar birthday banner & a party horn. Party on, Katie!

Collage - Madeline
I think it’s safe to say that Madeline surprised us all. We had no idea she was a closet crafter. Check out her mice. There is a sweet gray mouse in an apron with buttons, a daring hot pink lady bringing the bling, a sweetheart of a purple mouse embellished with red heart buttons (five hearts representing the fact that we both come from families with five girls), and the most adorable little aviator mouse complete with flight wings and a tiny toy airplane. Wow. Just wow.

Collage - Kat
Of course Kat, our resident fashionista, would go full-on glamorpuss. She created not one but SIX fearless females she calls the “Cougar Cocktail Conga Mice”. Here it is in Kat’s own words: “They’re all named Tammy. Naturally, they’ll paint your nails, tease your hair and cover you in rhinestones. It’s just how they operate.” Only Kat would send All The Tammys. It’s like ZsaZsa Gabor had a box of mice babies, and they are priceless! All is forgiven for the great Cilantro Apron Deception, Kat. All is forgiven. PS – they came with hooch!

Collage - Mads
Next up was Mads’ two mouse besties – Mildred & Sophie. They’re the Thelma & Louise of mice. Mildred just turned 50, and just like me she likes to stir up mischief and enjoys a good Bloody Mary. Her BFF Sophie is more inclined to pink fruity cocktails and riding in convertibles. Together, they are unstoppable and despite a few incidents involving glue they still look marvelous. Must be all that sunshine and beautiful weather on the California coast. Real Mousewives?

Collage - Anne
Anne of From My Sweet Heart blog is known for her beautiful desserts. Each of her sweet creations is a masterpiece and each will have you licking your computer screen. It should be no surprise then that she would channel that same artistic ability into felt mice, but we were still surprised. Just look at her beautiful works of art – there is a sweet berry-laden Flour Power mouse, a pie maker wielding a spatula, a cookie baker complete with cookie jar and slotted spatula, a rolling pin baker who loves her job, a sweet pink donut mouse (a girl after my own heart), a hot pink party mouse, and a sweet cotton candy confection that is as sweet as her treat. From My Sweet Heart in mouse form. Bravo, Anne. Bravo!

So much love. So much fun. So much anticipation followed by so much squeeing. And so many back stories – both for the mice and for all the secrecy, the glue gun & sewing needle injuries, and the swearing. Apparently there was a LOT of swearing. Beka’s two cats even brought violence and drama to the mix. RIP Unknown Soldier. You will not be forgotten.

To all the ladies who helped make my 50th birthday one for the record books, thank you a MILLION times over. Words can’t express not only how much I feel loved, but how much I love each of them in return. Some day we’ll all get together, and when we do it will look like one of those rugby tussles where all the sweaty men tackle each other and roll around on the ground. Except that we’ll be laughing instead of sweating. Everyone knows women don’t sweat – they mist.

PS – Special thanks to Kirsten, whom I suspect was the ringleader in all of this, but who is too modest to take the credit. Blame. No, credit. It was ALL amazing. I never saw any of this coming, so either she is a Super Sneak, or I am a mullet. Please refrain from voting out loud. Thank you.

PPS – I have no idea how I’m going to display all these mice, but rest assured that they will not be hidden away and forgotten. If I have to ask The Complete Package build a wall of shelves in my sewing room, so be it. (Right, honey? Right pookie bear? Right snoogie oogums? Right sugar booger? Honey? Hello?)

37 Comments

Filed under Blogger Collaborations, Craft Projects, Things I Love

Photo Tutorial: How to Make Felt Mice and The One That Got Away

Felt Mouse Tutorial - 1Header with Text

You asked for it; you got it. Following my post on the felt mouse invasion we launched upon my sister’s new home in the country, some of you requested a step-by-step tutorial on how to make them. Here’s my attempt. If you have any questions at the end of this, leave a comment and I’ll do my best to clarify.

To start, print my mouse pattern on an 8.5″ x 11″ standard sheet of paper.

Felt Mouse Tutorial - Printed Pattern

There are two patterns on the page – one for a large mouse and one for a small. Cut the page in half, and then you can decide if you’d like to make a large or small meeska buddy. For this tutorial, I’m using the large.

Felt Mouse Tutorial - Pattern Cut in Half

Carefully cut out the pattern pieces. I like to cut just outside the line since it will be trimmed off as I cut the felt. I’m a visual person & this helps me somehow.

Felt Mouse Tutorial - Cut Out Pattern Pieces

Next, you will need:
1 felt square in the color of your choice for the body
1 felt square (or piece of one) in a contrasting color for ears
embroidery thread (also called floss) that matches the body color
quilt batting or cotton balls for stuffing
an embroidery needle with a sharp point
black beads or buttons for eyes (2 per mouse)
small black pompom for nose (1 per mouse)
black embroidery thread for whiskers
sharp scissors & clear craft glue

I decided on a pale grey felt for this tutorial because it photographs well. For the ears, I chose black to show off the stitching. So, let’s get started.

First, fold your body felt so that it’s wide enough to fit the main pattern piece.

Felt Mouse Tutorial - Place Body Pattern on Fold

The long straight edge on the left should lay directly on the edge of the fold. You can pin the pattern pieces down if it helps, or simple hold tight and cut along the arched edge of the pattern. Sharp scissors are a must for me.

Felt Mouse Tutorial - Body Cut on Fold

At this point, I like to go ahead and cut out all the pieces. I’m a process girl – cut all the pieces, stitch all the pieces, connect all the pieces.

Felt Mouse Tutorial - Pattern Pieces Cut Out

If you’re not a certified anal retentive like me, you can cut & work one piece at a time. It’s really a matter of whatever you’re comfortable with. Once you’re ready to sew, the first step is to pick a thread color that matches the body.

Felt Mouse Tutorial - Pick a Thread That Matches the Body Color

I chose this nice grey shade; it’s a great match. Did you notice the spool? It’s actually a foam wine cork. Can we sidetrack for a minute? I want to show you how I reorganized my embroidery thread. I was inspired by a bag of horribly tangled embroidery thread and some heavy cursing (don’t ask).

Felt Mouse Tutorial - My Organized Thread Box

After untangling all my embroidery thread, I grabbed my jar of foam corks and a sharp paring knife. First, I cut a slit in the top of each cork; then I cut out a shallow “V” notch at the top of the slit.

Felt Mouse Tutorial - Corked Embroidery Thread

Using a strip of blue painter’s tape, I secured one end to the side of the cork. I then wrapped then entire skein of embroidery thread around the cork, leaving approximately 1 1/2 to 2″ as a ‘tail’ to tuck into the slit on top. The ‘V’ helps you find the slit in the top of the cork (because corks tend to self-heal when cut) and the deep slit holds the thread firmly in place. Once all your thread is corked, they can be easily stored in a metal tin or plastic tub with a lid. I used this metal tin because it was big enough to lay all the corks flat, which made it easier to see which colors I have. It also gave me enough room to store a pin cushion, extra packages of needles, a pair of scissors and a small embroidery hoop. I love it.

Felt Mouse Tutorial - My Embroidery Box

Now back to the mice! I like to use an embroidery needle with a nice deep hole because I’m turning 50 in March and it would take me all day to thread a smaller needle – even with reading glasses. Here’s a snap of what I’m talking about, in case you decide to pick some up at your local craft store.

Felt Mouse Tutorial - Embroidery Needle With Deep Eye

That deep, wide hole makes it easy to thread embroidery thread through the eye of the needle. It’s especially handy if you’re using all 6 strands at once. Did I just lose the beginners? Let me clarify. Embroidery thread is made up of 6 strands of thread twisted together. If you want bold stitching, you use all 6 threads. If not, you can separate out threads to use as many as you like. For stitching up these mice, I used 3 threads (except for the whiskers, when I used all 6). It helps to cut the length of thread you want to use BEFORE trying to separate threads. I like to work with a piece about 18″ long most of the time.

So, starting with a needle threaded with 3 strands of your embroidery thread, grab the body felt, fold it in half (just as you did when you cut it) and let’s start at the bottom (or wide) end. I use a straight stitch for this.

Felt Mouse Tutorial - Evenly Spaced Stitches are Key

Unless you’re planning to fashion a costume for your mouse, it’s important to keep your stitches evenly spaced. It makes a big difference in how the finished mouse looks. Just take your time. When you reach the tip of the nose, tie a good knot, then run your needle through the felt into the cavity of the body. Cutting the thread inside the mouse hides any loose ends when it’s knotted. I do this to all the pieces to make the finished part neater. When done, it will look like this:

Felt Mouse Tutorial - Body - Stitched on the Curved Side

If you have a bag of quilt batting (fluffy filler) lying around the house, grab it. If not, you can use cotton balls. They’re much cheaper than a bag of quilt batting, and you won’t need many to stuff a mouse. I find that 6-10 cotton balls are usually enough to stuff a large mouse. First, I like to stretch them out and fluff them up a little. It makes for a less lumpy mouse.

Felt Mouse Tutorial - Stuffing - Cotton Ball Stretched Out

Grab a cotton ball ‘strip’ and gently stuff it down into the nose. If it helps, you can close your scissors and use the pointy end to gently push the cotton into the tip of the nose. Then add additional cotton until the mouse is filled.

Felt Mouse Tutorial - Stuff Lightly With Cotton Balls or Batting

When I first started, I overstuffed my mice to the point that they were too firm. I didn’t think much of it until I tried to sew on the other body parts. If your mouse is overstuffed with filler, you’ll have a hard time running your needle through the body to attach other pieces. Plus, I’ve found that a less-stuffed mouse just looks better. When I’m happy with how stuffed my mouse is, I like to form a ring of cotton to put at the very bottom.

Felt Mouse Tutorial - Stuffing - Finish with a Cotton Coil

That little cotton ring forms a base so your mouse will sit up properly when he’s done. Now grab your circle you cut for the bottom and let’s put it into place.

Felt Mouse Tutorial - Bottom - Placing the Bottom Panel

Grab your needle and thread and stitch the bottom onto the mouse. As usual, if you start your knot inside the body cavity it won’t show when it’s finished.

Felt Mouse Tutorial - Bottom - Hide Knot Inside Before Stitching

Watch your stitching so it’s evenly spaced again. This part is going to show.

Felt Mouse Tutorial - Attaching the Bottom

When you’re done, tie a good knot to secure it and trim the loose threads at the end off. If you start and end at the ‘spine’ seam, you won’t have to worry about the knot showing. We’re going to cover it with the tail later.

Felt Mouse Tutorial - Parts - Prepped & Ready to Assemble

And now you’re ready to assemble the other body parts. Try not to notice that some of mine are already finished in the background of that photo. We’ll get to all of those in a minute. For now, let’s start with the ears. Grab one of your ‘outside’ pieces and center the contrasting center piece on top.

Felt Mouse Tutorial - Matching Ear Pieces

Feel free to move the inside color around until it’s centered and you’re happy with the way it looks. If it overhangs the outside color at the bottom edge, just trim off the excess felt. Once you’re happy with it, grab your needle and stitch it down. I love to use the body color so it shows up as contrast stitching on the ear. Again, I like to start with my knot on the back side so it doesn’t show.

Felt Mouse Tutorial - Ear - Hiding the Starting Knot

I’m not sure what this stitch is officially called, but I like to run my needle past the next stitch, then come back to make each ‘loop’. Why? Because it allows me to barely run my needle through the depth of the grey felt so my stitches aren’t as noticeable on the back of each ear.

Felt Mouse Tutorial - Ear - Detail Stitch Shown

If you’re not concerned about the back of the ears, just do a regular stitch to secure it. You’re using embroidery thread in the body color, so it’s not a big deal. Again, I’m anal retentive and I tend to get hung up on little details like that. I apologize. Here’s what it looks like when it’s done:

Felt Mouse Tutorial - Ear - Finished Detail Stitch

You don’t need to worry about tying a knot at the end, because we’re going to immediately fold the ear in half at the bottom edge and stitch it closed.

Felt Mouse Tutorial - Fold Ear in Half at Bottom Edge

Stitch across the straight edge at the bottom of the ear, just as you did when you sewed the body together, then tie a knot to secure it. All done!

Felt Mouse Tutorial - Finished Ear

Now do the same to the other ear, and we’re ready to stitch them onto the body. I like to start by placing the first ear (facing forward, of course) about 1″ from the tip of the nose, and about 1/3″ to 1/2″ from the seam of the ‘spine’. Then stitch it down (be careful not to go through the mouse and out the other side or you’ll sew your mouse shut); knot it and snip off the end. Like this:

Felt Mouse Tutorial - Attaching the First Ear

To make sure I get the second ear in the correct position, I line it up like this:

Felt Mouse Tutorial - To Place 2nd Ear - Line Up with First

You can pin it into place if that helps. Just make sure you reach inside the mouse body to make sure you’re not pinning or sewing all the way through the other side. Once both ears are attached, you can pry them open and move them up or down a little until you like how they look.

Felt Mouse Tutorial - The Ears Are On

Ready to make a tail? Me, too! Grab your tail piece and make sure you have enough thread in your needle. I hate to start a piece and have to stop and tie knots in the middle. Once I start a piece, I like to go to the end without stopping. I know! I told you I have issues! Don’t be like me. Just grab your tail (heehee)… I mean grab your mouse tail, and fold it in half at the bottom edge. We’re going to sew it up just like we did the body.

Felt Mouse Tutorial - Fold Tail in Half & Start Stitching at Base

Do you have a problem with your nails getting brittle and splitting and breaking off in the winter? I do. Drives me crazy. Anywho, stitch up your mouse tail until you get as close to the tip as possible. You’ll see what I mean when you get there.

Felt Mouse Tutorial - Fold Tail in Half & Stitch Edge to Tip

The more narrow that tail gets, the tougher it is to stitch it shut. When it’s done, it should look something like this:

Felt Mouse Tutorial - Finished Tail

Now grab your mouse body, and we’ll attach it at the ‘spine’ seam.

Felt Mouse Tutorial - Attaching the Tail

I find it easier to flip him upside down.

Felt Mouse Tutorial - Tail - Line Up Tail w Base - Tail Pointing to Head

And now your tail is attached. Here’s the bonus to all that tail stitching – it gives it enough structure to bend and shape the tail any way you want, which gives your mouse more personality. You can thank me later. So now you’re ears and tail are on. Congratulations! You’re almost finished.

Felt Mouse Tutorial - Almost There

Let’s move on to arms. I think the arms are what makes these mice so adorable. And versatile. A mouse with arms can do just about anything. More on that later. For now, grab an arm piece and we’ll stitch it up just like we did the tail – starting at the flat end. Stop when you get to the part where the palm flares, and secure with a strong knot. I like to run the thread back down through the arm before I cut it so the knot doesn’t show.

Felt Mouse Tutorial - Tuck the Thread Tail Down Into Arm

Here’s where I just get crazy stupid excited. I LOVE making these arms and hands. It adds so much personality to your mouse. And it’s seriously fun. Grab your scissors, and let’s start cutting fingers for your mouse.

Felt Mouse Tutorial - Hand - Cutting the First Finger

Using sharp scissors, remove little curved triangles to form 4 fingers.

Felt Mouse Tutorial - Hands - Trim Triangles Out to form Fingers

Gah! Isn’t that adorable? I just love these little mouse hands.

Felt Mouse Tutorial - Finished Arm

When both hands are done, we’re ready to stitch the arms on. I like to attach them both at the same time by pinching them together on the ‘spine’ seam.

Felt Mouse Tutorial - Arms - Attaching to Body at the Spine

I really stitch these down well, so I’ll go over it twice before I knot it off. Here’s what I mean when I say arms give these mice such character.

Felt Mouse Tutorial - One Body Down - One Face To Go

Felt Mouse Tutorial - Yo - Can a Mouse Get a Face Here

Felt Mouse Tutorial - Papa Can You See Me

See? They don’t even have faces yet, and they’re starting to come to life. This must be what being an animator feels like. Please say you’re just as crazy about this as I am so I don’t feel like a total craft geek. Please.

Maybe we should just move on to faces. Every mouse needs whiskers. For this, I use all 6 strands of the embroidery thread. Tying a knot about 1″ from the end, I pull the needle through the end of the snout (about 1/4″ from the tip). The knot stops the whiskers from pulling all the way through.

Felt Mouse Tutorial - Sewing Whiskers Onto Snout

Once it’s through, cut the second side to the same length as the first (1″). To secure them, I use a toothpick and apply a small dab of clear craft glue at the base of both sides of the whiskers. Tip: just as wax is used by men to keep handlebar mustaches in line, so goes Chapstick for wee little mousetaches – keeps those whiskers separated & stylish.

Next, we’ll place the eyes. If I’m not sure where I want to put them, I grab a few straight pins with the balls on the end. I just keep jabbing the mouse in the head until I like how it looks. If you need to, mark the spot with a pencil.

Felt Mouse Tutorial - Testing Eye Placement With Pins

I buy shiny round beads for the eyes and tiny pompoms for noses. (They love me at Hobby Lobby.) Once I sew them down, I hit them with a dab of clear craft glue just to make sure they’re securely attached.

Felt Mouse Tutorial - Beady Eyes & PomPom Nose

You’re done! Now you’re free to embellish your mouse any way you see fit. For this one, I created a flower from an antique button. I thought it would be sweet to have her holding a flower, since she’s making new friends here.

Felt Mouse Tutorial - Finished Mouse - Hello Cutie

It almost looks like a bridal bouquet. Which is an insight into how my mind works. Now that I’ve seen her and thought ‘bridal bouquet’, there’s a good chance I’ll end up making a wedding dress and veil for her. Because in my mind, more is more; and more is better.

And that brings me to The One That Got Away from Sister #4.

My Big Sister and I started this mouse project separately, but there came a time during the summer when Mom decided to visit and Big Sis decided to join us. At that time, we committed to combining the mouse tribes into one big happy family and finish it together so we could tag them and box them up in one tidy bundle. We made the last few mice together while sipping cocktails and chatting around the living room coffee table.

And that’s where Grandpa FisherMouse came to life. He was the very last mouse I crafted, and I fell so head-over-heels for him, I told the girls I wasn’t sure I could turn loose of him. I mean… could you?

Felt Mouse Tutorial - Grandpa FisherMouse - Basket Side

I just love him. He has a fishing net with a few small fish in it. And a fishing pole with one on the hook (and there’s a bobber on the line). He even has a fishing vest with teeny tiny buttons and a trout basket.

Felt Mouse Tutorial - Grandpa FisherMouse - Vest Close-Up

This is where that anal retentive attention to detail comes into play. Sometimes I can’t stop myself. He has a little print bandana, a black felt hat, and I even braided a band to go around the hat. He reminds me of the movie ‘A River Runs Through It’ – which may be why I’m obsessed with him. There’s a slight chance it might be tied to my deep and abiding love of Robert Redford, Brad Pitt and the great state of Montana. Maybe-ish. Whatever – he’s mine (my preciousss).

Felt Mouse Tutorial - Grandpa FisherMouse

Sorry, Sister #4. I love ya’ and all, but you’re not getting this one. :)
Maybe I should make him a canoe out of toothpicks & popsicle sticks…

55 Comments

Filed under Craft Projects, Family Stuff

We love meeces to pieces.

I have four sisters. I am #2 of five. This fall, Sister #4 and her husband built a new house in the country, so for Thanksgiving the entire family gathered to celebrate the holiday at their new place. Being the mischievous crafters we are, Big Sis and I decided to break in the new house with an invasion. Of mice. Don’t panic. This collection won’t require pest control; just some of #4’s time. You see, before everyone left for home – these were hidden all over her new house.

House Mice - The Full Line-Up

This might very well be the first time she’s seen the entire line-up. At last count, one or two still hadn’t been found (4 weeks later). Heh heh. I think everyone in the family is laughing except for her. From what I’ve heard, Baby Sister got pretty creative with hiding places. Those last few may never be found.

I’m sharing this with you because it has been almost torturous to keep this to myself for this long. Our little project started this summer when Big Sis and I found a photo of felt mice on Pinterest which got us thinking. What if we made all types of mice and gave them themes or specific rooms to hide in?

Enter the Kitchen Mouse:

House Mouse - Breakfast Over Easy

Her apron, bottle cap skillet and toothpick wire whisk inspired a legion of others – all hand crafted with love and attention to detail. For instance, Big Sis created the Country Mouse complete with overalls, a bucket & straw in his mouth. Perhaps he could sit on a windowsill overlooking their back meadow.

House Mice - The Country Mouse

Sister #4 loves embroidery, so I made her a Crafting Mouse.

House Mice - The Crafter

And since they are voracious readers and the new living room is filled with big beautiful book shelves, Big Sis upped the ante with a Book Worm Mouse.

House Mice - The Book Worm

I responded with The Artist Mouse, because while our brother-in-law is a fire captain by trade, he is a painter at heart and has a new art studio at the house to show for it. Every studio should have a mascot. Right?

House Mice - The Artist

For fun, Big Sis added a few colorful hippie mice.

House Mice - The Hippie Sisters

And I pulled together a teal sweetie pie bearing flowers as a housewarming gift…

House Mice - The Florist

and this little Glamor Puss for their granddaughter, Zoey. This mouse is a diva.

House Mice - The Glamor Girl

Not to be outdone, Big Sis went for broke with the Racy Lingerie Mouse. She’s the floozy of the bunch. It was hidden in #4’s undies drawer.

House Mice - Racy Lingerie Mouse

She followed up with some really psychedelic party mice.

House Mice - The Funky Bunch

I thought we needed a mouse nesting in laundry lint to hide behind the dryer,

House Mice - Dust Bunny

and this one for the pantry. I call him Mr. Beans.

House Mice - Mr. Beans

And there were more. Twenty-two mice in total. All bearing sweet little tags that said “Congratulations on your new home. We’re so happy we could SQUEAK!” I don’t know which mouse was found first, but I do know it made cleaning up after a house full of company a lot more fun. And we had a blast making them.

House Mice - The Whole Gang

Rumor has it they are now populating a Christmas tree. Enjoy your new friends, Sister #4. Congrats on your new home. We can’t wait to visit again.

Until then… leave a light on.

House Mice - The Watcher

38 Comments

Filed under Craft Projects, Family Stuff

Day of the Dead Papier-mâché

Halloween is a favorite holiday at our house. I’d like to say it’s the pumpkins and costumes and kids trick-or-treating, but that’s not always the case. Sometimes it’s more about the candy (or the fact that we tend to sneak/eat some of it prior to October 31st), and sometimes it’s more about the decorations or crafts.

Colorful masks in the Dia de los Muertos tradition

This year, The Complete Package decided to tackle a papier-mâché mask for Dia de los Muertos, or Day of the Dead. It’s a holiday celebrated in Mexico and other cultures around the world in honor of those who have passed. In Mexico, it’s a national holiday celebrated on November 1st. For us, it’s yet another way to celebrate Halloween with a cultural twist. Why? Because skeletons play a key role, and we can’t help but be drawn to these colorful and charismatic crafts.

In our case, TCP did the crafting of the mask and I did the embellishing. This was so simple, it’s almost unbelievable. The best part is that it only requires a few simple items you probably already have around the house.

What You’ll Need:
aluminum foil – to create a form
thin paper or newspaper – cut into strips
flour & water – to create simple paste
acrylic craft paints (small bottles) or colorful makers
black Sharpies or permanent markers (fine point)

It starts with the papier-mâché. Using 2-3 layers of aluminum foil, press it onto your face to create a form to work on. This is TCP in foil form. It reminds me of several things, one of which was Han Solo frozen into a block of carbonite.

Or this one: ‘Come with me if you want to live’ – name that movie!

Next up, the pasting and papering:

Papier-mâché – much easier to make than it is to spell.

See? I told you it was simple. Once the entire mask is covered in 2-3 layers of paper, dip your fingers into the paste and use it to smooth all the loose or rough edges. Place your mask in an out-of-the-way place to air dry; it may take a few days to dry, depending on the humidity where you live. In Houston, humidity is always a factor. That’s why we call it “air you can wear”.

Once dry, you can cut out holes for the eyes, nose & mouth (if you plan to wear your mask) or leave it intact and start to paint (if you plan to display your mask). I started by printing off a few examples from the internet for inspiration. Using a Sharpie (or a pencil), sketch your pattern onto the mask.

Stage 1 decorating – drawing your patterns

Once I was happy with my basic design, I started filling in the areas with colorful acrylic paints from the craft store. Bright primary colors are key.

The contrast between black & white and the colors make it pop

Once dry, use a black permanent marker to outline your design; it makes it really stand out. Then fill in the blank areas with decorative flourishes.

Outlining sharpens the detail of your design

If you want to use this for years to come, I recommend spraying the finished mask with a spray varnish or sealer. It will protect the paint and keep bugs from going after the paste when it’s stored. Just check with your local craft store on which varnish works best on paper crafts. We decided to leave ours as is.

Our finished Dia de los Muertos mask

It’s kinda creepy. It’s kinda cool. I kinda like it. A lot. And if you decide to give this a try, I hope you’ll share photos here. Next up: Sugar Skulls so stay tuned!

23 Comments

Filed under Craft Projects