Tag Archives: The Complete Package

Spring Outdoor Gardening With OXO

I haven’t posted since March? Well, we’re not dead – we just moved!

The Complete Package pulled the trigger on retirement and the lure to be close to our grandkids was just too strong for me, so we packed up our stuff and we moved to Beverly. Hills, that is. Okay, not Beverly Hills exactly, but we did move to the hills west of Austin. Hello, Hill Country!

Two weeks after we moved into our new home, we were hit with a massive hail storm that blew out three picture windows, totaled TCP’s truck, dented the guttering, destroyed our roof and beat our landscaping to a pulp. (Stupid hail.) Not the welcome we expected, but it didn’t dampen our love for the new place. It just meant we had more work to do. And we still absolutely love it.

While we wait for contractors to fix the big stuff, we started on the yard with a little help from OXO. Their Spring Gardening campaign kicked off just as we were preparing to redo the flower beds. Perfect timing! The box of tools they sent were exactly what we needed.

OXO Spring Outdoor Gardening Tools

I’ve made no bones about the fact that I love OXO products. Their commitment to smart design at a great price continually knocks me out. They don’t just design comfortable handles, for example. They add gel pads to the grips to prevent blisters. Ergonomic and comfortable for the win!

OXO Transplanting Trowel - Gel Pad Comfort

I decided to start with the hand plow and tackle replacing the salvia that got beat literally to death. Hail hath no fury? Try telling that to the salvia.

OXO Plow To the Rescue

Because of the pointed tip, I could literally plow through the rock to the soil beneath. This is a serious hand tool. Besides digging rocks, I also used it to re-trough the edge of the bed where approximately two gallons of tiny gravel from our asphalt shingles washed off the roof. Apparently, when golf ball size hail beats your roof badly enough, all that gravel will indeed come off and end up in your yard, which is totally bizarre. But fear not! The hand plow is your friend.

OXO Pointed Plow Blade

Next, we tackled trimming the broken branches from our oak trees and bushes. (Stupid hail.) I don’t have any idea what this bush is, but I like it. Could it be a blueberry bush? Only time will tell. If you recognize it, feel free to shout it out.

OXO Bypass Pruners

The bypass pruners made quick work of those branches and also helped me clean up our poor agave. He did not fare so well with the hail. Poor guy had holes blown all the way through his fronds.

Our Poor Hail-Damaged Agave

Once he was spruced up, I used the hand rake to create a zen pattern in the sand. You know… to help calm him and restore order. Quick question: Do you talk to your plants? I’m asking for a friend.

New House - Agave & Rock Bed

And the hand rake I mentioned? Wait until you get a load of it. Man, I love this thing. It’s the Edward Scissorhands of hand tools.

OXO Hand Rake - Fully Expanded

We used it to help spread new mulch because the storm washed all of our previous mulch into the adjacent greenbelt. (Stupid hail.) What I loved about this rake is that it’s expandable. Did you hear that? I said expandable!

OXO Expandable Hand Rake Collage

You can’t help but play with this thing, but the truth is it’s so functional and easy to use. TCP dumped piles of mulch, and I played with the new hand rake. I mean I ‘worked hard to improve the beds’. (Sometimes I wish he didn’t read my blog.) It made getting into tight nooks and crannies super easy.

OXO Hand Rake - Working Those Corners

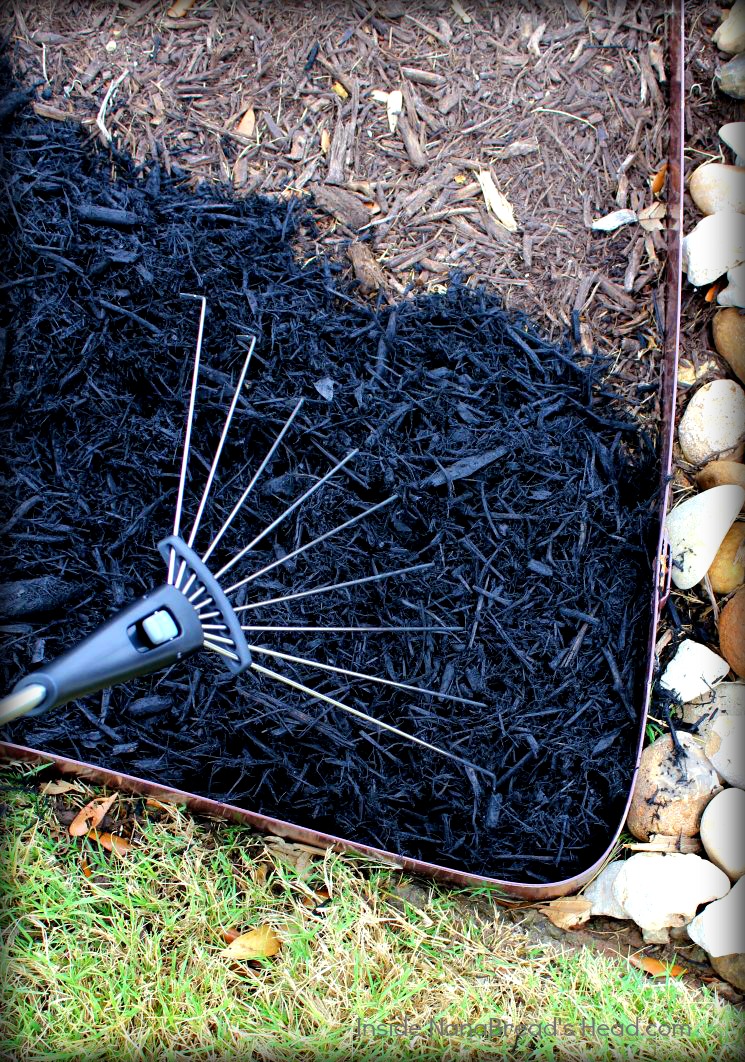
Because you can release the lock and adjust the rake width in or out, you can put that mulch into any corner instead of accidentally flinging it out into the grass. That’s a big bonus for a klutz like me.

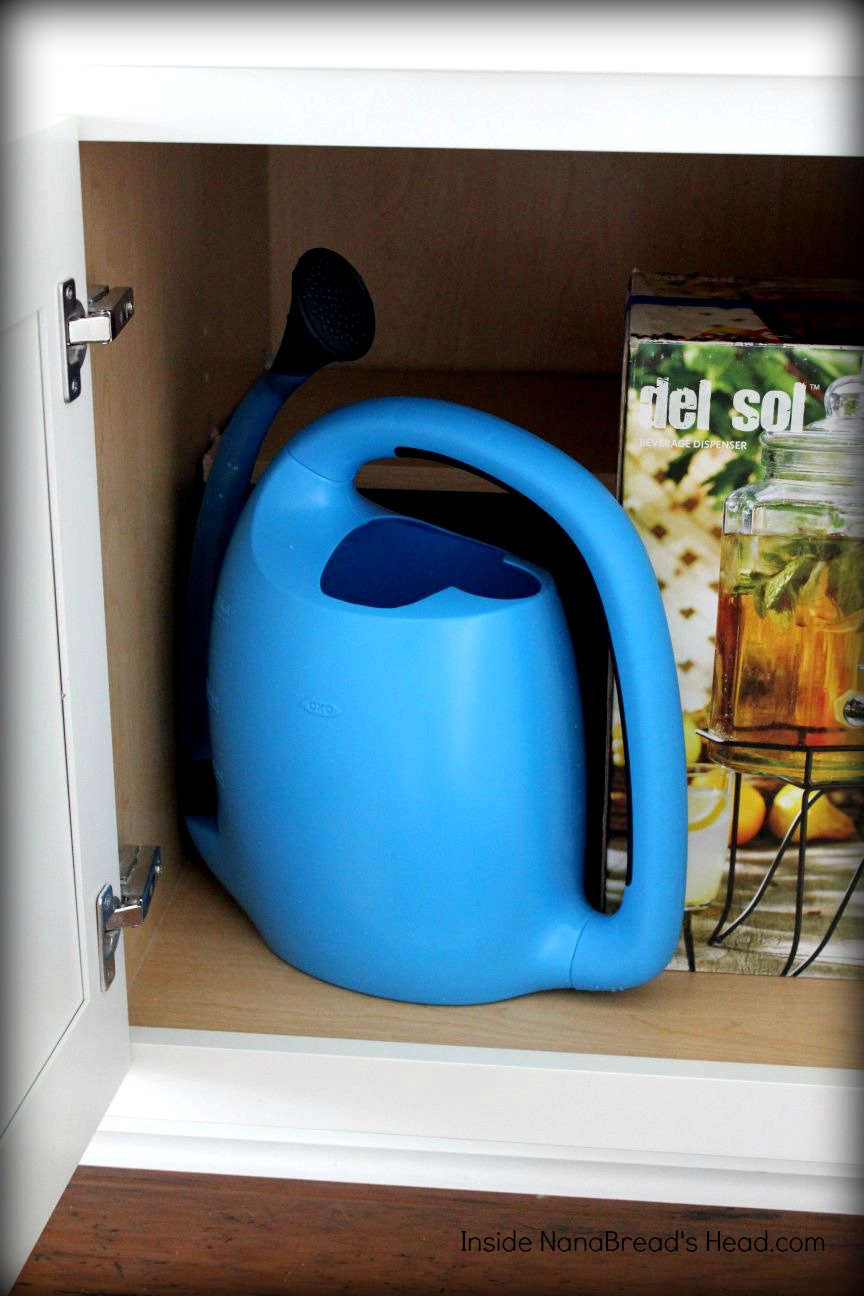
Now for my personal favorite – the Pour & Store Outdoor Watering Can. I’m telling everyone about this puppy. It’s pure dynamite. The spout actually swivels so you can fill and store with ease. What?!? You heard right!

OXO Pour & Store Watering Can - Easy Fill

And it holds 2+ gallons of water! You’d think that would be heavy and awkward to carry, but it’s really not. The can is so well balanced, you can grab it and go. And you don’t have to constantly peek into the can to see if it’s full yet, because the handle is translucent and you can see the water as it fills. See what I mean? The designers at OXO are so smart! Why did no one think of this before? Why didn’t I think of it before? I coulda’ been RICH, I TELL YOU!

OXO Pour & Store Watering Can - Easy View Fill Level

Other features that rock – the pivoting spout that allows you to fold and store easily and the removable spout head that goes from rain function to full stream with a twist. You’d better believe I am watering ALL the things now.

OXO Pour & Store Watering Can - Thoughtful Design

Once you’re done, give it a quick wipe, twist the spout back around and pop it under a kitchen cabinet. Pure genius.

OXO Pour & Store Watering Can - Easy Storage

We had so much fun playing with our new toys, we got a wild hair and planted a herb container for the front entry. In case you’re wondering, I’m already planning a Margherita pizza around that basil. ‘Hey, Basil…looking good! What, these? Oh, they’re just bypass pruners. No big whoop.’

New House - Herb Container Garden

It felt good to stand in the driveway and look over our work. The beds look good again. The plants are pruned, watered and feeling loved again. The oaks are still bruised and holding a grudge, but 2 out of 3 landscapers agree that they’ll probably recover and grow to be big and strong despite the trauma they endured.

Yes, we are still waiting for guttering and the roof to be replaced, but we really can’t complain. It could have been worse, that’s what insurance is for, and no one got hurt. For that, we are truly thankful.

New House - Front Beds & Porch

Now if OXO could just design a shingle remover and a guttering installer tool, we’d be set. Go ahead, guys. I know you can do it, and I’m willing to wait.
Up Next:
An update on the inside of our new house, including photos from that storm. (Stupid hail.)

NOTE: As a member of the OXO Blogger Outreach Program, I am occasionally given the opportunity to test OXO products, which I receive at no cost to me. I do not receive any other compensation and all opinions are my own. If you are a blogger and would like more information on the OXO Blogger Outreach Program, CLICK HERE.

15 Comments

Filed under Blogger Collaborations, Family Stuff, Things I Love

The times, they are a-changing.

So many changes in this new year, my friends. I’ll start with an apology for not posting since before Thanksgiving. Your patience has been greatly appreciated. In fact, readership has actually increased, and for that I am truly grateful. That you choose to follow the random thoughts in my head is an endless source of amazement and joy, and I love you for it.

What’s happening? Lots. First, The Complete Package is retiring! He likes to joke that I retired years ago when our first grandchild was born. He is not wrong, although technically it was more like dropping out to play Nana than retiring. The fact that I never went back to work was just a bonus (for me). Now, at long last, he will be joining me in what I like to refer to as our “funemployed years”. What’s on tap? All kinds of things, starting with this:

WE’RE MOVING TO AUSTIN!

Austin House - Street View with Banner
We found our ultimate retirement home in the rolling hills west of Austin. It’s a beautiful 4 bedroom, 3 1/2 bath one-story home with all of the features we’ve dreamed of – an open floor plan, low maintenance, high ceilings, wood floors and sweeping hill country views. Oh, and did I mention the kitchen? I knew I was home the instant I saw it.

Austin House - New Kitchen

Austin House - Kitchen Island

Austin House - Kitchen Tile

That island! Huge is an understatement. By all estimates, I’d guess it should accommodate 40 pies, 400 cinnamon rolls (at least), and sleep 4 full-grown adults if we run out of beds. It’s insane. I also love the great windows, morning light, deep counters and that herringbone subway tile backsplash. I can hardly believe I’m going to get to live here. For real – it almost brings tears to my eyes.

I’m looking forward to baking with the kids and cooking big family dinners. The idea being close enough for regular Sunday Suppers with the family has been a dream since our daughter graduated from UT and settled in Austin. We’ll be able to take the kids for long hikes in the hills, ride bikes around the miles of paved trails, and spend quality time at the neighborhood pool & play areas. Something else I’m looking forward to – a covered porch where I can relax and enjoy a good book or a cup of coffee. Guess what? Dreams do come true, kids.

Austin House - Back Porch

Austin House - Hill Country Views

And because the new house sits on top of a hill, we have great views of our new neighborhood and the rolling hills out by Lake Travis. I can hardly wait to pick out patio furniture. Besides the new house, we are thrilled to pieces to be closer to our daughter, Jonah Bear and Lilly Bug. With her pending divorce, we’ll now be there to help out and that gives all of us greater peace of mind. The kids are already plotting weekend sleepovers and calling dibs on bedrooms. They’re not alone. The Complete Package & I are ridiculously exited, too.

Blog posts may be few and far between for a bit. We’re working to list and sell our home of 25 years in Houston and prepare for the big move to Austin. If all goes well, we’ll be moving in early April (fingers crossed). I’ll try to keep you posted on our progress, if you’re interested. My goal is to be back up to full speed by May, with as many posts as possible in between, until I’m firmly planted here:

Austin House - Kitchen Desk with Arrow

Once we’re settled, I’ll break in that kitchen, hit the back roads to explore, and bring you new content from our little corner of Austin. Oh, the places we’ll go!
If you live in the Austin area, be forewarned – I’M COMING FOR YOU!
And I could not be more excited. -jeanne

18 Comments

Filed under Family Stuff, Miscellaneous Thoughts, Things I Love

#OXOTurkeyDay – Dinner For Two

OXO TurkeyDay - Title Shot

There are very few brands I love unconditionally. OXO is one of them. Their products are not only well made, but thoughtfully designed. This year, OXO is celebrating Turkey Day by sharing an array of Thanksgiving-friendly products via their Blogger Outreach Program, which I’m proud to be part of.

Tools in the #OXOTurkeyDay kit included the following:

OXO TurkeyDay - Tool Collage2
Left to Right: The most amazing twine dispenser (twine included), a non-slip butter dish with cover, a thoughtfully designed turkey baster with an angled neck & counter rest to prevent drips (and cleaning brush), and the turkey lifter that makes transferring your bird from pan to serving platter a snap.

OXO TurkeyDay - Tools Collage1
Left to Right: That twine dispenser I’m in love with (did I mention that?), a better look at the bird lifter’s design, and a fat separator only a gravy hoarder can truly appreciate. If only it worked on my thighs.

I started by tackling the bird. Since it’s just the two of us at home, The Complete Package picked out a lovely organic chicken that came in at around 4 pounds. Perfect! After the bird was properly cleaned & prepped, I broke out that twine dispenser and trussed her like 50 Shades of Prey. From there, I stuffed softened butter and fresh sage leaves under the skin, massaged more butter onto the outside, and gave her a generous sprinkle of kosher salt mixed with freshly ground black pepper and ground poultry seasoning.

OXO Turkey Day - Chicken Prep Collage

You know what I love most about preparing a turkey at Thanksgiving? Fresh sage. If you can get your hands on some, use it. Those frosted velvet leaves are so fragrant and wonderful. It’s the stuff Turkey Day dreams are made of.

#OXOTurkey Day - Fresh Sage

Next up was my mother-in-law’s easy cornbread dressing recipe. We make it every year without fail – come hell or high water. Some people insist on green bean casserole. Some go nuts without their beloved yams or cranberry sauce.
For us, it’s not Thanksgiving without Louise’s cornbread dressing.

#OXOTurkeyDay - Dressing Collage

The Complete Package has certain ideas about Thanksgiving dinner that are set in stone. His mother’s dressing is one. Mashed potatoes with gravy is another. I use thin-skinned white potatoes and leave the skins on. I like the rustic, vitamin-rich goodness of potatoes with the skins on. My secret is to add 2-3 tablespoons of Fage 0% fat-free Greek yogurt, real butter and a dash of milk. Perfect. Every. Time. My tool of choice is an old-fashioned hand masher. I also tried out the new OXO butter dish. It’s made with a sturdy non-slip metal base and has a clear acrylic cover that keeps funky fridge odors at bay. If you have fridge funk, that is. I’m not judging. This is a judgement-free blog. No judging here.

OXO Turkey Day - Mashed Potato Collage

In our house, every drop of bird broth is reserved for the most coveted of condiments – gravy. I looked forward to testing out the OXO fat separator, and it didn’t disappoint. Once the bird was baked, we poured the drippings & broth through the removable strainer and the separator did the rest. The red silicone stopper prevents spills and pops out easily when you’re ready to pour. Like all OXO products, the measurement markings are A+ here. I love that OXO uses bold, colorful markings for aging far-sighted Nanas like me.

OXO TurkeyDay - Gravy Collage

My last side dish was bacon-wrapped green bean bundles. These are so easy! Just blanch fresh green beans for 3-5 minutes in boiling salted water, then plunge them in ice, pat dry with paper towels, and wrap with bacon. I used a thick-sliced hickory smoked bacon. I also sprinkled half of the bundles with a coarsely ground black pepper to add so zing, because bacon & black pepper are BFFs. For real.

OXO TurkeyDay - Green Bean Bundle Collage

We also grabbed a few cornmeal rolls from the freezer (thank you Kirsten at Comfortably Domestic) and a jar of my homemade cherry, pear & apple cranberry sauce. The Complete Package needs gravy. I need my cranberries.
For me, it’s just not Thanksgiving without cranberry sauce.

OXO TurkeyDay - Finished Dinner

Start to finish, I had dinner on the table in 3 hours. Not bad for a table for two of all our Thanksgiving favorites with leftovers. You HAVE to have leftovers for the sandwiches alone. Am I right? Yes? Don’t leave me hanging, people.

OXO TurkeyDay - Finished Dinner2

My deepest thanks to the fine folks at OXO for providing all the tools we needed for our holiday feast. Now here’s a quick rundown of the recipes shown above.

Louise’s Easy Cornbread Dressing:
1 envelope (6 ozs.) Pioneer yellow cornbread mix
1 envelope (6 ozs.) Pioneer buttermilk biscuit mix
milk, eggs & oil – as directed on the above packages
Pam cooking spray to coat the baking pan
1 cup minced celery
1/2 cup minced white or yellow onion
2 tablespoons unsalted butter
1 can (10 ozs.) condensed cream of chicken soup
1 box (32 ozs.) low-sodium chicken broth (see below)
1/2 teaspoon poultry seasoning
1 teaspoon fresh sage, minced
salt & pepper to taste

Dump the cornbread and biscuit mixes into a large mixing bowl and add the eggs, milk & oil listed on the package instructions for both mixes. Whisk until smooth and pour into a lightly sprayed 8″ x 8″ baking pan. Bake at 375F until a toothpick comes out clean and the top is lightly browned. Remove from the oven & allow to cool to room temperature. Using a knife, score the cornbread into 1″ pieces and dump them into a large mixing bowl.

In a small skillet or pan, saute the celery and onion in 2 tablespoons of butter until lightly browned and translucent. Pour over the cornbread cubes and add the undiluted chicken soup and seasonings. Add enough chicken broth to create a moist but not soggy cornbread mixture (approx. 1 to 1 1/2 cups, then save the rest for gravy). Spoon into a lightly sprayed baking pan and bake at 350F for 30-45 minutes, or until the top starts to brown lightly. Serve hot.

NanaBread’s Simple Mashed Potatoes:
6-8 small white potatoes, scrubbed
2-3 tablespoons Fage 0% fat-free Greek yogurt
2-3 tablespoons unsalted butter
a splash of milk, if needed
salt & pepper to taste

Place washed whole potatoes into a saucepan and cover with water. Cook over medium heat until you can pierce the potatoes with a paring knife, and the knife goes easily through the cooked potatoes. Drain & return to the pan. Add the yogurt, butter and salt & pepper and mash with a potato masher or heavy fork until mostly smooth. If they are a little dry, add a splash of milk. Keep warm until everything else is ready.

Easy Poultry Gravy:
3 tablespoons butter or canola oil
3-4 tablespoons all-purpose flour
2-3 cups broth from your baked bird, or boxed broth from above
salt & pepper to taste
1/8 teaspoon poultry seasoning

In a saucepan over medium heat, add the butter and flour, whisking until smooth and slightly browned (3-5 minutes). Slowly whisk in the chicken/turkey broth and whisk until smooth. Continue to cook over medium heat, whisking often to prevent lumps. Season with salt, pepper and poultry seasoning and keep warm until all else is ready.

Bacon-Wrapped Green Bean Bundles:
1 pound of fresh green beans
12 slices of hickory smoked thick-cut bacon
1 teaspoon salt
coarsely ground black pepper, optional

In a saucepan, add enough water to fill the pan half-full. Add one teaspoon of salt and bring the water to a boil. Snap the stem ends off the green beans, then blanch them for 3-5 minutes in the boiling salt water. Remove from the boiling water and plunge them into a bowl of ice water to stop the cooking process. Drain and pat dry on paper towels, then divide them into four piles. Gather each pile into a bundle and wrap with 3 slices of bacon. Line a baking pan with aluminum foil, and arrange your bundles in the pan. Sprinkle with black pepper, if desired. Bake at 425F on the middle rack until the bacon is throughly cooked and starts to brown. If needed, fold the foil over the exposed green beans to keep them from overcooking. Once the bacon is done, remove from the oven and keep warm.

NanaBread’s Sage & Butter-Basted Bird:
1 whole chicken (mine was 4 pounds)
1/2 stick of butter, softened to room temperature
8-10 fresh sage leaves
1 teaspoon kosher salt
1/2 teaspoon freshly ground black pepper
1/2 teaspoon McCormick poultry seasoning
1 to 2 cups chicken broth, for the roasting pan
string to truss the bird

Begin by removing the chicken from the package and rinsing it thoroughly under lukewarm water. Pat dry with paper towels and place on a cutting board. Using cotton twine, tie the wingtips under the bird and tie the drumsticks together at the ankles. Run your fingers under the skin of the bird to loosen it, then rub at least half the softened butter under the skin, covering as much ground as you can. Gently place the whole sage leaves under the skin, then massage the bird with the remaining butter. Mix the salt, pepper & poultry seasoning and sprinkle it all over the bird. Place in a roasting pan and add the chicken broth. Cover and bake at 375F for 30 minutes, then uncover and bake an additional 20-30 minutes until nicely brown and the bird reaches 165F with an instant read meat thermometer. Baste once or twice when the bird is uncovered, and she’ll come out gorgeous.

For Kirsten’s Cornmeal Buns, click here. She made them as burger buns, but they are also fabulous as knotted dinner rolls. They’re my favorite.

So now you know our Thanksgiving favorites. What are yours? Do you have traditional dishes you prepare each year, or do you like to wing it (turkey pun) and try new things? Share here! You never know when your old family favorite might become someone else’s new family favorite. If you’ve posted them on your own blog, be sure to leave a link in your comment so we can all click over.

Happy #OXOTurkeyDay to one and all,
Jeanne

23 Comments

Filed under Blogger Collaborations, Food & Recipes

The Uncommon Goods-ness of Gnomes

Uncommon Goods - Gnome Onesie & Blanket Duo - cutest baby gift

When opportunity knocks, sometimes super cute things await. Such was the case when Uncommon Goods asked if I’d be interested in sampling goods from their baby gift collection. Since my friend Madelyn announced she is expecting her first baby in January, the timing was perfect. I couldn’t resist, and chose these gnomes. I knew they’d be cute, but I had no idea they’d be so well-made.

Uncommon Goods - Gnome Onesie & Hat Close-Up

Both the onesie/hat set and the blanket are made of recycled fibers. If you think recycled implies a lesser quality, you would be mistaken. These were flawless in every way. The fibers are super soft and snuggly, the colors are vibrant, and the gnomes scored a solid 10 on the cuteness meter.

Uncommon Goods - Gnome Onsie & Hat - it's just too cute!

Here’s what I learned (and what I love) about Uncommon Goods:

1. Founded in 1999, they are headquartered in New York City in the old Brooklyn Army Terminal. I know where I’m going the next time I visit NYC.

2. They are committed to supporting artists & designers; half of what they sell is handmade and most of their products are created right here in the USA. As a home crafter, I appreciate this more than I can express.

3. Approximately one-third of their products are made from recycled and/or upcycled materials. As an avid recycler, I love and support this.

4. They have B Corp status, which means they use the power of business to solve social and environmental issues. That B seal also means they meet rigorous standards on issues like wage levels, environmental impact, and giving back to the community. A company with a heart? You betcha.

Even if you don’t buy into the mission, you would be a fool to miss out on the quality and variety of products offered. Even The Complete Package, my beloved husband, gasped aloud “Wow…that blanket feels amazing. It’s so NICE!” Who says men don’t notice such things? He’s all mine, ladies.

Uncommon Goods - Recycled Cotton Fibers

Uncommon Goods - Recycled Fiber Label - Green 3 Apparel

What I love most is how they pulled it all together – great design, recycled materials, handmade products with a high level of craftsmanship, and made in America. Seriously amazing. All of it.

Somewhere in southern California is a wee baby who will someday be swaddled and soothed by these sweet, cuddly gnomes. And somewhere in Houston is a blogger who is appreciative of the folks at Uncommon Goods and their commitment to quality, creativity, and community and who, just for a second or three, contemplated keeping that snuggly blanket for herself. (Hint: it’s me.)

Uncommon Goods - Gnome Blanket

Disclaimer: Uncommon Goods offered to ship products from their selection of Baby Gifts and/or Personalized Gifts. I chose the gnome items from the baby collection, which were sent at no cost to me. I was not compensated for this post, and all opinions are my own. Readers know I only share items I love and feel strongly about, and these sweet gifts certainly fit that bill. -jeanne

Uncommon Goods Info

4 Comments

Filed under Family Stuff, Miscellaneous Thoughts

OXO’s #WhatAGrillWants – and what this girl wants is some smokey meat, sweet corn & fried green tomatoes

What’s missing from my website? Please don’t say humor, good writing or appetizing recipes. What I was shooting for is ads. There are none on my blog. It’s a personal choice made when I started blogging four years ago, and one I’ve stuck with since. It’s not a monetary or political issue, it’s just that I started blogging to share with friends and family, and ads never felt appropriate.

What you will see – products I occasionally share for one reason only – because I love them. OXO is one brand I stand firmly behind. Their products are well made, sturdy, easy to use and affordable. Because OXO supports the blogging community and blogs of all sizes, they created the Blogger Outreach Program. As a part of this program, I am occasionally selected to try random products. This month, it was OXO’s ‘What A Grill Wants’ collection.

OXO - What A Grill Wants Project

Included in package:
1 pair of 16″ grilling tongs
1 meat tenderizer
1 silicone basting brush
1 dressing shaker
1 corn stripper

That the box arrived just prior to the July 4th weekend was a bonus. We immediately plotted our attack. First up was playing with the corn stripper.

OXO Corn Stripper - What A Grill Wants

We started by grilling ears of fresh Texas sweet corn. Char = flavor.

OXO Corn Stripper & Grilled Corn - What A Grill Wants

Once they were cooled, The Complete Package grabbed that stripper and put her to work. The key was to start at one end apply the proper amount of pressure. {cue the uncontrollable giggling}

OXO Corn Stripper Collage

The Complete Package’s Review: (Overall Grade = C+)
1. He wasn’t sure it was any easier or quicker than using a knife.
2. The cutting blade tended to clog, which meant you had to stop & clear it.
3. Because one end was open, kernels tended to fall out constantly.
4. Cut kernels tended to be more pieces than whole kernels.
5. Pluses: OXO’s quality is always high & the ergonomics were good.

My Review: (Overall Grade = B)
1. I thought it WAS quicker than using a knife.
2. I also had issues with the blade area clogging occasionally.
3. A cap would be nice, as I somehow dumped corn all over the counter.
4. I had no issues with cutting whole kernels because I applied more pressure.
5. I love the size – it fits easily in your palm for ease of use.

What I also found was that the OXO corn stripper tended to remove ALL of the corn from the cob, while a kitchen knife tended to just shear off the tops of each kernel. This photo illustrates what I mean.

OXO Corn Stripper Comparison - Stripper vs Knife - What A Grill Wants

The cob in the front was denuded with a chef’s knife. You can see the flat surfaces of the cut kernels where the bottoms of the kernels are still attached. The cob in the back was cleaned with the OXO corn stripper, and you can clearly see that the entire kernel is missing. All that remains is the fibrous walls surrounding each kernel. Less waste and more volume of corn was a plus for me.

What did we do with all that cut corn? We made kicked-up creamed corn.

Grilled Creamed Corn

TCP’s Creamed Corn:
2 cans (15 ounces) sweet creamed corn
2 cups roasted sweet corn, stripped from the cob
4 tablespoons unsalted butter
2 tablespoons sugar
kosher salt & fresh cracked black pepper, to taste

Combine all ingredients; simmer over medium heat until warm.

Now, I’m not usually a fan of creamed corn because it tends to be mushy and flavorless, but this was really good. The char and flavor of the roasted corn really shines, and I found myself basically eating it right out of the pan with a spoon. I have no shame when it comes to corn, and I am unapologetic about it.

The Complete Package also broke in those 16″ tongs by grilling a pair of pork tenderloins. There’s something about meat smoked over post oak lump charcoal that touches my very soul. TCP’s pork tenderloin turns out juicy, smokey and perfect every time. For me, the mark of good smoked meat is that it needs no sauce and this needed nothing short of a napkin and some personal restraint.

TCP's Smoked Pork Tenderloin

TCP’s Smoked Pork Tenderloin:
3 pounds pork tenderloin, trimmed
Morton’s Nature’s Season Salt
Hungarian paprika
post oak hardwood lump charcoal

Start by removing the pork tenderloin from the package and rinsing them thoroughly. Pat dry with paper towels and remove any fat or silver skin. Sprinkle the meat liberally with Nature’s Season Salt and paprika.

TCP starts the smoker by stacking oak lump charcoal into a chimney and lighting it. When it is white-hot, he pours it into the smoker section of our grill along with a metal pan of hot water to create humidity. He then opens the grill vents on the opposite side of the grill to pull the smoke through the smoker. Placing the pork tenderloin over indirect heat, he smokes the pork for approximately 90 minutes at 250F, flipping once at the halfway mark, until the internal temperature reaches 160F. Removing it from the grill, he then wraps it in aluminum foil and allows it to rest on a cutting board on the kitchen counter for 30 minutes. Then it’s just a matter of slicing and serving. To sauce or not to sauce is a personal matter, but this pork needs no adornment.

OXO 16 Inch Tongs - Great Length for Grilling - What A Grill Wants

TCP’s Review of the 16″ grilling tongs: (Overall Grade: A+)
1. He loved the longer length, as it kept him from burning himself.
2. The silicone grips with thumb indention provided great grip.
3. The scalloped edges of the tongs provided a better grip on food items.
4. He loved the easy to use lock/unlock mechanism at the back of the tongs.

OXO 16 Inch Tongs Collage

In addition to the smoked pork and creamed corn, I also made fried green tomatoes. Please tell me you’ve had these before. It’s a southern favorite, and a clear sign that summer is upon us.

Fried Greed Tomatoes - Golden Brown
To make, start with firm green (unripe) tomatoes. Big slicing tomatoes work best. Here’s what you’ll need.

Fried Green Tomatoes - What You'll Need

NanaBread’s Fried Green Tomatoes:
2 large green tomatoes
2 cups all-purpose flour
1 tablespoon Morton’s Nature’s Season Salt
1/2 teaspoon freshly cracked black pepper
1 cup milk (whole or 2%)
canola oil, for frying

Wash the tomatoes, remove the core, and cut into 1/3″ slices.

Fried Green Tomatoes - Remove the Core

In a mixing bowl, combine the flour, season salt and pepper; whisk until well blended. Dredge each slice of tomato in the flour mixture, coating both sides, and lay them on a sheet of parchment or waxed paper. Once all slices are dredged, allow them to sit for 10-15 minutes to absorb the flour.

Fried Green Tomatoes - First Dredge in Flour

After 10 to 15 minutes, the flour on the tomatoes will look damp. When it does, pour the milk into a container for the second flour dredge.

Fried Green Tomatoes - Dredged

Dip each slice into the milk, then into the flour mixture for a second coat. Tap your fork on the side of the flour container to shake off any excess flour.

Fried Green Tomatoes - Dredge Collage
Place the freshly dredged tomatoes back onto the parchment paper, until all slices are coated twice. Why coat them twice? Well, the first coating of flour is not enough to adequately cover the tomatoes and keep them from splattering when fried. The second coat, along with the milk bath, creates a thick coating to help protect the tomatoes inside and create a crispy, crunchy coating.

Once your tomatoes are coated, add about 1/2″ of canola oil to a large skillet. Heat on high until the oil is shimmering and blazing hot. Carefully lower a few tomato slices into the oil (don’t crowd the skillet) and fry until the edges are clearly golden brown, then flip and fry until the second side is golden. Remove to paper towels and keep warm until all are fried. Serve immediately.

This time, we used the OXO dressing shaker to make a balsamic vinaigrette to drizzle over the finished tomatoes. It was a good call. While the tomatoes were frying, TCP whipped up a quick dressing.

OXO Salad Shaker - Balsamic Vinairgrette Ingredients

The OXO dressing shaker made this come together in a snap. Because volume measurements are printed on the side of the shaker, you can measure directly into the container. The one cup capacity is perfect for a quick vinaigrette of balsamic vinegar, olive oil, Dijon mustard, garlic and a pinch of salt.

OXO Salad Shaker - CloseUp

From there, you just screw on the lid, close the pour vent on top, and give it a good shake. We both loved this salad dressing shaker. And because the pour top seals to keep it closed, you can store unused dressing in the shaker. Just pop then entire thing into the fridge. (Overall Grade = a solid A.)

Fried Green Tomatoes - Finished with Balsamic Dressing

So we used our new OXO tongs to grill up some pork tenderloin, used the corn stripper to make quick work of grilled corn for creamed corn, and whipped up a quick vinaigrette for our fried green tomatoes. OXO delivered what they always do – fun, function, and affordability. It’s not only #WhatAGrillWants, it’s what THIS GIRL wants. Now if you’ll excuse me, there’s a plate of grilled goodness with my name on it. Hello, Summer!

Fried Green Tomatoes - Finished Meal

Special thanks to OXO for sending ‘What A Grill Wants’ products for me to play with via their Blogger Outreach Program. I was under no obligation to blog about these products, but because we love OXO & their products, I chose to share. All opinions are my own, as always.

6 Comments

Filed under Food & Recipes, Things I Love

Utah: we really kept them hopping!

Okay, so I shared where we stayed in my last post. Now it’s time to share what we did during our vacation in Ogden & Salt Lake City. The question should be what DIDN’T we do? Here’s a rundown of our week with the grandkids and all the fun we had. And boy, was it fun. Exhausting, but fun. We wore those kids out!

A drive through Ogden Valley & the Pineview Reservoir:
The drive up Ogden Valley into the Wasatch Mountains began just blocks from our vacation rental. After a brief stop for Farr’s ice cream (the kids had Play Dough, which tasted like Fruit Loops) we were on our way to the scenic loop around Pineview Reservoir through the tiny townships of Eden and Huntsville. We stopped at a campground on the south shore so the kids could swim. What a breathtaking place to soak up the sun and take advantage of the clear cool water.

Ogden Canyon Drive

Ogden Valley Drive - Farr's Ice Cream stop

Ogden Mountain Drive - Wasatch Range from Pineview Reservoir

Pineview Reservoir - Lilly & Jonah in the sand

Pineview Reservoir - Sibling Love

Huntsville, UT - view of the mtns near Pineview Reservoir

A day at the Eccles Dinosaur Park in Ogden:
This fun park is located at the mouth of Ogden Valley on the edge of town. We arrived just before it opened and were surprised to see a pretty good line forming. As it turned out, we were there on a free day. Bonus! We started by walking through the indoor museum, but it was the outdoor area that the kids truly enjoyed. The paved walking path meandered through a beautifully landscaped and hilly area dotted with dinosaur statues. It wasn’t long, though, until the kids spotted the playground area and all bets were off. Still, they had a great time and we enjoyed the rolling hills and view of the mountains.

Ogden - Eccles Dinosaur Park

Ogden Dinosaur Park - Lunchtime

Ogden Dinosaur Park - Lilly tames the beast

Ogden Dinosaur Park - Meat Eater

Ogden Dinosaur Park - LOOK OUT!

A hike through the Ogden Nature Center:
On the northern edge of town, the Odgen Nature Center is a combination of a windswept prairie, desert garden and small forest. We enjoyed the collection of birdhouses that dotted the walking path from the parking area to the visitor’s center. Over 100 birdhouses that were part of a local contest were stationed along the path. After a visit to the gift shop and puppet theater, we hiked around the grounds following the paths to the bear den, observation tower and several ponds. While the only wild creatures we encountered were a swarm of rogue mosquitoes, we had a great time hiking the trails and looking at the local wild flowers and grasses. We also enjoyed the small collection of birds that were being rehabbed at the center, including a bald eagle, golden eagle, peregrine falcon, a few owls and a turkey that was allowed to roam the grounds freely.

Ogden Nature Center - Gift Shop & Visitor Center

Ogden Nature Center - Hiking the Birdhouse Trail

Ogden Nature Center - Lighthouse Birdhouse

Ogden Nature Center - Bee on Wild Flowers

Discovery Place Children’s Museum at Gateway Mall in SLC:
Best. Children’s Museum. EVER! You know when you spend five hours in a museum and the kids beg to stay longer that you’ve found a good one. Jonah & Lilly absolutely loved the Discovery Place in Salt Lake City. We played a few hours, took a break for lunch, came back for a few more hours and they STILL wanted more. Play stations they loved included the Construction Zone, the Farm-to-Market area including a grocery store, and especially the rooftop terrace area that included a real rescue helicopter complete with command center and mini-hospital with triage and ER. That rooftop terrace was their favorite, as they spent hours changing costumes, piloting the helicopter, and playing ER doctor, nurse and patient. They talked about it for hours after we left, and asked if they could go back the next day.

SLC Children's Museum - Construction Zone

Discovery Place SLC - rooftop rescue helicopter

SLC - Discovery Place - Dr Lilly on Call

SLC - Discovery Place - Triage Area

SLC - Discovery Place - Jonah in the Wind Tunnel

That last shot shows Jonah in a Hurricane Simulator. Even though it only lasted 60 seconds, wind in the tube peaked at 75mph, which was pretty intense. It also proved to be a valuable lesson for us. While Jonah loved it, Lilly got spooked and clung to him, screaming as the wind grew stronger. She was fine as soon as it shut off, but it helped clarify a few questions about our next adventure.

iFLY Ogden:
We talked about this with the kids before we left for Utah and at that point, both Jonah & Lilly planned to participate. After our museum wind tunnel experience, however, Lilly opted out and Jonah went full steam ahead. After sitting through the training video with a room full of adults, Jonah suited up and was ready to fly. He looks so grown up to us at seven, but next to his flying group, he looked so tiny. Still, he was pumped about getting into that air chamber while some of the teens in his group were nervous. Here’s our fearless flyer.

iFly Ogden - Jonah in his flight suit

iFly Ogden - Jonah Geared Up & Ready to Fly

iFLY Ogden - Jonah Waits for His Turn

iFly Ogden - Jonah in Flight

iFly Ogden - Jonah & Instructor Soaring

That last photo was snapped just as the instructor picked up his feet and they shot up to the top of the wind chamber. Twice! It was thrilling. After the students finished their rounds, the instructors played in the wind chamber showing off some of their moves. One guy would go so high you couldn’t see him, then shoot straight down like a rocket, turn just as he reached the cage floor, and fly out the door landing standing up on the bench just outside the air chamber. We all gasped. He was Super Man. Jonah came out of his experience high five-ing the instructors and bouncing with excitement. I think he will definitely remember his flight, and thanks to The Complete Package, who recorded it on his ION camera and the iFLY DVD, he can relive it over and over.

Speaking of flying, we visited Hill Air Force Base & Museum:
It’s hard to miss this museum when you see the planes in the outdoor exhibits from the highway. We passed it several times during the week and each time, Jonah would point them out and ask if we could go see them. Of course! We started with the indoor exhibits then worked our way through the airplanes outside. Besides the airplanes, we also had a great view of the mountains and saw several airplanes practicing for the air show that took place the next day. The kids enjoyed the exhibits and were thrilled to get a toy plane from the gift shop. Jonah picked a stealth bomber while Lilly picked a stunt plane.

Hill AFB - Aerospace Museum - Old Planes

Hill AFB - Aerospace Museum - Awesome Paint Job

Hill AFB - Outdoor Exhibits & Mountains

Hill AFB - Outdoor Exhibit - Cargo Plane

The Museum of Natural History in Salt Lake City:
I’m not going to lie – we took the kids to this museum just to see the dinosaur exhibit. What surprised us was we found so much more and enjoyed all of it. With five floors of exhibits, we started at the top and walked our way down. This was a great place to spend half a day and it had just enough hands-on interactive exhibits to keep the kids interested. The Complete Package and I also enjoyed the architecture and views. The dinosaurs were still the star of the show, but the rest of the museum was terrific as well.

SLC Nat History Museum - Exterior

SLC Nat History Museum - Display Wall

SLC Nat History Museum - Dinosaur Hall

SLC Nat History Museum - Dig Site

SLC Nat History Museum - Ancient Bison

After the museum, we popped into a small cafe downtown for Belgian frites, burgers & waffles, then hit the LDS Conference Center to see the Mormon Tabernacle Choir’s weekly practice, which is open to the general public regardless of religion. After dodging thunderstorms outside and taking a brief tour of the center inside, we settled in to watch the choir. Growing up, I’d seen them from time to time on television and have always marveled not only at the sheer size of the choir, but how perfectly heavenly they sound. With approximately 360 vocalists and 110 orchestra members, it’s not just large – it’s HUGE. Seeing it in person was amazing and a really special treat.

SLC - Mormon Tabernacle Choir - Public Practice

A drive out to Antelope Island and the Great Salt Lake:
Our last adventure was one I think The Complete Package & I enjoyed more than the kids – a drive to Antelope Island to see the Great Salt Lake. The geology and science behind the region was a little beyond both kids, but they enjoyed seeing the American bison (not buffalo, as I was schooled) and a few pronghorn antelope. While we found the landscape beautiful, stark and fascinating, the kids were bored and bickering in the back seat. Ahh… reality. Still, it was a ‘must see’ and we can only hope they’ll look back someday and remember seeing it in person. Here are a few shots from our day at the lake.

Salt Lake - lake& mtn view from Antelope Island

Salt Lake Park - Bison on Antelope Island

Salt Lake Park - Jonah & Lilly & the bison statue

That’s Jonah telling us if we find rattlesnakes, he’ll karate chop them.

Salt Lake Park - Jonah Master of All He Surveys

That’s Jonah, looking for rattlesnakes to karate chop.

Salt Lake Park - Pronghorn on Antelope Island

Salt Lake NP - Buffalo & Tourists

For the record – YES, that is a wild bison as big as a truck out on the beach, and YES – those are families with very young children getting dangerously close to him. WHY?!?! We had our own close encounter with the bison, even though it was unintentional. When we noticed a group walking near the road, we stopped the car so the kids could see them. When they turned and crossed the road in front of our car, we all held our breath collectively.

Salt Lake Park - Antelope Island bison crossing

We’ve been in bison jams in Yellowstone but it never ceases to take my breath away when they come so close. This small group with two babies crossed right in front of the car. We had to keep the kids from squealing with excitement. It’s hard to be quiet when you’re young and bison are right outside your car window. Heck, it’s hard for adults, too!

The Great Salt Lake and Antelope Island are really lovely. The contrast between the salt flats, desert flora and rocky terrain against the water and mountains is both surreal and stunning. It’s a little like being on the surface of the moon, with a view of Salt Lake City in the background. And that contrast is what makes the Salt Lake area beautiful. It’s a mix of high desert and mountain landscape. It can be lush one moment (Ogden Valley & the Pineview reservoir) and stark the next (the salt flats). It’s thrilling one moment (iFLY) and supremely relaxing in yet another (evening sunsets on the back patio). You can be as adventurous (mountains & rivers) or as zen (museums and parks) as you like, and have access to all of it within an hour’s drive.

We spent seven full days in Ogden and Salt Lake City, and still didn’t make it through our ‘must see’ list. If we are able to return, we’ll take those scenic drives through Big & Little Cottonwood Canyons up to Park City and Sundance. If you haven’t visited this part of Utah, maybe it’s time to add it to your bucket list.

Salt Lake Park - view of causeway & lake

Travel Links from Our Trip (click to open):

HomeAway.com: Vacation Home Rentals

Farr’s Ice Cream in Ogden, Utah & images of Farr’s Ice Cream

Eccles Dinosaur Park in Ogden, Utah

The Ogden Nature Center in Ogden, Utah

Discovery Place Children’s Museum in Salt Lake City, Utah

iFLY in Ogden, Utah

Hill Air Force Base & Aerospace Museum north of Salt Lake City, Utah

The Museum of Natural History in Salt Lake City, Utah

Bruges Waffles & Frites in Salt Lake City, Utah

The Mormon Tabernacle Choir in Salt Lake City, Utah

Antelope Island State Park & Great Salt Lake in Syracuse, Utah

15 Comments

Filed under Family Stuff, Travel Tales

Utah: they wanted to see mountains

It happened because they wanted to see mountains. ‘Real mountains with snow on top’ they said. So last week, The Complete Package & I took our two young grandchildren – Jonah Bear & Lilly Bug – to Salt Lake City and Ogden in Utah to see the Wasatch mountains. Real mountains. With snow on top.

Wasatch Mountains - Ogden, Utah

Why Utah? That’s a legitimate question, I guess. Our answer is “Why not Utah?” It is beautiful, and the Salt Lake City to Ogden area offered us a unique opportunity to not only show the kids mountains, but also a high desert environment and the Great Salt Lake. More bang for our buck, if you will. While we stayed in Ogden most of the time, we were close enough to explore and play in Salt Lake City. And while the mountains were mere minutes away, so were the activities of both cities. It was a really good choice.

For this trip, as we do for most vacations, we found a vacation rental home at HomeAway.com. The craftsman style house we chose in the historic district of Ogden was perfect for us. It looks small. Don’t let that fool you. This house had four bedrooms, two bathrooms, a full kitchen, a breakfast room, formal dining room, sitting area, living room and a basement laundry room. It also had a great fenced backyard for the kids to play in when we spent time at the house.

HomeAway Rental - from the webpage

Ogden Rental House - Living Room

Ogden Rental House - Sitting Room

Ogden Rental House - Kitchen

Ogden Rental House - Kitchen Kitsch

Ogden Rental House - Breakfast Nook

Ogden Rental House - One of 4 Bedrooms

We loved the craftsman-style details of the home, but I especially loved the vintage kitsch that gave it personality. For antique junkies like me, it was a dream come true. Every room was adorned with pieces of the past and touches of fun. Check out the funky upstairs bathroom and some of the old paint-by-number pieces from around the house. They are a blast from my past.

Ogden Rental House - Upstairs Bath

Ogden Rental House - Vintage Paint-By-Numbers

The kids were really good about not trying to play with all the antiques. Instead, they were focused on the big screen TV, the fenced backyard and the front porch. Each evening, we spent time playing in the yard while the sun set. I’m including a diagram of Jonah & Lilly’s use of the backyard living space. I’m all for giving children a creative outlet, but if I hear ‘Let It Go’ one more time…

Ogden Rental House - Back Yard

Most mornings, their attention was focused on the front porch. Jonah loved to sit on the front steps and whittle the sticks he collected from everywhere we went. Sticks and rocks, sticks and rocks. That boy LOVES sticks and rocks.

Ogden Rental House - Jonah Whittles on the Porch

Lilly fell in love with the porch swing. If she wasn’t swinging in it, she was pushing it or laying across it. Some day, boys will line up to woo her on a porch swing like that, but not too soon. (Somewhere, her parents just shivered.)

Ogden Rental House - Lilly & the Porch Swing

Oh my gosh, we love these kids so much. They have our hearts, for sure.

Ogden Rental House - Lilly & Jonah on the Porch

When the weather was nice, we took evening strolls to explore our historic neighborhood. We especially loved the street behind ours, which was lined with huge trees and beautiful old mansions from a bygone era. To say it was lovely is to sell it short. It was like stepping back in time, which was magical.

Ogden Historic District - Evening Walks1

Ogden Historic District - Evening Walks3

Ogden Historic District - Evening Walks2

I fell in love with the tiny barking squirrels in Ogden. They ran the phone lines each evening, and every time Jonah or Lilly started singing those squirrels would join in with their high-pitched yipping. It was hilarious. Throughout the week, they would come close enough to check us out, but not so close that we could touch them. This little guy ran circles around a tree, then started popping out of the knothole on the right like a jack-in-the-box. It was adorable. I tried to convince him to come home with us, but he was having none of it.

Ogden Historic District - Evening Walks - Furry Friends with Arrow

Lilly, who loves all creatures, also found a neighborhood friend. Not as furry or cute, but just as friendly. Meet Turbo.

Ogden Historic District - Evening Walks - Lilly's Snail

Next up: what we did with the kids during our week in Ogden & Salt Lake City. It involves flying (but not in planes), swimming (but not in the Great Salt Lake), bison (not buffalo), and a few of these monsters. KIDS – LOOK OUT!!!

Ogden Dinosaur Park - LOOK OUT!

17 Comments

Filed under Family Stuff, Travel Tales

The Complete Package: MotoGP Austin

Track Shot - Friday Practice - MotoGP Austin

Confession: I don’t know jack about motorcycle racing.
But I know someone who does, and that someone is my beloved husband, The Complete Package. Earlier this month, TCP and I went to Austin so he could attend the MotorGP event. While he was at the racetrack, I played with the grandkids. And thus we reveal the key to a 32-year marriage – compromise.

Because TCP had a great time, I thought it would be fun to share a few photos from the races on the off chance some of you enjoy it as well. The following photos were taken by The Complete Package at the MotoGP Austin event:

Track Shot - Lap Board & Stands - MotoGP Austin

Track Shot - The Tower - MotoGP Austin

Austin 360 Concert Stage - MotoGP Austin

Corn Hole Corner - MotoGP Austin

Traffic Jam - MotoGP Austin

Qualifying Rounds2 - MotoGP Austin

Coming Out of the Corner - MotoGP Austin

Here’s what I do know:
1. The Complete Package is a Valentino Rossi fan.
2. Our grandkids love everything TCP loves because they love him.
3. Lilly Bug is now in love with Valentine Rossi (all the ladies are).
4. Jonah Bear thinks Marc Marquez rocks because he’s the fastest in the world.
5. This next shot is of their favorites – Rossi (blue/green) & Marquez (black/orange/white).

The Kid's Favorites - Rossi & Marquez - MotoGP Austin

Valentino Rossi makes the fans go wild. People are crazy for this Italian racer, and I get it. He’s a maniac on a racing bike, has enough personality and charm for 10 racers, and is a world champion many times over.

Rossi - Going Going Gone - MotoGP Austin

Rossi - Signature Move - MotoGP Austin

But then there’s the up-and-comer, Marc Marquez. This Spanish biker is young, aggressive, and taking the racing world by storm. He is also the current World Champion and the winner of the Austin MotoGP event. How fast is he? Well, his top speed at the Austin event was clocked at 341.6 km/h. That’s 212.3 miles per hour. {gulp!} I. Cannot. Fathom. I wonder what his mother thinks about it.

Mark Marquez - Victory Lap

Mark Marquez - Victory Lap2

Three days of fun & sun at the Circuit of the Americas track was just enough for TCP. He had a blast, saw all the qualifying rounds and races including the big finale, and has the sunburn to prove it. Jonah Bear & Lilly Bug both got racing shirts (hers is a Rossi; his is a Marquez), got to hit the new Luby’s near the house, and spent some time in the hotel hot tub and at the park with their mother & I. We also hit Sandy’s Frozen Custard, so basically a great time was had by all.

Jonah & Lilly on the Swings

Okay, I lied. I took that last shot of Jonah Bear & Lilly Bug. But just that one.
#TruthInAdvertising #GratuitousGrandkidShot #HashtagAttack #NotSorry

Note: The Complete Package wanted me to point out that some of these photos were taken early on Friday during qualifying rounds, which is why the stands might look empty or sparse. For Saturday’s events and Sunday’s final races the racetrack was packed with spectators, as those in attendance can attest.

6 Comments

Filed under Family Stuff, Travel Tales

Papaya Cheesecake Bars

Papaya Cheesecake Bars - Cut Bars & Pan

The Polar Vortex killed our papaya tree. Poor little guy. We just planted him last summer, so we barely knew him. To make matters worse, we’re having trouble finding another papaya tree to replace him. Not that we’re interviewing or anything, but the nursery doesn’t have any. Which is a round-about way to say The Complete Package bought a fresh papaya last weekend that was bigger than my head so he could germinate the seeds in an attempt to grow papaya trees. That’s great, but it left us with a gallon of diced papaya. Thatza lotta papaya.

What does one do with a gallon of fresh papaya? Not much, apparently. I searched the internet for ideas, but recipe choices were mainly limited to smoothies. After two or three of those, I was done. Then I saw a recipe for papaya jam, and that really got me thinking. Surely I could so something with papaya jam, right? Enter Papaya Cheesecake Bars.

Papaya Cheesecake Bars - In the Pan

Sometimes I come up with an idea that actually works. Surprising, I know.

NanaBread’s Papaya Cheesecake Bars:
(makes two 8″ x 8″ square pans or one 13″ x 9″ rectangle)

For the papaya jam:
4 cups fresh papaya – peeled, seeded & diced
1/2 cup orange marmalade
1/4 cup orange juice
1/4 cup sugar (optional, or add to taste)
2 tablespoons cornstarch dissolved in 3 tablespoons cold water

In a heavy-bottom saucepan, combine the fresh papaya, marmalade and orange juice. Simmer over medium-low heat until the papaya is soft and the mixture begins to thicken a little. Taste to determine if sugar needs to be added. If so, add up to 1/4 cup of sugar (to your taste) and cook until the sugar dissolves. Whisk in the cornstarch slurry and continue to stir constantly until the mixture thickens. Place a strainer over a mixing bowl, and pour the papaya mixture into the strainer. Using a flexible silicone spatula, press the papaya mixture through, straining out any fruit fiber or lumps. Allow the strained mixture to cool completely. While it’s cooling, you can start your shortbread crust.

For the shortbread crust:
1 cup Bob’s Red Mill coconut meal
1 cup Bob’s Red Mill almond meal
6 tablespoons brown sugar
a pinch of salt
2 sticks (1 cup) unsalted butter, cold & cubed

Pre-heat your oven to 375F. In a food processor, combine all of the shortbread ingredients. Pulse until well combined and the texture of course sand. Line your baking pan(s) with parchment and add the shortbread mixture (it will be crumbly). Shake the pan to distribute the crumbs, then tap it flat on the counter a few times to help settle them in an even layer. Cover with a sheet of parchment and use a rolling-pin or heavy glass to roll the crumbs into a solid, compact layer. Bake for 10-12 minutes, or until the edges start to brown. While the crust is baking, mix up your cheesecake filling.

For the cheesecake layer:
1 package (8 ozs.) cream cheese, softened
1/4 cup granulated sugar
2 egg yolks
1 whole egg
1/2 teaspoon almond extract
1/2 teaspoon coconut extract

In a mixing bowl, combine the cheesecake ingredients. Whisk until the mixture is completely smooth. Pour over the baked shortbread crust, tapping the pan on the counter to remove any air bubbles. Pop it back into the oven for 10-12 minutes, or just until you can shake the pan gently and the cheesecake doesn’t jiggle. Remove from the oven and allow it to cool completely. Once cooled, top with papaya jam, spreading it into a smooth even layer. Chill for at least 2 hours before serving. Keep refrigerated.

Papaya Cheesecake Bars - Cut

Truth in Marketing Moment: I dusted mine with powdered sugar, but it really served no purpose other than adding texture to the photographs. The sugar dissolved almost immediately into the papaya jam and vanished. Feel free to skip that step unless you’re also photographing your papaya bars, in which case it’ll look pretty and everybody loves pretty desserts.

That papaya jam? It’s supremely tasty, so I’ll be canning more of that.

Remember when people used to ask “If you were a crayon, what color would you be?” I’m changing my answer. It used to be Cornflower Blue, but now it’s Papaya Orange. That color just screams SASSY.

Papaya Cheesecake Bars - Horizontal

7 Comments

Filed under Food & Recipes

TCP Cooks: French Toast Waffles

Challah: A braided bread laden with eggs, symbolizing manna from heaven.

Challah: A braided bread laden with eggs, symbolizing manna from heaven.

If you love good bread, let me hear you challah!

Corny food puns are my secret love, as is warm eggy challah bread. But it’s what The Complete Package does with it that really makes my heart sing. Inspired by a sleep-over episode of Bobby Flay’s cooking show, he does the unthinkable and combines two breakfast favorites into one – French Toast & Waffles.

French Toast Waffles - Inside NanaBread's Head

To make this mouth-watering delicacy, you’ll need a fresh loaf of challah, the standard cast of French toast ingredients, and a piping hot waffle maker. A bowl of homemade whipped cream and some fresh fruit doesn’t hurt either.

TCP’s French Toast Waffles: (makes 8 slices)
1 loaf of fresh challah bread
4 large eggs
1/4 cup brown sugar
1/2 cup heavy whipping cream
1 1/2 teaspoons vanilla extract
1/8 teaspoon salt
powdered sugar, to dust with
fresh whipped cream & macerated fruit, to garnish

Pre-heat your waffle iron (set to medium heat, if yours is adjustable).

Slice the challah bread into 1″ thick slices; set aside.

In a large bowl, beat the eggs until lemon-colored and frothy. Whisk in the brown sugar, beating until the sugar is mostly dissolved; add the cream, vanilla and salt and whisk until combined.

Dunk each slice of challah into the egg mixture, turning to coat well, and place it in the waffle maker. Gently press the lid closed and bake until golden brown. Our small waffle maker can bake one slice at a time and each takes about 4 minutes, but it’s 32 years old, so watch yours carefully for a perfect golden hue.

When done, remove to a warm plate, dust with powdered sugar then top with fresh fruit and whipped cream. Serve immediately.

French Toast Waffles - Close-Up

Leftovers, if there are any, can be frozen. Simply place the cooked & completely cooled waffles into a zip-style freezer bag, press out any excess air, seal tightly, then drop in the freezer. To warm, place them on a baking sheet and re-heat in the oven at 275F, or pop them in the microwave for 25-30 seconds, or drop them into your toaster (just be sure to keep an eye on them so they don’t burn).

These are great with fresh peaches, strawberries, bananas or any favorite fruit. They’re also delicious with a smear of coconut curd and blackberry jam, or lemon curd and raspberry jam. There’s also the old-fashioned favorite – a pat of real butter and a drizzle of pure maple syrup. So many fabulous options, but that’s for you to discover. A word of caution: these are addictive.

Thinking of making your own Challah? Check out Smitten Kitchen’s recipe.

8 Comments

Filed under Family Stuff, Food & Recipes