Tag Archives: recipes

‘Not A Recipe’ Donuts

'Not a Recipe' Donuts - Mini M&Ms - Inside NanaBread's Head

Blogger friends and I are always sending each other links to recipes found on Pinterest. Sometimes it’s because ‘OMG you need to make this!’ and other times it’s because ‘OMG why would anyone make this?!’ Example: the cake made by layering Twinkies into a pan and covering them with frozen strawberries and Cool Whip. I’m not saying which category that one fell in, but it does bring up a comment frequently heard in foodie circles:

“If you start with a mix or packaged food, it’s not a recipe. It is a creation.”

I get it. I didn’t hand craft a donut dough for these. I started with a can of refrigerated biscuits. Which brings up another comment frequently heard in non-foodie circles:

“Ain’t nobody got time for that.”

My position is firmly on top of the fence. A good 80-90% of what I make is from scratch, but sometimes quick and easy is what we need. And these are easy. Incredibly, beautifully easy and perfect for those Saturday mornings when all you want is a big cup of coffee and to get breakfast on the table in a hurry.

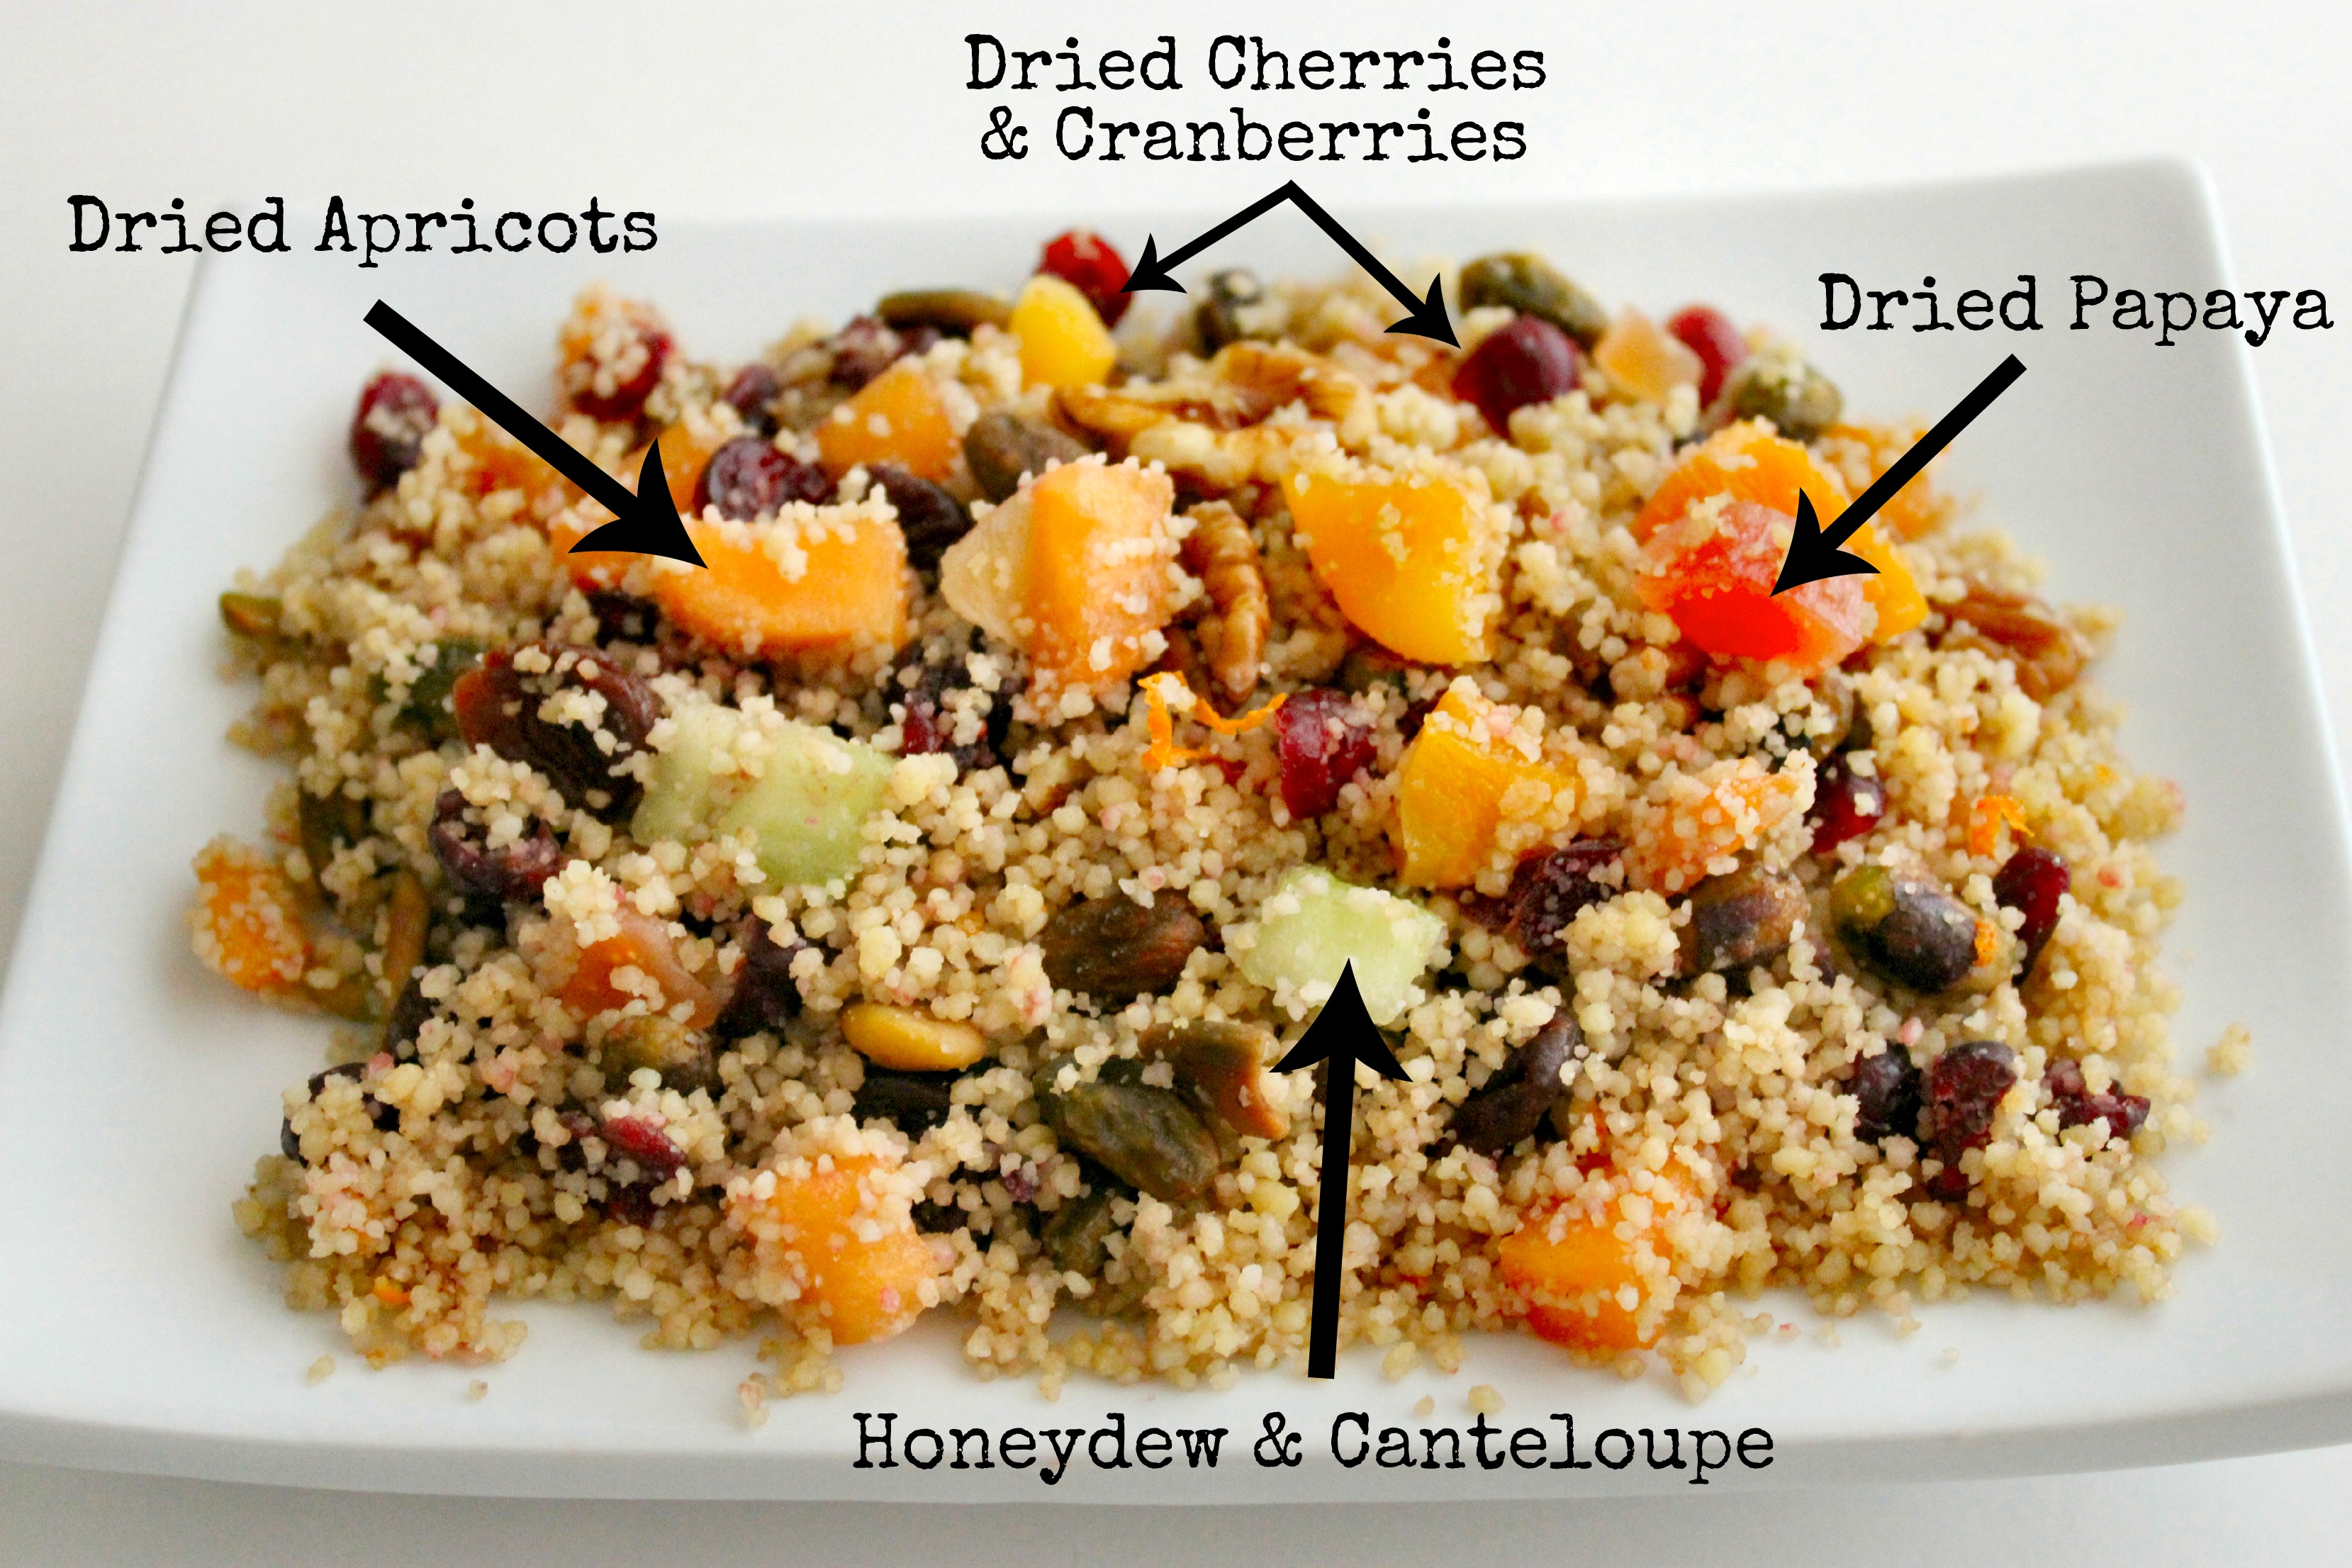
NanaBread’s ‘Not A Recipe’ Donuts:
one can (16.3 ounces) Grands Butter Flaky Biscuits
canola oil for frying
miniature chocolate chips (2 cups, divided)
miniature M&M candies (1 cup)
heavy whipping cream (2 tablespoons)
unsalted butter (1 tablespoon)

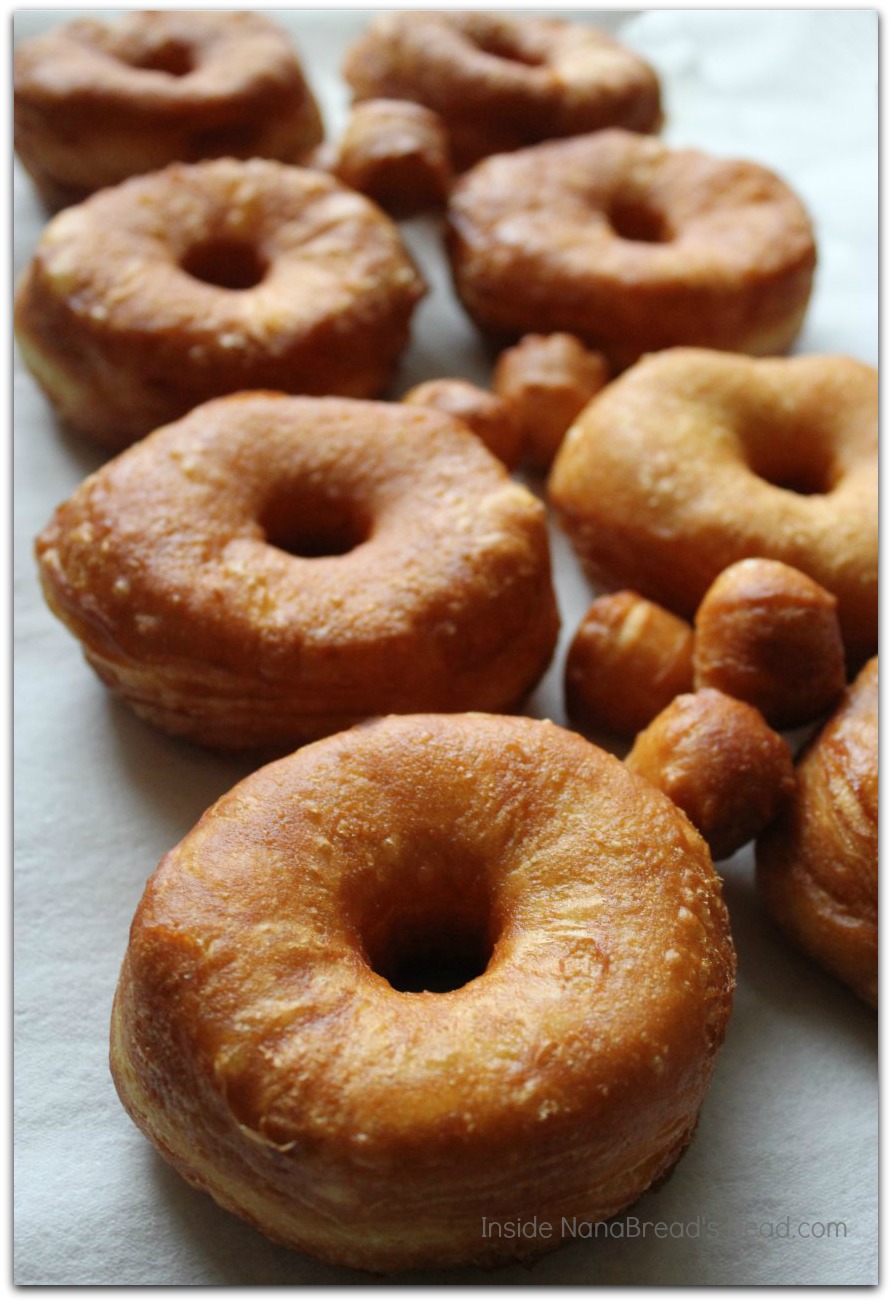
Start by heating 2″ of canola oil to 325F in a deep, heavy pot. While your oil is coming to temperature, unwrap your can of biscuits and cut center holes.

'Not a Recipe' Donuts - Ready to Fry - Inside NanaBread's Head

Fry until golden brown, turning once. Remove to paper towels and repeat until all donuts are fried. Cronut? We don’t need no stinkin’ cronuts!

'Not a Recipe' Donuts - Fried to a Golden Brown - Inside NanaBread's Head

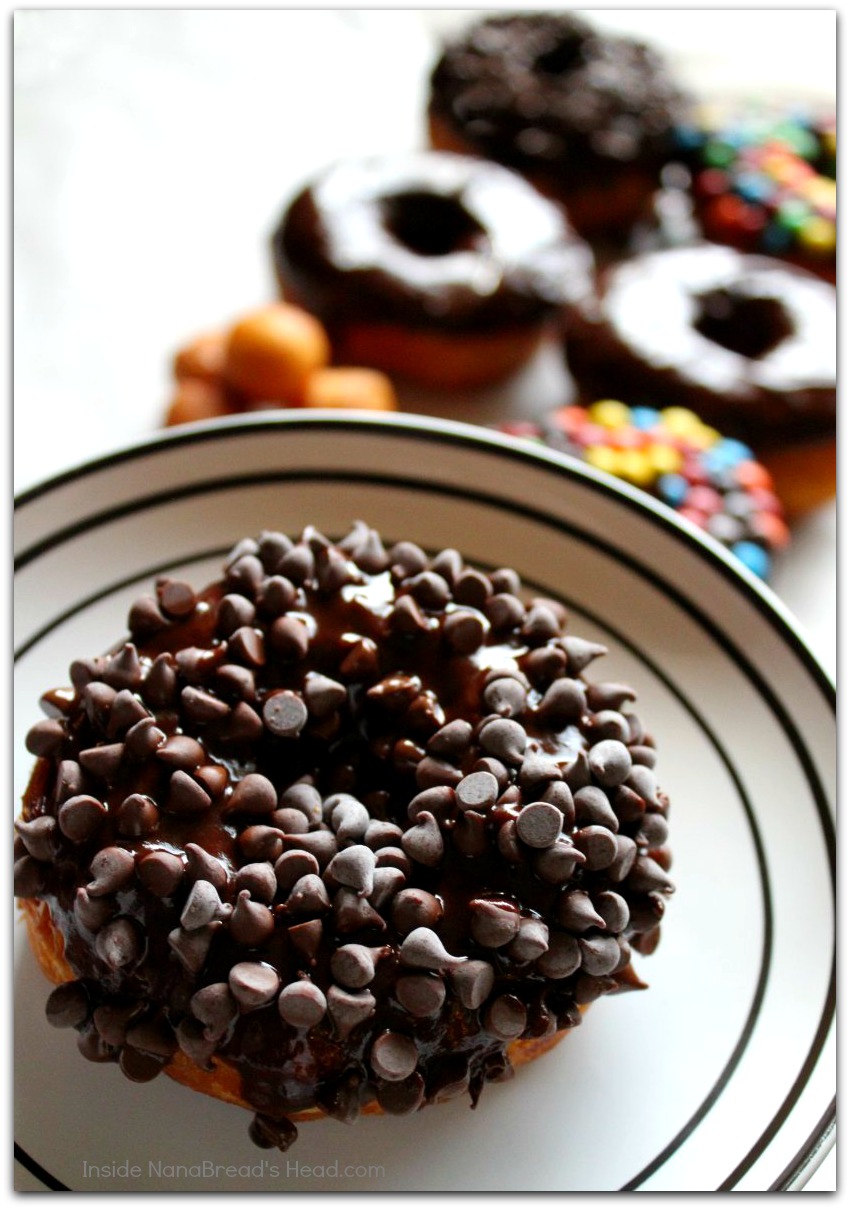
Now you could shake a little powdered sugar over these to get them in your pie hole quicker, but I wanted chocolate. Don’t judge. We all have those days.

'Not a Recipe' Donuts - Toppings - Inside NanaBread's Head

I put one cup of miniature M&Ms on a saucer and one cup of miniature chocolate chips on another. The remaining cup of chocolate chips went into a bowl with the heavy whipping cream and butter, then into the microwave for 90 seconds. Once melted and whisked, I had a bowl of glossy, gorgeous ganache to dip my golden orbs in. No, not THOSE golden orbs, silly! These.

'Not a Recipe' Donuts - Ganache Glazed - Inside NanaBread's Head

Plain chocolate glazed are yummy, but chocolate on chocolate is crazy good.

'Not a Recipe' Donuts - Mini Chips - Inside NanaBread's Head

The key is to dip the donut into the ganache, then let it sit for a few minutes. It gives the ganache time to set up a little before dunking them into toppings. It also gives you time to lick the chocolate off your fingers.

What? Where are all the donut holes? I don’t know what you’re talking about.

'Not a Recipe' Donuts - Is Eight Enough - Inside NanaBread's Head

Okay, so I ate the donut holes. Someone had to. Please forgive me blah blah blah, I beg of you. Would it help if I bribed you with a donut?

'Not a Recipe' Donuts - I saved you one at Inside NanaBread's Head

You’re right. I have no shame.

21 Comments

Filed under Food & Recipes

Blackberry Cheesecake Swirl Ice Cream

Blackberry Cheesecake Ice Cream with Mini-Mallows - Inside NanaBread's Head

Know how I know it’s almost summer? The “101 Favorite Recipes” lists start flying around the internet. Last weekend it was Memorial Day Must-Haves. Soon it will be “Fourth of July Favorites”. Today, we’re getting a jump on summer with a celebration of ice cream. Jenni Fields, author of Pastry Chef Online has invited bloggers to join her for Ice Cream Tuesday – Marshmallow Edition. The marshmallow twist can take any form – a fluff topping, stacked on or stirred in, or incorporated right into an ice cream base. Anything goes!

Luckily, I have a secret weapon in my back pocket – Allison, my foodie friend who makes homemade marshmallows. We’re talking serious combinations like honey latte, pina colada, and the latest batch she sent – blackberry sage. For my ice cream, I started by cutting her full-size marshmallows into teeny tiny baby marshmallows. Man, I wish you could taste these blackberry beauties.

Photo from my Instagram feed @HeyNanaBread

Photo from my Instagram feed @HeyNanaBread

It was a no-brainer to pair these puppies with my homemade blackberry jam.
A cheesecake ice cream base, with its slightly tart bite, is a perfect match for Allison’s luscious marshmallows and the sweetness of blackberry jam.

I love it when a plan comes together. Granted, most people don’t have handmade blackberry marshmallows lying around, so fret not – this ice cream, even without pretty marshmallows, is still worthy of any summer party. And there’s no shame in a store-bought bag of mini-mallows. I buy them, too.

Blackberry Cheesecake Ice Cream - So Good - at Inside NanaBread's Head

If you love cream cheese like I love cream cheese, you’re going to love this ice cream. If you like a thick layer of cream cheese on a warm bagel, this one will make your heart sing. The combination of cream cheese, kefir and buttermilk will give you all the tang you crave, and then some.

If, however, you are more of a no-bake cheesecake person who prefers a higher fruit to cream cheese ratio, you can adapt this recipe to lessen the twang. I’ll post a note at the end of the recipe and tell you how to tone it down.

Blackberry Cheesecake Ice Cream - 8

NanaBread’s Blackberry Cheesecake Ice Cream:
1 package (8 ozs.) cream cheese, softened to room temperature
1/4 cup kefir OR plain thick Greek yogurt
1/4 cup sugar
a pinch of salt
1/2 teaspoon almond extract
1 box (3.4 ozs.) instant cheesecake pudding mix
2 cups heavy whipping cream
1 cup buttermilk (low-fat is fine)
1/3 cup + 3 tablespoons of your favorite blackberry jam
1/2 cup mini-marshmallows (optional)

In the bowl of an electric mixer, combine the cream cheese, kefir or yogurt, sugar, salt, almond extract and dry pudding mix. Beat on medium speed until thoroughly combined. Reduce speed to low and slowly add the whipping cream, buttermilk and 3 tablespoons of the blackberry jam (for color). Beat just until combined and smooth, then scrape the mixture into an electric ice cream maker. Process according to the manufacturer’s instructions, or until the ice cream thickens to a perfect frozen soft-serve consistency.

If you are adding mini-marshmallows, stir them in now.

Into a freezer-safe container with a tight-fitting lid, pour half of the ice cream base and spread to a smooth layer with a rubber spatula. Add the 1/3 cup of blackberry jam and spread into an even layer. Top with the remaining ice cream base and seal the container. Pop it into the freezer for at least 2 hours to set.

Substitutions for a lighter, less twangy cream cheese base:
1. Swap a light berry flavored yogurt for the kefir or plain Greek yogurt.
2. Use vanilla pudding mix in place of the cheesecake pudding.
3. Substitute 2% or whole milk for the buttermilk.

If you’re not into blackberries, this recipe would also rock with raspberry, blueberry or cherry jam. If you really want to go big, leave out the jam all together and add a layer of caramel, fudge sauce and nuts for a Turtle Cheesecake Ice Cream. Personally, I’m really digging the blackberry combo.

Blackberry Cheesecake Ice Cream - Ice Cream Tuesday - Inside NanaBread's Head

But wait… there s’more! Check out these Ice Cream Tuesday posts:
Posts go live throughout the day. If at first you don’t connect – try, try again!

Jenni @ Pastry Chef Online:
Strawberry Cheesecake Ice Cream with Key Lime Marshmallow Swirl

Karen @ Pint-Sized Baker:
Frozen Coconut S’Mores Bars

Dionne @ Try Anything Once Culinary:
Strawberry Ice Cream with Marshmallow Swirl and Toasted Walnuts

Liz @ That Skinny Chick Can Bake:
Fudge-Topped Marshmallow Ice Cream

Betsy @ Desserts Required:
Kahlua Marshmallows/Marshmallow Sauce

Stacy @ Food Lust People Love:
No-Churn Coffee Amaretto Ice Cream with Almond Marshmallows

Kirsten @ Comfortably Domestic:
Traverse City Cherry Cordial Frozen Yogurt

Donna @ Cookistry:
Strawberry Marshmallow Ice Cream

Allison @ Decadent Philistines Save the World:
Horchata Ice Cream with Mocha Mallow Swirl

Sophia @ NY Foodgasm:
Princess Badass Vanilla with Bourbon Cherries & Marshmallow Fluff

Jenni's Ice Cream Tuesday -Mallow Week logo

19 Comments

Filed under Blogger Collaborations, Food & Recipes

Sausage, Egg & Asparagus Tart

Spring Sausage Egg & Asparagus Tart - Inside NanaBread's Head

You know Spring has sprung when fresh asparagus pops up in abundance. I grabbed a handful this week and made this easy tart for lunch. If you like quiche, you’ll love this. It starts with these beauties. I love this vibrant green color.

Spring Sausage Egg & Asparagus Tart - Raw Asparagus

Alton Brown (Food Network) says the best way to cook asparagus and preserve its flavor and bright green color is to microwave it. Start by cutting off the tough stem ends, then grab a strip of 4 paper towels (still connected). Wet them and squeeze out most of the water. Un-wad the paper towels until you have a strip two towels long and two towels thick. Spread the asparagus on the damp towels in a single layer and sprinkle with kosher salt. Roll the asparagus up in the paper towels and microwave on high for 3 minutes. Done!

Spring Sausage Egg & Asparagus Tart - Chicken Sausage

Next up are these gorgeous organic chicken, asparagus and parmesan smoked sausages from my local HEB market. I simply seared them in a hot skillet until lightly browned on both sides, then sliced them in half lengthwise.

Spring Sausage Egg & Asparagus Tart - Scrambled Eggs

Soft scrambled eggs are cooked in the same skillet until almost but not quite set. These are just getting started. A box of frozen puff pastry makes quick work of the tart shell. To save time, thaw the puff pastry while you’re steaming the asparagus and browning the sausages. I promise – this tart could not be easier and topped with shredded parmesan cheese, it could not be more delicious.

Spring Sausage Egg & Asparagus Tart - Cut

NanaBread’s Sausage Egg & Asparagus Tart:
1 box frozen puff pastry (17.3 ounces or two ready-to-bake sheets), thawed
2 tablespoons butter, melted

1 package smoked chicken sausage (I used an asparagus & parmesan version)
1 pound fresh asparagus, microwaved (instructions above)
2 slices Lacey Swiss cheese, from your grocer’s deli counter
1/2 cup shredded parmesan cheese, to sprinkle on top

2 tablespoons unsalted butter
4 large eggs
4 tablespoons heavy cream or half-n-half
2 tablespoons butter, melted
1/2 teaspoon kosher salt
1/4 teaspoon cracked black pepper

Pre-heat the oven to 425F; remove the puff pastry from the box and let it thaw.

In a hot skillet, place the chicken sausages (sliced or whole) and brown on both sides over high heat, then remove from the skillet. In a mixing bowl, combine the eggs, cream or half-n-half, melted butter, salt & pepper. Whisk until fluffy. To the hot skillet, add 2 tablespoons of butter and swirl the pan until it is melted. Pour in the eggs, and using a silicone spatula, gently push the eggs around the skillet until they are almost set, but still wet and glossy. (Don’t worry, they’ll finish cooking in the oven.)

On a lined baking sheet, lay out one full sheet of puff pastry. Cut the remaining sheet into 3/4″ strips, and lay them around the outside edge of the bottom sheet to create a frame. Brush the edges with melted butter, then layer on your ingredients starting with the Swiss cheese, then the cut up sausages, the scrambled eggs, then the steamed asparagus. Bake at 425F for 20-30 minutes (depending on your oven), or until the puff pastry is a light golden brown.

Spring Sausage Egg & Asparagus Tart - Construction Collage

Allow the tart to cool for a few minutes before slicing. To serve, top with a sprinkle of parmesan cheese. This tart makes four large servings (main course) or nine small servings (appetizer). It’s perfect for any time of day. We had it for lunch, but it would also be lovely for brunch with fruit or dinner with a side salad. No one needs to know how simple it was, except for us. And I’ll never tell.

Spring Sausage Egg & Asparagus Tart - Sliced

Notes from the Kitchen:
1. This can be made meat-free by omitting the sausages.
2. It would also be lovely with a rotisserie chicken instead of sausage.
3. To reduce the amount of butter, try spraying the skillet with Pam instead.
4. To further reduce fat, swap 2 Tbsp. fat-free Greek yogurt for the cream.
5. The sausages & asparagus can be cooked in advance to save time.
6. To tart up your tart, try adding a small pinch of nutmeg or cayenne pepper to your scrambled eggs.
7. Leftovers should be refrigerated and eaten within 2-3 days.

7 Comments

Filed under Food & Recipes

TCP Cooks: French Toast Waffles

Challah: A braided bread laden with eggs, symbolizing manna from heaven.

Challah: A braided bread laden with eggs, symbolizing manna from heaven.

If you love good bread, let me hear you challah!

Corny food puns are my secret love, as is warm eggy challah bread. But it’s what The Complete Package does with it that really makes my heart sing. Inspired by a sleep-over episode of Bobby Flay’s cooking show, he does the unthinkable and combines two breakfast favorites into one – French Toast & Waffles.

French Toast Waffles - Inside NanaBread's Head

To make this mouth-watering delicacy, you’ll need a fresh loaf of challah, the standard cast of French toast ingredients, and a piping hot waffle maker. A bowl of homemade whipped cream and some fresh fruit doesn’t hurt either.

TCP’s French Toast Waffles: (makes 8 slices)
1 loaf of fresh challah bread
4 large eggs
1/4 cup brown sugar
1/2 cup heavy whipping cream
1 1/2 teaspoons vanilla extract
1/8 teaspoon salt
powdered sugar, to dust with
fresh whipped cream & macerated fruit, to garnish

Pre-heat your waffle iron (set to medium heat, if yours is adjustable).

Slice the challah bread into 1″ thick slices; set aside.

In a large bowl, beat the eggs until lemon-colored and frothy. Whisk in the brown sugar, beating until the sugar is mostly dissolved; add the cream, vanilla and salt and whisk until combined.

Dunk each slice of challah into the egg mixture, turning to coat well, and place it in the waffle maker. Gently press the lid closed and bake until golden brown. Our small waffle maker can bake one slice at a time and each takes about 4 minutes, but it’s 32 years old, so watch yours carefully for a perfect golden hue.

When done, remove to a warm plate, dust with powdered sugar then top with fresh fruit and whipped cream. Serve immediately.

French Toast Waffles - Close-Up

Leftovers, if there are any, can be frozen. Simply place the cooked & completely cooled waffles into a zip-style freezer bag, press out any excess air, seal tightly, then drop in the freezer. To warm, place them on a baking sheet and re-heat in the oven at 275F, or pop them in the microwave for 25-30 seconds, or drop them into your toaster (just be sure to keep an eye on them so they don’t burn).

These are great with fresh peaches, strawberries, bananas or any favorite fruit. They’re also delicious with a smear of coconut curd and blackberry jam, or lemon curd and raspberry jam. There’s also the old-fashioned favorite – a pat of real butter and a drizzle of pure maple syrup. So many fabulous options, but that’s for you to discover. A word of caution: these are addictive.

Thinking of making your own Challah? Check out Smitten Kitchen’s recipe.

8 Comments

Filed under Family Stuff, Food & Recipes

Horchata at Home

Horchata - long grain rice

Rice. My family loves it. In fact, it we might even prefer it to potatoes. Sounds crazy, but we find ourselves craving rice more than french fries. This weekend, The Complete Package whipped up one of our favorite summer refreshers.

Horchata - Inside NanaBread's Head

Horchata: a refreshing Mexican drink made with rice & cinnamon.

So simple, delicate, and fragrant – a good horchata is a revelation. And it’s easy to make. It only takes a few ingredients, most of which you probably already have in your fridge or pantry. Horchata is best when allowed to sit and bloom overnight, so plan to start this a day in advance for best results.

Horchata - Ingredient Collage

TCP’s Horchata (updated 2/26/2014):
1 cup long-grain white rice
2 1/2 cups boiling water
1 3″ Mexican cinnamon stick (canela)
4 cups whole milk (not skim or reduced fat)
1 can (12 ozs) evaporated milk
1 can (14 ozs) sweetened condensed milk
1 teaspoon Mexican vanilla
1/2 teaspoon ground cinnamon

Combine the rice and boiling water in your blender; blend on medium to medium-high until the rice begins to break up into small pieces (about a minute or so). Add the 3″ cinnamon stick. Cover the blender jar and allow it to sit on the counter at room temperature overnight (or up to 48 hours).

Strain the rice water to remove the kibbles & bits and discard the rice. Rinse out the container to remove any debris and pour the strained rice water back into the blender pitcher. Add the milks (all 3), vanilla, and ground cinnamon. Blend on medium speed for one minute. Pour into a serving pitcher and refrigerate. Stir just before serving to blend all the ingredients, as the fine rice pulp tends to settle to the bottom.

Horchata - CloseUp

Notes:
1. Mexican cinnamon & vanilla really are different that the version you’ll find in most markets. If you can find it in your area, please use it. The delicate, floral aroma is heavenly and takes this recipe to a whole new level.
2. This recipe can be doubled for a crowd.
3. This recipe is adapted from Lola’s Horchata at AllRecipes.com.
4. Horchata is perfect on a hot day or paired with spicy foods.
5. Horchata will keep in the refrigerator for up to a week.
6 Horchata makes excellent coffee creamer.

13 Comments

Filed under Family Stuff, Food & Recipes

My Favorite New Salad: CousCous

Couscous - Banner Shot - Inside NanaBread's Head

I am addicted to couscous. I blame my little sister (aka #4). She’s the one who first introduced me to it, and since then I have come to love it beyond words. It’s hard to even pinpoint what I love most. Maybe it’s the couscous grain itself – so buttery and delicious. Or perhaps it’s the combination of fresh & dried fruits; it does pair my favorite tart dried cherries, cranberries and apricots with the sweetness of fresh melons. Or maybe it’s the nuts? That’s a strong possibility, since toasty roasted pistachios, walnuts & pecans are showcased.

Couscous - Ingredients - Inside NanaBread's Head

Who am I kidding? It’s all of it, tossed together to create a sweet & savory, soft & crunchy perfection you just can’t find in other salads. And the best part is that you can customize it to include any of your personal favorites. My little sister loves to add pomegranate seeds. I adore it with the fresh melon and dried papaya. Any way you choose to make it, be forewarned – once you try it, you may never stop obsessing over it. Trust me.

NanaBread’s Easy CousCous:
1 cup water
1 pinch of table salt
1 tablespoon agave nectar or honey
1/8 teaspoon ground cinnamon
4 tablespoons butter
1 cup uncooked couscous
1/2 cup dried cranberries
1/2 cup dried papaya, diced
1/2 cup dried apricots, diced
1/2 cup dried, pitted tart cherries
1/2 cup fresh honeydew melon, diced
1/2 cup fresh cantaloupe, diced
1/2 cup roasted & salted pistachios
1/2 cup toasted pecans
1/2 cup toasted walnuts
zest & juice of one orange

In a saucepan, combine the water, salt, agave, cinnamon and butter; stir over medium-high heat until the water mixture comes to a boil. Quickly add the couscous and stir constantly for one minute, to prevent the couscous from sticking. Cover tightly with a lid, turn off the heat, and let it sit for 5 minutes.

While the couscous is resting, chop your fruits and nuts into roughly the same size pieces and place them in a large mixing bowl; toss with the juice and zest of one orange. Once the couscous is ready, fluff it with a fork and pour it over the fruits and nuts; toss to thoroughly combine.

Couscous - Close-Up - Inside NanaBread's Head

Let the mixture sit at room temperature for at least 30 minutes before serving. Leftover couscous should be refrigerated in an airtight container and should keep for at least 4-5 days. I don’t think mine will last that long. Not even close. Nope. Not at all. Not sharing, either. Nuh-uh. {going back for more}

14 Comments

Filed under Food & Recipes

Because sometimes you just need a giant pile of homemade potato chips

Potato chips - Finished Image with Text - Inside NanaBread's Head

Tired of reaching for stale potato chips from a greasy bag? Me, too. And it’s unnerving to read the list of preservatives on some of those bags. Am I right? Well, those days are over thanks to The Complete Package’s new toy – the OXO V-Blade Mandoline. This little guy is incredibly quick and efficient when it comes to slicing veggies. And it’s incredibly sharp.

Potato Chips - OXO Mandoline - Inside NanaBread's Head

Here’s how we sliced up a whole mess of fresh potato chips. It really could not have been any easier. To start, grab a few russet potatoes, scrub them, and peel most of the outer skin off. I like to leave a little of the potato skins for color, so I peel off every other 1/2″ or so. Give them a quick rinse and pat them dry.

Next, set up your mandoline and turn the dial to the thinnest setting. In this case, it’s 1/16th of an inch (1.5mm) for super thin & crispy chips.

OXO Mandoline - Settings - Inside NanaBread's Head

Starting at the top of the mandoline, apply a little pressure to the potato and move it back & forth across the blade. It glides so easily, it almost seems as though it’s not working, but it is. When you get down to the last inch or two of spud, grab the tool included.

OXO Mandoline Tool - Inside NanaBread's Head

I’m not sure what it’s called, but I know what it does – it keeps you from slicing your fingertips off. Just spear the end of your potato, grab the tool by the ergonomic handle, and continue slicing your potato down to the very last slice. It’s so easy, and it completely eliminates any fear you may have of working with the super sharp blades. I love that. OXO really does think of everything.

OXO Mandoline - Tool to Hold Food - Inside NanaBread's Head

When you’re done, you are left with a pile of perfectly sliced potatoes. In a million years, I could never accomplish this with a chef’s knife.

Potatoes Sliced on an OXO Mandoline - Inside NanaBread's Head

Sure, I can slice potatoes with a knife, but I can’t come anywhere close to this razor thin. I mean, c’mon. You can actually see through them. It’s amazing.

OXO Mandoline - Thin Enough To Read Through It - Inside NanaBread's Head

Once your potatoes are all sliced up, toss them into a colander and give them a thorough rinse under cold water to remove the excess starch. Spread them out onto a bed of paper towels and pat them dry.

Next, pour about 2″ of canola oil into a deep, heavy pan. Heat the oil to 350F. If you don’t have a clip-on thermometer for projects like this, I highly recommend it. I have one that can be used for frying, candy-making, you name it. And it is important to make sure the oil is hot enough. It’s what makes them crispy and keeps them from being greasy.

Once your oil hits 350F, use a slotted spoon to transfer the potatoes into the oil. This is my favorite frying tool. I found it in an antique shop years ago. If you ever run across one some day, grab it!

Perfect Frying Tool - Inside NanaBread's Head

Fry, stirring occasionally, until they are a lovely golden brown.

Frying Potato Chips - Inside NanaBread's Head

When done, lift them from the oil and allow as much oil as possible to drain off, then move them onto a paper towel lined plate to drain thoroughly. While they are still warm, sprinkle them with your favorite salt. And that’s it – you’re done!

Now grab your favorite sandwich or a hot dog, or just grab a cold drink and eat them right off the plate. Either way, they’re much tastier than chips from a bag. Let’s dig in! You grab the napkins.

Potato chips - Finished Image with Text - Inside NanaBread's Head

This is not a sponsored post. I’ve featured the OXO Mandoline because I love it and use it frequently. If you’re in the market for one, I highly recommend it. OXO’s products are well made, reliable and affordable – all things I appreciate. All opinions are my own. Pinky swear.

18 Comments

Filed under Food & Recipes, Things I Love

It’s a girl & a cornbread!

Today I’m guest posting over at Mommy Notes for my friend & fellow Texan, Sarah. We’re celebrating her beautiful new baby girl, grandmotherhood, Mother’s Day and our mutual love of Texas comfort foods. Please drop in to say hello and congratulations, and while you’re at it you can get my mother’s recipe for Mexican Cornbread. Stuffed with ground beef, cheese and green chilies, it’s rib stickin’ and delicious! To see it, click here. Congratulations & hugs, Sarah!

Mexican Cornbread for Sarah

3 Comments

Filed under Blogger Collaborations, Food & Recipes

I love a good pimento cheese sammich

Pimento Cheese Sandwich - Inside NanaBread's Head

It’s hard to beat a good sandwich, isn’t it? Some people like tuna or egg salad. Some reach for a PB&J, a BLT or a grilled cheese. All are great, but let’s not forget the sometimes overlooked pimento cheese sammy. In my book, a really good homemade pimento cheese made with great cheddar and roasted piquillo peppers is hard to beat.

Let’s break one down. It starts with a great cheese. In this case, my favorite – Tillamook Cheddar. Medium or sharp, it needs to have great flavor.

Pimento Cheese - Tillamook Cheddar - Inside NanaBread's Head

Oh, Tillamook Cheese… how I adore you. If you have a food processor with a grater blade, grating the cheese happens in mere seconds. No fooling.

Pimento Cheese - Grating the Cheese - Inside NanaBread's Head

You only need 6 ounces to make two good-sized sandwiches. Which gives me an excuse to show off one of my favorite kitchen gadgets, my OXO food scale. This little guy is awesome. I’m using it with the digital reader in its ‘parked’ position, but if you’re trying to weigh something larger, it pulls out about 3″ so you can still see it even when using a larger container. Very cool. Just set your empty bowl or plate on the scale and hit ‘zero’ to clear the weight of the plate off, then add enough cheese to hit six ounces.

Pimento Cheese - Cheese Peppers & OXO - Inside NanaBread's Head

Next, grab jar of these gorgeous DeLallo grilled piquillo peppers. No cheap pimentos here, kids. Trust me – these piquillo peppers will rock your world. I love their rich roasted flavor and that they’re packed in water, not vinegar. They are robust and so much better than those small jars of brined pimentos. For this, five or six of these beauties will do nicely.

Pimento Cheese - Piquillo Peppers - Inside NanaBread's Head

In a mixing bowl, combine the grated cheese, chopped peppers and 1/4 cup of mayonnaise (we’re a Hellman’s house). Toss in a pinch of kosher salt and 1/4 teaspoon of coarse ground black pepper. Stir until well blended, then cover it tightly and let it sit in the fridge for about 20-30 minutes.

After that, the only decision left is which bread to use, whether to toast it, and what to top it with. We like a good oat nut wheat bread. It’s so darned tasty. I love mine plain; he likes his with add-ons. A pickle on the side gets an A+ too.

Pimento Cheese - His & Hers - Inside NanaBread's Head

Mmm… so good. So creamy. So cheesy. And those piquillo peppers? I could kiss them. So, share time… do you like pimento cheese or do you reach for that BLT? Are you a grilled cheese & tomato soup guy/gal or do you prefer a good tuna or egg salad? Let’s talk sammies. And GO!

Note: I’m aware this post sounds like an advertisement for certain brands, but I swear it’s not. The post was not sponsored in any way by Tillamook Cheese, OXO or DeLallo Foods. These are products I love and use frequently; they just all came together beautifully for this post. All opinions are my own and are shared without influence from the companies shown. I promise.

11 Comments

Filed under Food & Recipes, Things I Love

NanaBread’s Crispy Potato Pancakes

Potato Pancakes - Plated

This is absolutely my favorite way to use leftover mashed potatoes. In fact, I love these so much, I sometimes intentionally make more mashed potatoes than we need for dinner just so I can make these the next day. They’re just SO GOOD! Crispy on the outside and creamy on the inside, these gorgeous golden beauties are packed with flavor and smothered in comfort.

NanaBread’s Crispy Potato Pancakes:
(makes eight 3″ potato pancakes)

2 cups leftover mashed potatoes
2 large eggs
1 tablespoon sour cream or Greek yogurt
3 tablespoons all-purpose flour
1 teaspoon Mrs. Dash salt-free seasoning
1/8 teaspoon black pepper
2 teaspoons chives (optional; I use freeze-dried)
oil for frying

Combine all of the ingredients (except the oil) in a mixing bowl.

Potato Pancakes - Ingredients

Whisk until well combined. It’s okay if there are small lumps of potatoes.

Potato Pancakes - Mixed

Add just enough oil to a non-stick skillet to about 1/8″ deep. You’ll want just enough oil to allow it to bubble around the edges as these fry. If you’re really adventurous and you’re making these for breakfast, fry a few strips of bacon first, then fry your potato pancakes in the bacon grease. The extra punch of flavor it adds will blow your mind, and if it’s hot enough, they will turn out nice and crispy without being greasy. I promise.

Potato Pancakes - Frying

Cook over medium-high heat until both sides are golden brown and crispy around the edges. Drain on paper towels and keep warm until they’re all finished. These make a great side to almost anything, but we love them for breakfast. Piled onto a plate with a little bacon and a soft fried egg? Fuhgeddaboudit.

Potato Pancakes - Breakfast

Make these, and I swear you’ll never look at leftover mashed potatoes the same way again. Now go make your own; these are mine.

24 Comments

Filed under Food & Recipes