Tag Archives: supper

Sausage, Egg & Asparagus Tart

Spring Sausage Egg & Asparagus Tart - Inside NanaBread's Head

You know Spring has sprung when fresh asparagus pops up in abundance. I grabbed a handful this week and made this easy tart for lunch. If you like quiche, you’ll love this. It starts with these beauties. I love this vibrant green color.

Spring Sausage Egg & Asparagus Tart - Raw Asparagus

Alton Brown (Food Network) says the best way to cook asparagus and preserve its flavor and bright green color is to microwave it. Start by cutting off the tough stem ends, then grab a strip of 4 paper towels (still connected). Wet them and squeeze out most of the water. Un-wad the paper towels until you have a strip two towels long and two towels thick. Spread the asparagus on the damp towels in a single layer and sprinkle with kosher salt. Roll the asparagus up in the paper towels and microwave on high for 3 minutes. Done!

Spring Sausage Egg & Asparagus Tart - Chicken Sausage

Next up are these gorgeous organic chicken, asparagus and parmesan smoked sausages from my local HEB market. I simply seared them in a hot skillet until lightly browned on both sides, then sliced them in half lengthwise.

Spring Sausage Egg & Asparagus Tart - Scrambled Eggs

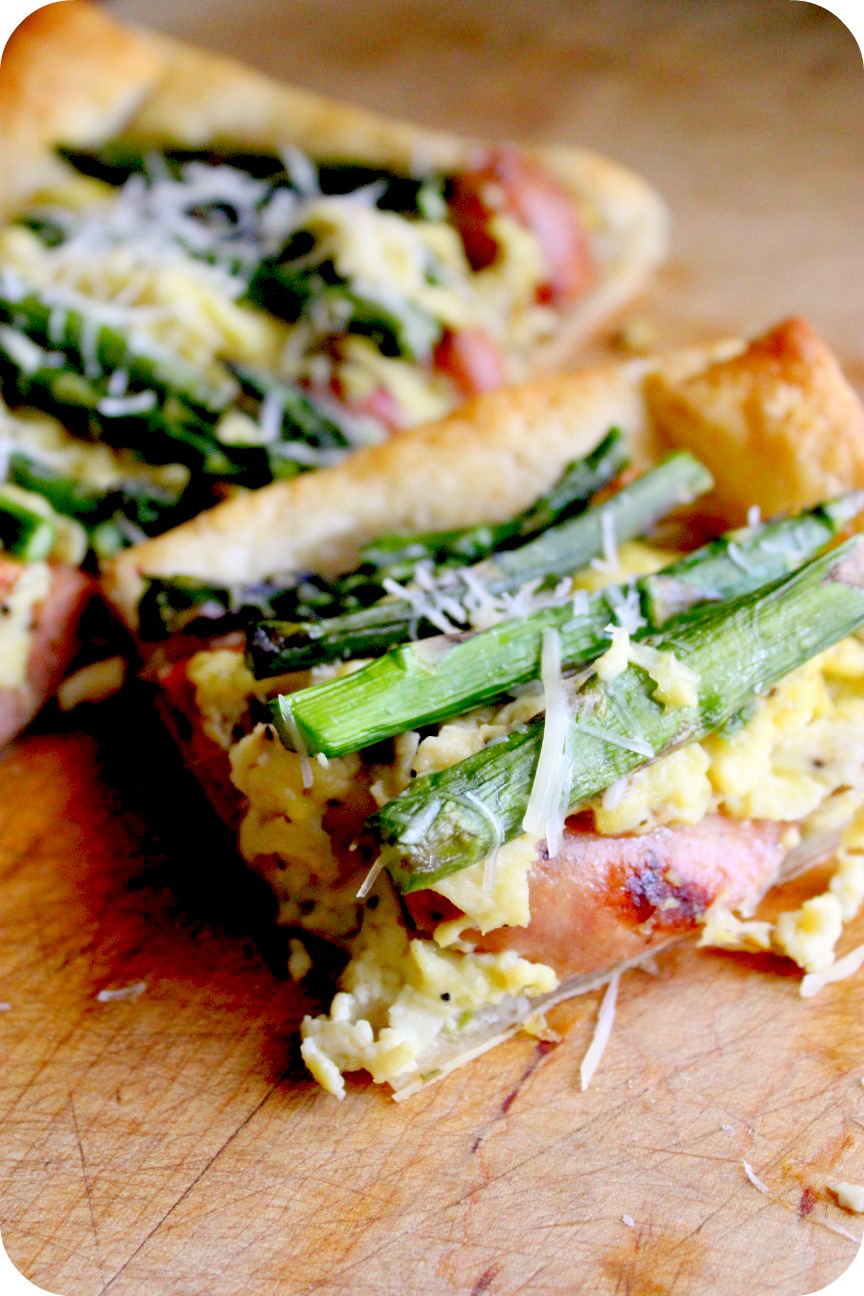
Soft scrambled eggs are cooked in the same skillet until almost but not quite set. These are just getting started. A box of frozen puff pastry makes quick work of the tart shell. To save time, thaw the puff pastry while you’re steaming the asparagus and browning the sausages. I promise – this tart could not be easier and topped with shredded parmesan cheese, it could not be more delicious.

Spring Sausage Egg & Asparagus Tart - Cut

NanaBread’s Sausage Egg & Asparagus Tart:
1 box frozen puff pastry (17.3 ounces or two ready-to-bake sheets), thawed
2 tablespoons butter, melted

1 package smoked chicken sausage (I used an asparagus & parmesan version)
1 pound fresh asparagus, microwaved (instructions above)
2 slices Lacey Swiss cheese, from your grocer’s deli counter
1/2 cup shredded parmesan cheese, to sprinkle on top

2 tablespoons unsalted butter
4 large eggs
4 tablespoons heavy cream or half-n-half
2 tablespoons butter, melted
1/2 teaspoon kosher salt
1/4 teaspoon cracked black pepper

Pre-heat the oven to 425F; remove the puff pastry from the box and let it thaw.

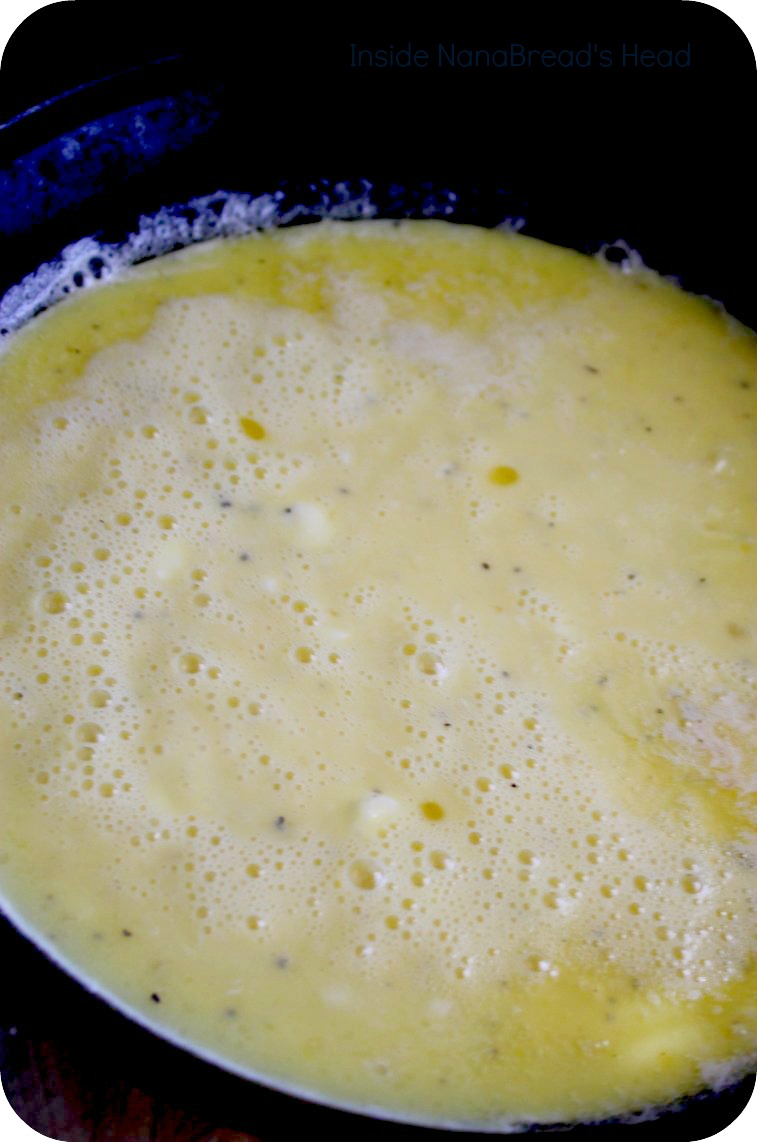
In a hot skillet, place the chicken sausages (sliced or whole) and brown on both sides over high heat, then remove from the skillet. In a mixing bowl, combine the eggs, cream or half-n-half, melted butter, salt & pepper. Whisk until fluffy. To the hot skillet, add 2 tablespoons of butter and swirl the pan until it is melted. Pour in the eggs, and using a silicone spatula, gently push the eggs around the skillet until they are almost set, but still wet and glossy. (Don’t worry, they’ll finish cooking in the oven.)

On a lined baking sheet, lay out one full sheet of puff pastry. Cut the remaining sheet into 3/4″ strips, and lay them around the outside edge of the bottom sheet to create a frame. Brush the edges with melted butter, then layer on your ingredients starting with the Swiss cheese, then the cut up sausages, the scrambled eggs, then the steamed asparagus. Bake at 425F for 20-30 minutes (depending on your oven), or until the puff pastry is a light golden brown.

Spring Sausage Egg & Asparagus Tart - Construction Collage

Allow the tart to cool for a few minutes before slicing. To serve, top with a sprinkle of parmesan cheese. This tart makes four large servings (main course) or nine small servings (appetizer). It’s perfect for any time of day. We had it for lunch, but it would also be lovely for brunch with fruit or dinner with a side salad. No one needs to know how simple it was, except for us. And I’ll never tell.

Spring Sausage Egg & Asparagus Tart - Sliced

Notes from the Kitchen:
1. This can be made meat-free by omitting the sausages.
2. It would also be lovely with a rotisserie chicken instead of sausage.
3. To reduce the amount of butter, try spraying the skillet with Pam instead.
4. To further reduce fat, swap 2 Tbsp. fat-free Greek yogurt for the cream.
5. The sausages & asparagus can be cooked in advance to save time.
6. To tart up your tart, try adding a small pinch of nutmeg or cayenne pepper to your scrambled eggs.
7. Leftovers should be refrigerated and eaten within 2-3 days.

Advertisement

7 Comments

Filed under Food & Recipes

Luscious Leftovers: Lettuce Wraps

We meal plan in this house. Each Sunday evening, I sit with a notepad and plan out our week. Lately, my game plan involves picking a few main dish meats that can be re-used as leftovers in a variety of ways. With just two of us, it makes it easier to buy, easier to stretch, and easier to save money as well.

For example, The Complete Package recently smoked a rack of pork ribs. That night, we had a traditional barbecue feast of ribs with beans and macaroni salad. The next night we one of my favorite simple go-to meals – Asian lettuce wraps. When I say this one is easy, I’m not even kidding. Not one little bit.

Lettuce Wraps - Inside NanaBread's Head

Here’s what you’ll need:

  • leftover smoked pork (ribs, pulled pork, chops, etc.), warmed up
  • a small pan of steamed white rice (we love basmati)
  • scallions, cut into 2″ strips lengthwise
  • butterhead or Boston lettuce, rinsed & patted dry
  • your favorite Asian hoisin or sweet chili sauce

Lettuce Wrap - Inside NanaBread's Head

To serve, simply lay out a leaf or two of lettuce. Add a spoonful of steamed rice, some smoked pork, a few scallions and a drizzle of your favorite hoisin or chili sauce (or both). Roll it up and stuff it in your pie hole. BAM! So good, and ready in mere minutes. This meal confirms my favorite motto: Keep it Simple.

Lettuce Wraps Collage - Inside NanaBread's Head

What is your go-to dinner in a hurry meal? I’d love for you to share it! -jeanne

9 Comments

Filed under Food & Recipes

It’s a girl & a cornbread!

Today I’m guest posting over at Mommy Notes for my friend & fellow Texan, Sarah. We’re celebrating her beautiful new baby girl, grandmotherhood, Mother’s Day and our mutual love of Texas comfort foods. Please drop in to say hello and congratulations, and while you’re at it you can get my mother’s recipe for Mexican Cornbread. Stuffed with ground beef, cheese and green chilies, it’s rib stickin’ and delicious! To see it, click here. Congratulations & hugs, Sarah!

Mexican Cornbread for Sarah

3 Comments

Filed under Blogger Collaborations, Food & Recipes

My new favorite chicken salad

My twist on ATK’s Classic Chicken Salad; it’s light & lemony & yummy

It’s from America’s Test Kitchen. Raise your hand if you’re surprised I fell in love with yet another ATK recipe. No? Nobody? Yeah, me either. It’s no secret I’m a rabid fan of America’s Test Kitchen cookbooks and TV shows. I just love that they devote their lives to perfecting recipes so I don’t have to.

So let’s get on to the chicken salad. This Classic Chicken Salad is adapted from The America’s Test Kitchen Family Cookbook (revised edition).

1 rotisserie chicken from your grocer’s deli, plain
2 tablespoons canola oil
3 ribs celery, chopped fine
3/4 cup mayonnaise (we prefer Hellman’s)
2 scallions, minced
2-3 tablespoons fresh lemon juice
2 tablespoons minced flat-leaf parsley
kosher salt & cracked black pepper to taste

Bone and chop your rotisserie chicken and toss it in a mixing bowl.

Note: I prefer the plain chicken seasoned only with salt & pepper. I say that because I once mistakenly grabbed a barbecue seasoned chicken and it was a horrible choice for chicken salad. Don’t be like me; read the label.

Add the canola oil, celery, mayonnaise, scallions, 2 tablespoons of lemon juice, parsley and a good pinch of salt & pepper. Give it a stir and allow it to sit for a few minutes, then come back and taste it. I found I liked this recipe with a little more lemon juice, so I added another tablespoon. It gives it a bright citrus zing. Instead of adding more juice, you could also throw in some zested lemon peel, since you’re using a fresh lemon anyway. What I’m saying here is that the lemon is my favorite part of this chicken salad. It’s refreshing. And zingy. I also add a pretty heavy pinch of fresh cracked black pepper, because that’s my thing. I loved cracked black pepper.

Cover tightly and refrigerate for about 20-30 minutes before serving. It helps the flavors come together, and everyone is happier when they’re all getting along. To serve, simply scoop onto your favorite chicken salad vehicle. In my case, it’s a toasted bagel. I can also vouch for the fact that it’s delicious on whole wheat toast, saltine crackers and celery sticks.

If you’re feeling frisky, you can top it with a fresh sliced tomato and a nice crispy piece of romaine. I also highly recommend spicy sweet pickles and your favorite chips on the side so you can get in all the food groups – sweet, salty, crunchy and creamy. Wait, that’s wrong. There are five food groups. I totally left off chocolate! {slaps forehead} Have mercy… can you ever forgive me?

13 Comments

Filed under Food & Recipes

Easy Chicken Tortellini Soup

Tortellini Soup - From NanaBread to You, With Love


I just love this recipe. It’s quick, easy, flavorful and satisfying. A friend shared it with me in the early 1990’s when we were working on a church cookbook and I’ve been making it ever since. She made hers with ground beef and beef broth, but I prefer this lighter chicken version.

Ingredients List:

1 rotisserie chicken (plain) from your grocer’s deli
1 32-oz. carton of organic chicken broth
1 medium onion, diced
4 cloves of garlic, minced
1 15-oz. can of diced fire-roasted tomatoes
1 9-oz. package of frozen chopped spinach, thawed
1 10-oz. package of cheese tortellini (refrigerated or frozen)
1/2 teaspoon of garlic salt
1/2 teaspoon of McCormick’s Montreal Steak seasoning
salt & pepper to taste
pinch of dried oregano and basil
pinch of red pepper flakes (optional)
parmesan cheese & chopped flat-leaf Italian parsley, for garnish

Place the rotisserie chicken in a large heavy-bottomed pot and pour in the carton of chicken broth. Cover and simmer until the chicken is thoroughly heated and begins to fall apart. Using a slotted spoon, remove the chicken and allow it to cool until you can chop it without burning yourself. Strain the chicken broth to remove any kibbles and bits and return it to the pan. If needed, add a cup or two of water to create more broth. (May be necessary if your broth simmers too long and/or reduces too quickly.)

Over medium heat, bring the broth back to a simmer. Add the onion, garlic, tomatoes and seasonings. If you like a little spice, throw in that pinch of red pepper flakes. While that simmers, bone the chicken and chop it into bite-size pieces. If you’re feeding a crowd, use all of the chopped chicken. If you’re not, use half the chicken and save the rest for chicken salad tomorrow night. Return the chopped chicken to the pot. Add the spinach and tortellini. Simmer for an additional 15-20 minutes. Taste to see if it needs additional salt and pepper. I also like to taste one of the tortellini to make sure they’re done. If you like your soup on the thicker side, combine 1 tablespoon of cornstarch with 2 tablespoons of water and whisk until smooth; stir into the soup.

To serve, spoon into bowls and top with chopped parsley and grated parmesan cheese. A great loaf of crusty bread is the perfect side to this soup.

Substitutions:
1. make with beef broth and ground beef (my friend’s version)
2. use cheese, spinach, or meat tortellini – your choice
3. use mini-ravioli instead of tortellini
4. leave out the tomatoes for a clear broth (great for colds)
5. substitute the pasta of your choosing for the tortellini
6. substitute browned Italian sausage for chicken or beef
7. substitute fresh spinach, kale or other favorite greens

Helpful Hint:
Prepping early can save a ton of time! Simmer your chicken in broth in advance. Strain the broth and store in airtight containers until needed (fridge for 2-3 days/freezer for 2-3 weeks). Bone and chop the chicken and refrigerate or freeze separately from the broth. If you prep these 2 things in advance, you can make this soup in under an hour. Just place the frozen broth in a pan and heat to simmering. Add the chicken and other ingredients, except for the parsley and parmesan. Heat until thoroughly warmed, season to taste, and sprinkle with parsley and parmesan cheese. See? I told you it was easy.

Go make this soup. You know you want to.

11 Comments

Filed under Food & Recipes

Recipe Review: ATK’s Chicken Marsala


I am locked in a perpetual search for new main dish recipes. This weekend, I decided to take on Chicken Marsala from the America’s Test Kitchen Family Cookbook. There’s a lot of good stuff in that cookbook, and I’m a big fan of their work. I’m also a big fan of mushrooms stewed in wine, so it was a no-brainer. This recipe makes 4 servings. Here’s how it all went down.

Ingredients:
2 boneless, skinless chicken breasts
salt & pepper
1/2 cup all-purpose flour
3 tablespoons of vegetable oil
3 ounces of pancetta, finely minced
8 ounces of button mushrooms, thinly sliced
1 garlic clove, minced
1 teaspoon of tomato paste
1 1/2 cups of sweet Marsala wine (see note below)
1 1/2 tablespoons of freshly squeezed lemon juice
3 tablespoons of cold butter, cut into 3 pieces
2 tablespoons of minced flat-leaf Italian parsley
Spaghetti, linguine or other pasta, cooked

Start by pre-heating your oven to 300F. You’ll want to keep your chicken cutlets warm while you’re making the sauce.

To prepare the chicken, slice each breast in half horizontally to make two thinner cutlets. If one end is thicker, pound the thick end to make chicken cutlet uniformly thin. Once the chicken is halved and pounded, season each cutlet with salt and pepper and dredge it in flour to coat. In a hot skillet over medium-high heat, add the vegetable oil and cook the chicken until golden brown on each side. Place the cooked cutlets in an oven-proof pan, cover lightly with foil and place them in the hot oven to stay warm.

Using the same oil that is already in the skillet, cook the pancetta and sliced mushrooms until they are a deep, gorgeous brown and the pancetta is crispy. Note: I did not mince my pancetta, and I came to regret it. The larger pieces really distracted from the desired texture of the sauce. Don’t be like me. Mince your pancetta into tiny little tidbits. You’ll thank me for it later.


When the pancetta and mushrooms are a gorgeous golden brown, make a well in the center and throw in the garlic and tomato paste. Brown for a few seconds, or until you really start to smell the garlic. Stir together with the mushrooms and pancetta and add the Marsala wine (as soon as you read the following note).


NOTE ON SWEET MARSALA VERSUS DRY MARSALA WINE: The ATK Cookbook clearly says to use sweet Marsala wine. The little Italian man at the liquor store said to use dry Marsala wine. I bought both, thinking I might blend the two. Instead, I convinced myself to use the sweet Marsala, as stated in the cookbook. Big mistake, in my opinion. The final sauce was… well, too sweet. Not at all like the savory Marsala sauce I order in restaurants. Next time, I’m sticking with the little Italian man and using the dry Marsala. As he so wisely stated, “You use the sweet Marsala for tiramisu; you use the dry for marsala in sauces for meat.” Lesson learned? Never argue with an authentic Italian when you’re making Italian food. That seems so clear to me now.

Okay, so once you’ve decided to skip the sweet for the dry Marsala, pour the wine into the pan with the mushrooms. Keeping the heat at medium-high, allow the sauce to cook down until it is reduced by at least half and the wine takes on a syrupy texture. This will take a few minutes, so stir it occasionally and keep an eye on it. Once it’s reduced, add the lemon juice and stir to combine. Turn off the heat and add the cold butter, one piece at a time, whisking it in before adding the next piece. Add the minced parsley and stir it in; add salt and pepper to taste.


Serve over the cooked pasta of your choice. I also recommend a nice salad and a warm, crusty baguette. And if you have a lovely bottle of Italian red on hand, well that’s just frosting on the cupcake.

Final Thoughts: this recipe is worth making, with a few minor adjustments. I feel strongly that dry Marsala is the better choice here. And because I like the smooth texture of a Marsala sauce that really showcases the mushrooms, I think I will fry the pancetta and remove it from the pan next time so it will flavor the mushrooms, but not be incorporated in the final sauce. I’m looking forward to trying this again with the dry Marsala, possibly on a grilled sirloin. If you love mushrooms in wine, this one is worthy of a shot at your dinner table. Mangia!

NanaBread's Chicken Marsala courtesy of America's Test Kitchen

11 Comments

Filed under Food & Recipes

Our Perfect Meal

Smoked pork tenderloin, stir-fried cabbage & Texas caviar - oh, my!

The Complete Package and I have discovered our perfect meal. We made it this weekend, but usually we save it for New Year’s Day. It’s one of our favorites of all time and it confirms my theory that sometimes the simplest foods are the most wonderful. Here’s the rundown:

Pork Tenderloin
rubbed with Salt Lick dry rub (it’s spicy & wonderful) and smoked over oak

Stir-Fried Cabbage
green cabbage chopped & braised in a hot skillet with bacon, salt & black pepper

Texas Caviar
black-eyed peas w/jalapeno, purple onion, cilantro, red wine vinegar & olive oil

Oh, baby. Who wouldn’t love to put down a plate of this cabbage? When you add a slab of smokey pork tenderloin and Texas caviar, it’s amazing. Try it for yourself and see if you don’t agree. It’s simple. Beautiful. Flavorful. Perfect.

One tip: if you’re sensitive to cabbage, consider serving this meal with a simple appetizer – Beano. {And just like that, she makes a subliminal fart joke.}

11 Comments

Filed under Food & Recipes, Things I Love

TCP Cooks: Smoky Baby Back Ribs


Of all the things The Complete Package cooks, his smoked meats are among my favorites. Pork ribs, brisket, pork tenderloin, chicken breasts – it’s all good. One of my personal favorites is the pork ribs. They’re not only delicious as a meal – with baked beans and potato salad, they are fabulous as leftovers. Once the meat falls off the bone (literally), it can be used in posole, pulled pork sandwiches, and one of my favorite light summer meals – smoky pork lettuce wraps. Today, I’m sharing TCP’s secret formula for fall-off-the-bone smoky pork ribs and those easy, flavorful wraps.

Here’s what you’ll need for the ribs:
1 rack of pork baby back ribs
2-3 teaspoons of garlic salt
2-3 tablespoons of Salt Lick Dry BBQ Rub
aluminum foil and oak smoking chips

First, remove the pork ribs from the package and rinse them thoroughly. Pat dry with paper towels. Using a sharp knife, remove the silver skin from the back side of the ribs and leave the fat on the top side. Sprinkle liberally with garlic salt, then apply a light coat of the dry rub mix, rubbing it in until the entire rack is coated. If you can’t find Salt Lick rub, you can order it online or simply substitute your favorite brand. If you’re in Texas, you’ll find it in HEB stores.

TCP uses a gas grill, but you could do this with charcoal, too. Heat the grill to high heat and sear the ribs on both sides, until they are browned and crispy. Remove the ribs from the grill so you can adjust your grill temperatures as follows. Remember: the key to tender smoked ribs is “slow and low” which means a longer cooking time at low heat. The result is smoky perfection.

If you are using a gas grill, turn off the heat on ½ of the grill, and turn the heat on the other ½ of the grill down to medium heat. This divides your grill into a “warm” side and a “cool” side for smoking your ribs. Place your ribs back on the cool side, and a wood chip packet on the warm side (see below).

If you are using a charcoal grill, remove the grill from your cooker and push your charcoal briquettes to one side of the grill. If you still have quite a few hot coals, use a pair of tongs to remove some of them. You want half of your grill to be free of coals, and half your grill to have just enough hot coals to cause your wood chip packets to smoke. Use extreme caution when moving hot coals!!

Rip off 2 sheets of aluminum foil about 12-14” long. Place 1 ½ cups of oak smoking chips in the center of each sheet and fold them into a sealed packet. Using a sharp knife, cut 6 to 8 slits in the top of the foil packets to allow the smoke to escape. Place the ribs on the “cool” side of the grill and one of the oak chip packets on the “hot” side. Close the grill and allow the ribs to smoke for 30 minutes. After 30 minutes, remove the first wood chip packet and replace it with the second. Smoke for an additional 30 minutes, making sure the “cool” side of the grill doesn’t get too hot, overcooking or drying out your ribs.

After one hour of smoking on the grill, place the ribs into a baking pan, cover tightly with foil and place them in a warm oven (250F) for 3 hours. When you remove them from the oven, remove the foil and allow your ribs to rest for 10 minutes before cutting into them. When I say cutting them, I really mean using tongs to pull the rib bones out. It’s not really cutting if they fall apart when you touch them. As a bonus, your house is going to smell fabulous and your neighbors are going to be ringing doorbells trying to identify the source of this heavenly aroma. It’s up to you whether you share or not. I’m not saying a word.

Smokey pork, scallions & hoisin on crisp Boston lettuce? Win-win-win!

For the lettuce wraps, you’ll need:
one head of Boston lettuce
2 to 3 cups of leftover smoky pork rib meat
2 or 3 scallions, sliced lengthwise into 3-4” strips
your favorite hoisin sauce

Separate your head of lettuce into individual leaves, cut your scallions into thin julienned strips, and warm your smoky rib meat. To serve, hold one lettuce leaf in your hand. Place a spoonful of smoked pork in the lettuce leaf, add scallion shreds and top with hoisin sauce. Roll and consume. It’s that easy. If you’re a rice lover, you can add steamed rice to your lettuce wraps. If you like crunch, you can add those crispy chow mein noodles. I’m a purist. I like to keep it simple with pork, scallions and hoisin. But that’s the beauty of leftovers. You can be as creative or as straight forward as you like. I just wish I had the words to describe how incredible this tastes. Oh, TCP and smoky pork… I love you so!

Now, if you'll excuse me, I have a date with a lettuce wrap.

14 Comments

Filed under Food & Recipes

Recipe Review: Pasta al Pomodoro


She’s young, she’s spunky, she’s a Chicagoan and she makes a mean Pomodoro sauce. Who am I speaking of? Well, that would be the lovely Jenna of Jennaseverthingblog.wordpress.com. On May 11th, she posted a recipe that caught my eye and made my tummy grumble. And I had just eaten. I knew when I saw it that I would have to try it. It’s her version of Pasta al Pomodoro, and if you’re a rabid pasta fan like me, you’re going to want to make it, too.

Here’s what I loved about Jenna’s Pomodoro:
1. It’s incredibly easy to make.
2. It’s made with a handful of all-natural ingredients.
3. It packs a wallop of flavor you don’t get from jarred sauces.
4. It can be paired with every type of pasta – from bow-ties to lasagna.
5. I can make big batches of this and freeze it for quick meals.
6. It contains fresh basil. Everything is better with fresh basil.
7. It contains lots of fresh garlic. Everything is better with garlic.
8. It tastes better than any other pasta sauce I’ve ever eaten. Seriously.

Here’s what I didn’t love about Jenna’s Pomodoro:
Nothing! This is my new go-to sauce. No more Prego for me, baby.

So do me a favor. Jump over to Jenna’s blog and take a look at her step-by-step instructions, complete with full-color photos. If you’re not sold on this sauce, then I’m a monkey’s uncle. Which will be tricky, since I am neither a monkey nor an uncle. Now if you’ll excuse me, I need to go find an Altoid.

14 Comments

Filed under Food & Recipes

TCP Cooks: Flank Steak Sandwiches with Soy-Ginger Mayonnaise

TCP's Steak Sandwiches with Soy-Ginger Mayo - No one can eat just one!

This sandwich has become a Complete Package signature dish. He’s made it so often, family and friends consider it a trademark TCP creation. But the truth is the recipe came from The America’s Test Kitchen Cookbook (2001, Boston Common Press). Once he tried it, we were hooked. The recipe may sound less than dazzling at first glance, but it’s packed with tremendous flavor. It’s hard to describe, except to say that everyone who’s ever tried it loves it. Last week, when Mom and two of my sisters were here, TCP broke out the flank steak sandwiches, and they fell in love. They’re that good. The key is a good flank steak and the soy-ginger mayonnaise. If you’re not a ginger fan, don’t worry. Mom isn’t either, but she loved these sandwiches. All I can say is “try them…you’ll like them!”

First, mix up the Soy-Ginger Mayonnaise:
1/2 cup of Hellman’s Mayonnaise (not Miracle Whip, Hellman’s – TCP insists)
1 tablespoon of soy sauce
1/2 teaspoon of honey
1/2 teaspoon of garlic, smashed to a paste
1 teaspoon of fresh ginger, grated on a microplane
1/2 teaspoon of sesame oil

Combine all ingredients in a small bowl and whisk until well blended. Cover and refrigerate until ready to use. You can make this up to one day in advance, and it really tastes best if you make it early so all the flavors come together.

For the sandwiches, you’ll need:
1 1/2 pounds of flank steak, trimmed of fat & patted dry
1/2 teaspoon of garlic salt
Salt & Pepper, to your own taste
1 tablespoon of vegetable oil (if you use a skillet)
1 baguette of French bread (use a good soft one)
The soy-ginger mayonnaise (made in advance)
1/2 of a small purple onion, sliced paper thin
2-3 cups of arugula, washed, stemmed & dried

Season your flank steak with garlic salt, salt & pepper. If you’re using a cast iron skillet, heat it to blazing hot first, add the oil and then add your flank steak. If you’re using an outdoor grill, you can skip the oil and just season it first. Either way, cook your flank steak over high heat until the outside is seared and the inside is medium-rare. Remove from the heat and allow it to rest on a cutting board for 10 minutes. If you have a piece of foil handy, throw it over the steak to keep it warm. While the steak is resting, prep the rest of the sandwich.

Slice your baguette in half lengthwise and toast each half on the grill or in a dry skillet or griddle until lightly toasted. Spread each half liberally with soy-ginger mayonnaise. Cutting across the grain and on a bias (45 degree angle), thinly slice your flank steak and place it on the bottom half of the baguette. Top the steak with purple onion and arugula and put the lid on it. Gently press the sandwich to bring it all together, then slice into 4″ to 6″ segments and serve immediately.

We could talk about side dishes for this meal, but the truth is I never remember what we had with these sandwiches. Pickles? Chips? Maybe. I really couldn’t tell you. They’re so good, everything else becomes a blur. And really, you don’t need anything except a handful of napkins and something cold to wash them down with. Enjoy! And thanks for making these for the girls, honey. You da’ man!

16 Comments

Filed under Food & Recipes