Tag Archives: easy recipes

Peanut Butter & Co Plays Two Ways

Confession: I once jogged 5 miles for a big jar of peanut butter.
It was my junior year of high school and a friend’s dad bet he could train me to run 5 miles. My first thought was “Joke’s on you, suckah! I don’t run unless my butt’s on fire.” My second was “What’s in it for me?” His bait: a giant jar of peanut butter. This will date me, but it was 1980 and there was a nation-wide peanut butter shortage. As a PB junkie, I was game. After a few weeks of training, I ran that 5 miles and claimed my prize. Then, because I have 4 sisters, I promptly hid it under a pile of laundry in my room because a.) kids never touch laundry, b.) I didn’t care to share, and c.) see above re: peanut butter shortage.

If any sisters are reading this, I apologize. It was a dark time for peanut butter lovers and I went into “every man for himself” mode. I did what I had to.

Peanut Butter & Company recently issued a Mystery Ingredient Challenge to members of its Yum Squad. Sign up, and they would send you not only the peanut butter to play with, but a secret ingredient. Until your box arrived, you would have no idea what your mystery ingredient might be.

Here’s the peanut butter I chose to play with for this challenge:

PB&Co - White & Dark Chocolate Peanut Butters

And here’s my mystery ingredient:

PB&Co - Secret Ingredient - Espresso Powder

If you know me, you know I’m a coffee lover. I don’t function in the morning until I’ve quaffed my first cup, so this secret ingredient was perfect for me. Pinterest has been taunting me with scones lately and I found myself craving warm, flaky layers. So the first thing I made was a two-tone layered scone based on the America’s Test Kitchen cream scone recipe.

PB&Co - Two-Tone Scones2 - March 2015

NANABREAD’S TWO-TONE CHOCOLATE PEANUT BUTTER SCONE

For the white chocolate peanut butter layer:
1 cup all-purpose flour
3 tablespoons sugar
1/2 tablespoon baking powder
3 tablespoons butter, cut into small cubes & chilled
3 tablespoons White Chocolate Wonderful peanut butter
1/2 to 2/3 cup heavy whipping cream, as needed

Place all ingredients except the cream in a food processor and process for 6-8 pulses. Turn the processor on and slowly add enough cream until the dough sticks together and starts to form a ball. It should be the consistency of a soft biscuit dough. Scrape the dough out onto a floured surface and knead a few times, forming it into a square about 3/4″ thick.

For the dark chocolate peanut butter layer:
1 cup all-purpose flour
2 tablespoons sugar
1/2 tablespoon baking powder
1 tablespoon Medaglia D’Oro instant espresso powder
1/2 cup semi-sweet miniature chocolate chips
3 tablespoons butter, cut into small cubes & chilled
3 tablespoons Dark Chocolate Dreams peanut butter
1/2 to 2/3 cup heavy whipping cream, as needed

Place all ingredients except the cream in a food processor and process for 6-8 pulses. Turn the processor on and slowly add enough cream until the dough sticks together and starts to form a ball. It should be the consistency of a soft biscuit dough. Scrape the dough out onto a floured surface and knead a few times, forming it into a square about 3/4″ thick.

To layer, make sure each square of dough is the same size. Brush the top of the dark chocolate dough with a little cream and place the white chocolate layer on top. Press gently and square up the sides, then set aside while you make the glaze.

For the espresso glaze:
2 tablespoons heavy whipping cream, chilled
1 teaspoon Medaglia D’Oro instant espresso powder
1 tablespoon honey or agave nectar
2 tablespoons raw or Demerara sugar crystals, to sprinkle on top

In a small bowl, combine the cream, espresso powder and honey or agave. Whisk until smooth.

Pre-heat your oven to 425F and prepare an 8″ square baking pan by spraying it lightly with baking spray or lining it with parchment paper. Using a large kitchen knife or a bench scraper, cut the layered scone dough into equal pieces (I cut mine into 3 rows of 3 for 9 smallish scones). Place them in the baking pan so that the sides are just touching. Using a pastry brush, brush the entire surface of the scones with a thick coating of glaze, then sprinkle generously with raw sugar crystals. Bake for 14-18 minutes, or just until a toothpick comes out clean. I don’t like dry scones, so I tend to take mine out of the oven when there are still a few small crumbs sticking to that toothpick. Serve warm from the oven with a pat of butter and a hot cup of coffee. Man, I wish you could smell these.

PB&Co - Two-Tone Scones1 - March 2015

“But NanaBread… that recipe only used 3 tablespoons of each peanut butter. What else can we make with all of the ooey gooey peanut butter goodness left in those jars?” Well, I’m glad you asked, because (and I love to say this)…

BUT WAIT… THERE’S MORE!

I also made a layered peanut butter parfait using both White Chocolate Wonderful and Dark Chocolate Dreams peanut butter AND my beloved secret ingredient espresso powder. That’s right, folks! It’s a parfait of chocolate espresso cake layered with creamy peanut butter custard and topped with espresso whipped cream and cake crumbs. SHUT THE FRONT DOOR!

PB&Co - Chocolate Espresso PB Parfaits - Trio

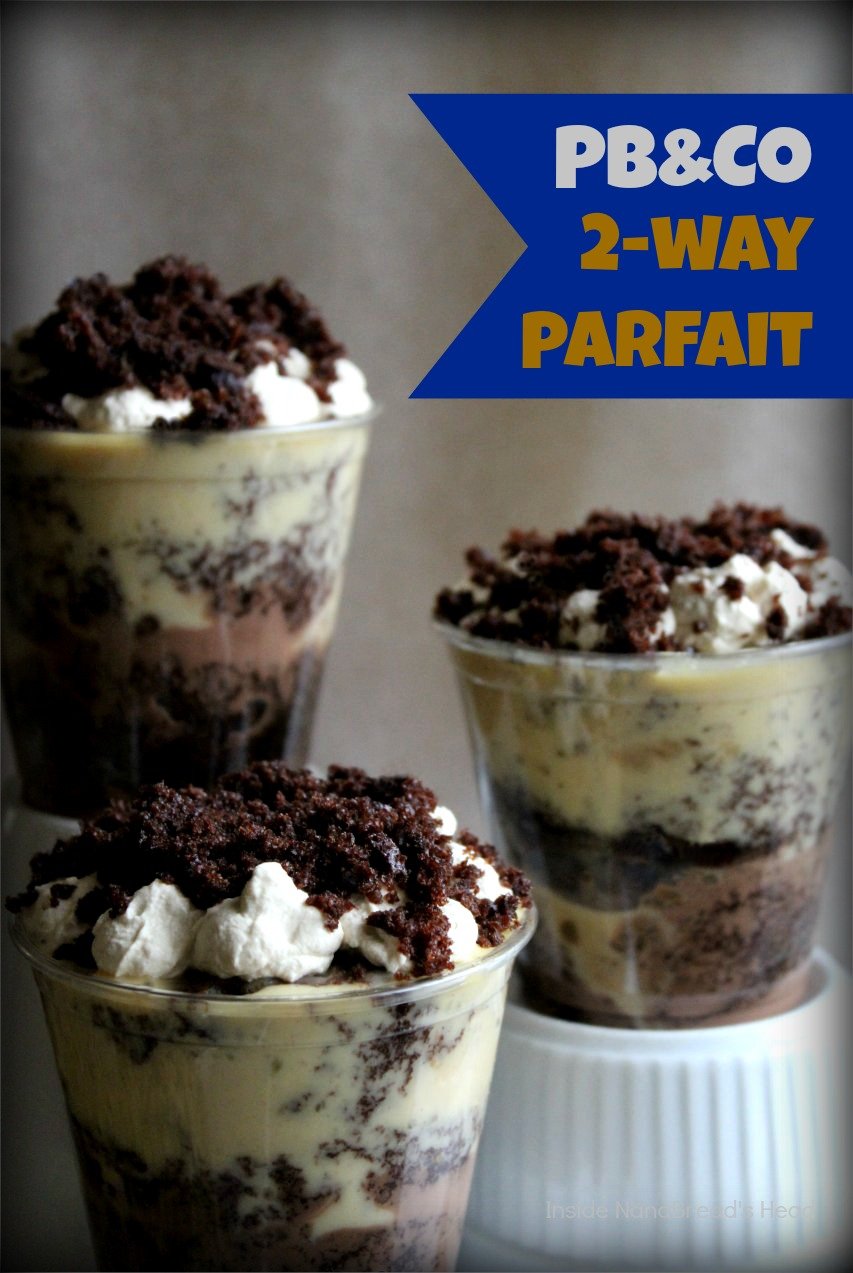
NANABREAD’S TWO-WAY PEANUT BUTTER ESPRESSO PARFAIT

For the cake:
1 box (15.25 ozs) Betty Crocker Triple-Chocolate cake mix
1 1/4 cup water
1/2 cup canola oil
3 large eggs
1 tablespoon Medaglia D’Oro instant espresso powder

Whisk all ingredients until smooth and pour into a prepared 13″ x 9″ baking pan. Bake according to the directions on the cake mix box, just until a toothpick comes out clean. Remove from the oven and set aside to cool.

For the peanut butter custard:
1 box (4.6 ozs.) Jell-O Cook & Serve vanilla custard mix
2 cups milk (I used 2%)
1 tub (8 ozs.) mascarpone cheese (or cream cheese)
1/2 cup each of White Chocolate Wonderful & Dark Chocolate Dreams

In a saucepan, combine the vanilla custard powder and milk and whisk until combined. Cook over medium-high heat, whisking frequently, until the mixture is thick and bubbly. Remove from the heat and allow it to cool, then transfer to a bowl, cover with plastic wrap and refrigerate until completely chilled.

Once chilled, divide the custard equally into two bowls. Add half of the mascarpone (4 ozs.) and one type of peanut butter to each bowl. Whisk until smooth and keep refrigerated until assembly.

For the espresso whipped cream:
1 cup heavy whipping cream, chilled
1 teaspoon Medaglia D’Oro instant espresso powder
1 teaspoon vanilla extract
2-3 tablespoons sugar, to taste

In a mixing bowl, combine all of the ingredients. Whip with an electric mixer until it thickens and holds stiff peaks. Scrape it into a plastic bag and press all the air out, and place in the refrigerator until needed.

To assemble, cut the cooled cake into circles the size of the glass you’re serving these in. Start by placing a layer of cake, then spoon in the dark chocolate peanut butter custard. Top it with a another layer of cake, followed by the white chocolate peanut butter custard. Continue to layer until each glass is full, then snip the tip off that plastic bag and pipe a layer of espresso whipped cream on top. To finish, crumble leftover cake scraps over the top of each parfait. Keep refrigerated until ready to serve.

PB&Co - Chocolate Espresso PB Parfaits - Close-Up

I made these in two sizes – small 8-oz disposable cups for ‘party-size’ servings and large 20-oz iced tea glasses for ‘I’m alone watching a movie in my pj’s and no one can see me’ servings. As I’ve said before, this blog is a no judgement zone. These were so good, Jonah Bear & Lilly Bug didn’t come up for air.

Me: “Is it good? Do you like it?”
Them: Nod vigorously; keep shoveling
Verdict: The proof is literally in the pudding.

PB&Co - Chocolate Espresso PB Parfaits - Mine

Special thanks to Peanut Butter & Co for sending me a big ol’ box of fun for their Mystery Ingredient Challenge. They were kind enough to provide multiple jars of peanut butter and a jar of espresso powder at no cost to me, and I had a ball playing with it. To clarify, as a member of the Peanut Butter & Co Yum Squad, I am not compensated in any way. I just love the product and enjoy experimenting with it. To find out more about the many fabulous flavors they sell, CLICK HERE.

YumSquad-Banner-MysteryIngredient-espresso

Advertisement

11 Comments

Filed under Blogger Collaborations, Food & Recipes, Things I Love

OXO offers pans now? YES!

We all know OXO makes a million fabulous kitchen gadgets, and I’ve made no bones about the fact that I use mine with enthusiasm. They are some of my favorites because of three key things:

1. they’re thoughtfully designed,
2. they’re well constructed & durable, and
3. they’re always affordable

When OXO launches something new, my ears perk up. When they announced they were launching a new line of pots & pans, my jaw dropped. And when they then offered members of their Blogger Outreach Program the chance to possibly test drive one, I jumped at the chance. With both feet. Receiving the e-mail that I’d been selected to receive my pan of choice was like opening presents on Christmas morning. I was giddy. Openly, gleefully giddy.

Here it is, y’all – My Precious.

OXO - 12 Inch Non-Stick Skillet - With Text

It’s sturdy. A little on the heavy side, but WOW is it solid. My first test was a simple soft fried egg. Nothing tests a new non-stick pan like a delicate egg. Result: so slippery, it sent my fried egg spinning when I swirled the pan. Also impressive was the heat distribution of the skillet due to the hard-anodized aluminum construction of the pan and that built-in heat disc in the bottom. Smart.

OXO - 12 Inch Non-Stick Skillet - Bottom

I also like the rise and slope on the sides of this skillet. The rolled edge is high enough to contain bubbly sauces and perfectly pitched to slide those early morning omelets onto a plate, even before you’ve had your coffee. It also allows sauces to be expertly poured. Again, smart design.

OXO - 12 Inch Non-Stick Skillet - Coating

My ultimate test for a new non-stick pan is caramel – hot, gooey, sticky thermonuclear caramel. To put my pan to the test, I opted for a baked caramel apple pancake. It starts on the stove and finishes in the oven, so it was a perfect way to test this pan. And since this skillet can take oven temperatures up to 430F, you can fearlessly go from stove to oven.

Baked Apple Pancake - Browned Butter & Brown Sugar

I started with butter and brown sugar and let it heat up to see if it would stick. I was surprised at how easily I could move the caramel around the pan without anything sticking. As it got hotter and hotter, I kept moving it around with a silicone spatula. As you can see from the photo, it didn’t stick at all and moved easily around the pan.

Baked Apple Pancake - Easy Caramel

While the sugar was caramelizing, I peeled and sliced 3 apples. I like firm, sweet apples like Gala, Pink Lady or SweeTangos. Cored and sliced into even pieces (about 1/4″ thick), they’re ready to roll.

Baked Apple Pancake - Apples1

Baked Apple Pancake - Apples2

Tip: remove the skillet from the heat while you add the apple slices. It takes a few minutes to get them arranged to look pretty, and removing the pan from the heat keeps your caramel from burning while you work.

Baked Apple Pancake - Apples in Caramelized Butter & Sugar

Because I prefer firm apples, I like to pop them in the oven and let them bake 5-10 minutes before adding the pancake batter. Once the caramel is bubbling and the apples are toasty, I remove the pan from the oven and pour the batter evenly over the top. It goes back into the oven for 12-15 minutes, or until the pancake is just set and firm. Confession: I love bubbly edges on pancakes.

Baked Apple Pancake - Pancake Batter - Post-Bake

You know it’s done when you can gently press on the surface of the pancake and it bounces back. It’s better to take this one out a little early than to over bake it, so keep an eye on it during that last few minutes.

Now for the tricky part – flipping it out of the pan. I flipped mine immediately after I took it out of the oven and got a caramel burn on my wrist, so in retrospect, I’d wait 5-10 minutes and let it cool next time. I need to learn to be patient when pancakes are involved. To flip mine, I placed a piece of parchment over the pancake, then set a plate on top of that. Using a folded kitchen towel, I grabbed the skillet on both sides instead of the handle and gave it a quick flip.

The true moment of truth is when you lift the skillet. That’s when you see if your pan is a hero or a zero based on how many apple slices are stuck to the pan. Here’s what I got. You be the judge.

Baked Apple Pancake - Flipped & Flawless

Booyah, baby! Look at that gorgeous golden caramel apple beauty.

Want to see what the skillet looked like? I expected it to be coated in a thick, deeply entrenched layer of molten sugar but this is what I saw.

Baked Apple Pancake - Sticky Caramel Goo

This is the part where I’d usually mutter bad words and grab a scouring pad. Oh, OXO… how I test thee. Instead, I ran a little hot water in the skillet and let it sit for a minute while I grabbed plates, forks and syrup. To my surprise, the remaining crusty sugar wiped right out. No scrubbing. No sweating. No cursing. It seriously wiped right out with a paper towel. Way to go, OXO. You win again. And technically, I win too.

OXO - 12 Inch Non-Stick Skillet - Handle

Final Thoughts:
1. This is my new favorite skillet. For real.
2. The size (at 12″) is great for just about any task.
3. It is well constructed and sturdy, which I expect from OXO.
4. It browned evenly and held heat beautifully, which is a must for me.
5. OXO says this skillet is dishwasher safe, but I always hand wash non-stick pans because I’m a big ol’ chicken.
6. This skillet is on the heavy side, which may prove hard to handle for someone who’s older, younger or has problems handling heavier pots or pans. If heft isn’t an issue, you’ll love it.
7. Overall rating – two thumbs way up. I’ll be using this pan for years to come.

If you’d like to take a shot at this easy baked caramel apple pancake, here’s how you can recreate it at home.

2 cups baking mix (Bisquick or my favorite – Pioneer Buttermilk Baking Mix)
2-3 tablespoons raw (or granulated) sugar
1 pinch of salt
3 large eggs
1 teaspoon vanilla extract
2/3 to 1 cup low-fat buttermilk (can sub regular milk)
2-3 large apples – peeled, cored & cut into 1/4″ slices
6 tablespoons unsalted butter
1/2 cup brown sugar

Pre-heat the oven to 375F.
In a large mixing bowl, combine the baking mix, raw or granulated sugar, salt, eggs, vanilla & buttermilk. Whisk until smooth. Batter should be a little on the thin side, like crepe batter. Set aside to rest, and start on your apples. Peel, core and slice the apples. Heat your non-stick skillet over medium-high heat, then add the butter and brown sugar. Stir until the sugar melts and the mixture begins to bubble. Remove from heat and arrange your apple slices. Pop the skillet into a hot oven for 10-12 minutes, or until the caramel mixture is bubbling furiously around the edges. Remove the skillet from the oven and pour the pancake batter evenly over the top. Return to the oven and bake just until the pancake is set, approximately 12-15 minutes. Remove from the oven and allow your pancake to cool for 5-10 minutes before flipping.

To flip, invert a plate larger than the skillet over the top, place one hand firmly on top of the plate, grab the handle with a dish towel and flip quickly. If you’re not a confident or expert flipper, invert the plate over the skillet, then place a kitchen towel folded lengthwise across the skillet. Place one hand on each side of the skillet, grabbing the plate with your thumbs and using your fingers to grab the skillet. Either way, flip quickly.

Note: if you’re using an older non-stick skillet that doesn’t release as well, run a silicone spatula around the edge of the skillet to help the pancake release prior to flipping. If you’re still left cursing your old ratty non-stick, consider acquiring one of these new OXO beauties. You will not regret it.

For this apple pancake, I made a simple cinnamon cream syrup.

1/2 cup real maple syrup
1/2 cup heavy whipping cream
1/2 teaspoon ground cinnamon

Heat all 3 ingredients in a small saucepan over medium-high heat, whisking often, until the mixture comes to a rolling boil. Remove from heat and transfer to a small pouring pitcher. Serve hot.

Baked Caramel Apple Pancake - Breakfast is Served

Disclaimer: This OXO 12″ non-stick skillet was provided to me free of charge by the OXO Blogger Outreach Program so that I could play with it and share my experience. All opinions are my own, and are my honest take on it. Have you tried OXO yet? Which are your favorite OXO products? To learn more about OXO cookware, CLICK HERE.

4 Comments

Filed under Blogger Collaborations, Food & Recipes, Things I Love

NanaBread’s Crispy Potato Pancakes

Potato Pancakes - Plated

This is absolutely my favorite way to use leftover mashed potatoes. In fact, I love these so much, I sometimes intentionally make more mashed potatoes than we need for dinner just so I can make these the next day. They’re just SO GOOD! Crispy on the outside and creamy on the inside, these gorgeous golden beauties are packed with flavor and smothered in comfort.

NanaBread’s Crispy Potato Pancakes:
(makes eight 3″ potato pancakes)

2 cups leftover mashed potatoes
2 large eggs
1 tablespoon sour cream or Greek yogurt
3 tablespoons all-purpose flour
1 teaspoon Mrs. Dash salt-free seasoning
1/8 teaspoon black pepper
2 teaspoons chives (optional; I use freeze-dried)
oil for frying

Combine all of the ingredients (except the oil) in a mixing bowl.

Potato Pancakes - Ingredients

Whisk until well combined. It’s okay if there are small lumps of potatoes.

Potato Pancakes - Mixed

Add just enough oil to a non-stick skillet to about 1/8″ deep. You’ll want just enough oil to allow it to bubble around the edges as these fry. If you’re really adventurous and you’re making these for breakfast, fry a few strips of bacon first, then fry your potato pancakes in the bacon grease. The extra punch of flavor it adds will blow your mind, and if it’s hot enough, they will turn out nice and crispy without being greasy. I promise.

Potato Pancakes - Frying

Cook over medium-high heat until both sides are golden brown and crispy around the edges. Drain on paper towels and keep warm until they’re all finished. These make a great side to almost anything, but we love them for breakfast. Piled onto a plate with a little bacon and a soft fried egg? Fuhgeddaboudit.

Potato Pancakes - Breakfast

Make these, and I swear you’ll never look at leftover mashed potatoes the same way again. Now go make your own; these are mine.

24 Comments

Filed under Food & Recipes

Lemon Cream Crepe Cakes for Two

It’s Crepe Week! I love these collaborative cooking weeks with my blogging buddies. Having never made crepes before, I’ll admit this one caused me some doubt and anxiety. Then I read the America’s Test Kitchen crepe recipe we chose as our common element, and those doubts evaporated. I’ve said before that I’m a huge fan of America’s Test Kitchen. Why? Because they work diligently to perfect all of their recipes; they do the work so you don’t have to.

For Crepe Week, we’re using this America’s Test Kitchen Crepe Recipe. It’s so adaptable and easy to follow, my fears evaporated when my first crepe came out of the pan. It was perfect. They’re so easy, your French friends will sing your praises with “Vous êtes tellement fabuleux parce que vous pouvez faire des crêpes. Je suis très impressionné!” Translated, that’s “You are so fabulous because you make crepes. I am so impressed!” Now that I know how easy crepes are to make, this could become a regular and delicious thing.

Love to cook? Then I encourage you to register as a user of the ATK website. It’s free, it only takes a second, and you’ll find yourself going there over and over to take advantage of their recipe collection. As a bonus, there’s a video linked to this recipe so you can watch their crepe-making tutorial. They really do think of everything. And now, here’s my contribution to Crepe Week.

Lemon Cream Crepe Cakes for Two
makes two 3″ diameter crepe cakes

For the lemon cream:
one box (5 ozs.) Jell-O Cook & Serve Vanilla Pudding Mix
2 cups milk (whole or 2% works best)
1 carton (6 ozs.) lemon-flavored yogurt
1/2 jar (9.5 ozs.) Dickinson’s lemon curd (or your favorite)

In a saucepan, whisk the pudding mix and milk until well blended. Cook over medium heat, whisking often, until the mixture is thick and smooth; remove from heat and allow to cool completely. To speed up the cooling process, I like to transfer the pudding to a mixing bowl and set it over an ice bath; just whisk often to prevent lumps. Once the pudding is chilled, whisk in the lemon yogurt and half of the jar of lemon curd (4-5 ounces) until smooth. Cover with plastic wrap and chill in the refrigerator while you make the crepes.

For the crepes:
1 cup all-purpose flour
1 teaspoon sugar
1/4 teaspoon salt
1 1/2 cup whole milk
3 large eggs
2 tablespoon butter, melted & cooled
a non-stick skillet or crepe pan
1/2 teaspoon of oil for the skillet

I followed the America’s Test Kitchen crepe recipe exactly as it was written. As a crepe novice, I had no intention of playing around with this. The key to perfect crepes is to properly oil and pre-heat the pan for 10 minutes, so don’t skip that part. Mix up the crepe batter and cook as directed. If you don’t have a crepe pan, don’t worry. I used a 10″ non-stick skillet and it worked perfectly. I also prepped 12-14 sheets of waxed paper and stacked my cooked crepes to keep them from drying out. Let the crepes cool completely.

When I finished my crepes, the stack was about 1″ to 1.5″ tall. Since I had envisioned a crepe cake at least 3-4″ tall, this was a problem. And because there are only two of us at home, it made no sense to make 2-3 more recipes for crepes. Two people really shouldn’t eat 36-48 full-size crepes. Instead, I decided to grab my 3″ biscuit cutter and turn my 12 full-size crepes into mini-crepes, as pictured. In my case, that was 3 minis per crepe for 36 total.

Once cut, I layered them in waxed paper again and covered them with a clean kitchen towel to prevent any air from getting to them and drying them out while I assembled the crepe cakes. It actually worked really well, as I could peel off one sheet of waxed paper and work with a few crepes at a time.

With my baby crepes cut and prepped, I was ready to assemble. Removing the lemon cream from the fridge, I gave it one last whisk to add a little air, then I grabbed a spoon from my silverware drawer and dug in for a sample. My eyes then rolled back in my head and I murmured “Man! That is really great stuff!” But that’s not really part of the recipe. :)

Now, layering custard between crepes and stacking them high can be a slippery mess. I was warned of this by another blogger before I started. So with a little forethought and planning, I decided to build my crepe cake on a piece of waxed paper so I could move it easily from my cutting board to my cake plate. I also decided to build each crepe cake inside the same biscuit cutter I used to cut mini-crepes to help keep them straight and tall. It was a good call.

Starting with a baby crepe, I laid it into the mold and made sure it was flat against the waxed paper. I then spooned in one tablespoon of lemon cream and topped it with another crepe. Using a flat-bottomed juice glass, I lightly pressed the crepe into place, working around the edges of the mold just until the crepe was flat and I could see the custard around the edges. The key here was to press gently enough to disperse the custard evenly between the crepe layers, but not so hard that the custard squished out. The juice glass worked perfectly.

Once I hit the top of the mold, I finished with a good layer of lemon cream. I confess – the hardest part of crepe cake construction is controlling the urge to hork down the entire bowl of lemon cream with a big spoon. I kid you not.

Now here’s an important tip: to keep the cakes from collapsing like dominoes when the mold is removed, cut two bamboo skewers about a 1/2″ taller than the crepe cake and pushed them in just off-center. Then put the crepe cake into the refrigerator (still inside the mold) to firm up completely. Before serving, run a thin-bladed knife around the edge of the mold and lift it off; remove the skewers and top each crepe cake with whipped cream and a fresh slice of lemon. Voilà! Light, lemon lusciousness in single-serve form.

Here’s what I learned:
1.) This was so much easier than I had imagined, and so fun to make!
2.) No biscuit cutter? Use a clean empty can with both ends cut off.
3.) Stacking these higher than 3″-4″ will make them tricky to eat.
4.) Slide these off the waxed paper onto a plate before removing the mold.
5.) You can substitute any filling – other custards, jam, ice cream, etc.
6.) Leftover lemon cream makes excellent popsicles or fro-yo; seriously.

Now, here’s the best part of Crepe Week! Eleven other bloggers are putting up their best crepe creations throughout the week and four will be giving away the following America’s Test Kitchen cookbooks thanks to the fine folks at ATK: the Cook’s Illustrated Cookbook, the Baking Illustrated Cookbook, the Family Baking Cookbook, and Simple Weeknight Favorites. Also, be sure to check out the Crepe Pan Giveaway sponsored by King Arthur Flour on Bakeaholic Mama’s blog starting this Thursday. This week promises to be epic, so be sure to follow our Crepe Week shenanigans and enter to win!

Monday:
Kirsten @ Comfortably Domestic (*) – savory Tuscan Crepes
Megan @ Wanna Be A Country Cleaver (*) – sweet Grand Marnier Berry Crepes

Tuesday:
Kat @ Tenaciously Yours – savory Southwest Crepes with Cilantro Pesto
Jeanne @ Inside NanaBread’s Head – sweet Lemon Cream Crepe Cakes for Two

Also on tap as Crepe Week unfolds:

Wednesday:
Lauren @ Climbing Grier Mountain (*) – savory Pork Belly & Mushroom Crepes
Madeline @ Munching in the Mitten – sweet Blueberry Ginger Crepes a la mode

Thursday:
Carrie @ Bakeaholic Mama (*) – savory Vermonter Ham & Cheese Crepes
Katie @ The Hill Country Cook (*) – sweet Blackberry Orange Crepes

Friday:
Monica @ The Grommom – savory Prosciutto & Asparagus Crepes with Fresh Mango Cream Sauce
Mads @ La Petite Pancake – sweet Strawberry Crepes Au Lait

Saturday:
Allison @ Decadent Philistines – savory Red Pepper & Goat Cheese Crepes
Anne @ From My Sweet Heart – sweet Red Velvet Crepes with Mascarpone

Note: Bloggers hosting Crepe Week giveaways are marked with (*) above.

A very special thank you goes to America’s Test Kitchen for partnering with us for Crepe Week. Their help and support, along with the donation of cookbooks for giveaways has helped make Crepe Week particularly special. As a collective group of superfans, it’s a thrill for us to collaborate with America’s Test Kitchen.

43 Comments

Filed under Blogger Collaborations, Food & Recipes

Blueberry Crumb Cake

Blueberry Crumb Cake - simply beautiful, simply delicious


Next week is Cake Week, and in honor of our efforts to woo you with cake and as a teaser of the treats to come, I’m sharing this little snack cake to help get you in the mood. This recipe features one of my favorite things – itty bitty dried wild blueberries. They’re so sweet, they’re like candy. You’ll love how simple this crumb cake is to make. And it’s even more perfect warm out of the oven with your morning coffee or cup of tea.

NanaBread’s Blueberry Crumb Cake:
2 cups of all-purpose flour
2 teaspoons of baking powder
1/2 teaspoon of table salt
1/2 cup (one stick) of butter, softened
3/4 cup of granulated sugar
1 egg
1 teaspoon almond extract (or vanilla, if you prefer)
1/2 cup milk
1 pkg. dried wild blueberries (3 to 4 ounces)

For the crumb topping:
1/4 cup of granulated sugar
1/4 cup of light brown sugar
1/3 cup of all-purpose flour
1/4 cup (half a stick) of butter, softened

Optional Glaze:
4 ounces of cream cheese
1/2 teaspoon of vanilla extract
1/4 teaspoon of almond extract
1 1/4 cup of powdered sugar, sifted
1/2 – 1 tablespoon of milk

To start, pre-heat your oven to 400F. Prepare an 8″ x 8″ square pan. I use parchment paper to make a paper sling, then lightly spray it with cooking spray.

To start the cake batter combine the flour, baking powder and salt in a mixing bowl, mixing with a wire whisk to blend as well as remove any lumps. Set it aside.

In a large mixing bowl, beat the butter until light and fluffy, then add the sugar and continue to beat for 2 minutes more. Add the egg and almond extract; mix just until combined. Add half of the flour mixture and beat on low speed just until blended. Add the milk and mix to incorporate, then finish with the other half of the flour mixture, stopping just before the flour is fully incorporated. For a tender crumb cake, you don’t want to over mix. Scrape down the sides of the bowl, add the blueberries, and finish incorporating the flour and berries with a rubber spatula. Spoon the batter into the prepared pan and spread evenly.

To make the crumb topping, combine the sugars, flour and softened butter in a mixing bowl. Beat with a wire whisk until it forms soft, lumpy crumbs. Spoon them evenly over the cake batter and place in the middle of the center rack of the oven. Bake for 25-30 minutes, or until a toothpick or skewer comes out clean from the center of the cake.

Remove from the oven and allow to cool slightly before glazing or serving.

If you’d like to make the optional glaze, place the cream cheese in a microwave-safe bowl. Microwave on high power for 30-45 seconds, or until the cream cheese is completely softened. Whisk in the flavorings, then slowly whisk in the powdered sugar. Add enough milk to thin to the consistency you like. Spoon or pour over the top and serve.

Makes 4 very large servings or 9 regular servings.

Now, I’m off to have a slice with my coffee this morning. Care to join me?

Care to join me for breakfast? Coffee or tea?

27 Comments

Filed under Food & Recipes

Dark Chocolate Peanut Butter Cookies

Need cookies in a hurry? Try these beauties!

Forty-five minutes. That’s all you’ll need. Seriously, that’s how quick and easy these cookies are. See for yourself!

NanaBread’s Dark Chocolate Peanut Butter Cookies:
1 cup of creamy peanut butter
1 cup of Peanut Butter & Co.’s Dark Chocolate Dreams Peanut Butter
1 1/2 cups of granulated sugar
2 large eggs
1/2 teaspoon of vanilla extract
1 cup of all-purpose flour
2 teaspoons of baking soda
good pinch of salt
1 cup roasted peanuts (I used lightly salted)

Plus 2-3 tablespoons of sugar for sprinkling on top

Pre-heat your oven to 350F. Dump all cookie ingredients into a mixing bowl and stir until thoroughly combined. The dough will be a little thick, so I used a heavy wooden spoon. Using a cookie scoop or a spoon, form dough into walnut-size or golf ball size balls. {Yes, I said balls. Stop giggling.} Place about 2″ apart on an ungreased non-stick cookie sheet (or use silpat mats, if you have them) and sprinkle with additional granulated sugar. Bake for 10-14 minutes, or until the cookies start to crack as seen in the photos. Remove from the oven and allow them to cool completely. Makes 24-30 cookies.

See? Chocolate peanut butter cookies in under an hour. Start to finish. It might take longer to run to the store for a gallon of milk. Now let’s dig in!

Seriously. Is there anything better than warm cookies & cold milk?

18 Comments

Filed under Food & Recipes

The Amazing Crustless Coconut Pie

I don't know how it works, but it does and it's delicious!


Yes, you heard correctly. It’s a crustless pie and it’s crazy simple to make. I first had it around 1990 or 1991 when my mother and I visited a tea room in Stafford, Texas. The tea room is long gone, but my love for this pie has never waned. If you love coconut, give this one a try and see if it doesn’t knock your socks off.

Crustless Coconut Pie:

1 14-oz. can of sweetened condensed milk (not evaporated)
1 1/4 cups of milk
1/2 cup of Bisquick, Pioneer or other dry baking/biscuit mix
3 whole eggs
1/4 cup (4 tablespoons) unsalted butter, softened
1 1/2 teaspoons of pure vanilla extract
1 cup of sweetened flaked coconut

Pre-heat your oven to 350F. Put all ingredients except for the coconut into a blender and blend on low speed for 3 minutes. Pour into a greased 10″ pie plate or casserole dish (I used a rectangle Pyrex). This will puff, so don’t fill your dish to the very top. Let it sit for 5 minutes to allow the ingredients to settle properly, then sprinkle the coconut evenly across the top.

Place on a foil-lined baking sheet with a raised edge (to prevent spills) and place in the center of the middle rack of the oven. Bake for 35-45 minutes, or until the top is golden brown, the center is slightly jiggly, and a knife inserted near the edge comes out clean. Remove from the oven and allow it to cool to completely. Like a souffle, this will deflate as it cools, so don’t panic if you notice shrinkage.

Serve at room temperature for best results. Leftovers should be stored in the refrigerator. Serves 6-8, depending on serving size.

Gorgeous and golden straight from the oven.

Note: This recipe was adapted from the Grateful Prayer Thankful Heart Blog who adapted it from the Favorite Brand-Name Best-Loved Recipes of All Time published in 1996 by Publications Limited. Her photo, by the way, is gorgeous. So if you want to see a spectacular photo of this pie, click on the link and be prepared to drool. My version is a cross between her recipe & my mother’s.

36 Comments

Filed under Food & Recipes

My Baby turned 29 last week

She'll always be our baby

I haven’t written about it yet because it has taken me a week to come to terms with the fact that my baby turned 29 last week. How did this happen? Where did the time go? I swear I remember taking her to her first day of kindergarten like it JUST HAPPENED. I can tell you exactly what she was wearing – a pale turquoise jumper with pink buttons and little pink sneakers. She had her hair in pigtails with pink ribbons. But now our baby is 29, and I’m gonna need a minute. {insert long pause here}

At her request, I made rainbow cupcakes for the occasion. If you were a reader last spring, you’ll remember that my big sister led a baking session when she, my baby sister, and our mother came to visit. We had a blast and the rainbow tie-dyed cupcakes were a hit. At that time, we used Big Sis’s scratch-made white cake recipe and the expensive Wilton food colorings. This time, I used white cake mix. Guess what? It worked! Two cake mixes made one dozen regular cupcakes and six jumbo-size cupcakes. For the mixes, I used whole eggs instead of eggs whites and dialed the amount of water back just slightly so the cupcakes would have better structure. I also added a teaspoon of almond extract, which added great flavor. With a basic set of Wilton food colors from the grocery store, I divided the batter into 6 bowls and colored each. For the regular cupcakes, I swirled the colorful batter; for the jumbo cupcakes, I layered it. Here’s how they turned out:

Unfrosted in 2 Sizes - Jumbo = 5" and Regular = 2"

A jumbo rainbow cupcake - frosted with sprinkles

Look out! She's going in for a bite!

Too tall for a normal approach, she had to turn it sideways.

She did it! And apparently, she liked it.

Happy birthday, honey. I’m so happy you loved your cupcakes, but I’m especially happy that you are our girl. Your dad and I are so very proud of you. And now that 29 is behind you, we’ve got 12 months to plan for next year – when you turn 30 and I turn 50. I’m pretty sure that requires a big blow-out of some kind, don’t you? I’m thinking Vegas (with bail money, of course).

16 Comments

Filed under Family Stuff

Granola Brownies: they’ve got granola in them, so they’re good for you…right?

Granola Brownies: breakfast or snack? You choose.


Last week, I experienced a “fail” on a first-time recipe. I attempted to make homemade granola bars with chopped dates, coconut, almonds and dark chocolate chips. While it tasted spectacular, the bars just never stuck together. Guess my granola mix was too dry. Next time, I’ll add more honey. BUT… from lemons we make lemonade, and from failed granola bars, we make granola (which was great over Greek yogurt, by the way). And since I can can never seem to leave anything alone, I decided to kick it up a notch by making granola brownies. I mean, it makes sense in an unconventional way. Oats are good with chocolate. So are almonds, dates and coconut. And nothing satisfies a craving for sweets like a brownie, so…

Here’s how it all went down:
1 stick of unsalted butter
3 ounces of unsweetened chocolate
2 eggs
3/4 cup sugar
1 teaspoon vanilla extract
2/3 cup all-purpose flour
1/2 teaspoon baking powder
1/4 teaspoon salt
1 cup of granola, divided
Optional Ingredient: 2-3 Tbsp. Hershey’s Dark chocolate syrup
(because I’ve learned that nothing makes chocolate brownies taste more chocolatey than adding more chocolate, or a pinch of instant espresso powder)

In a microwave-safe bowl, melt the butter and chocolate squares (and the optional chocolate syrup, if you so choose). Beat with a whisk until smooth, and add the sugar, eggs and vanilla extract. In a small bowl, blend flour, baking powder and salt. Stir into the chocolate mixture just until combined; do not over mix. Stir in 3/4 cup of your favorite granola (if it’s in bigger chunks, break it up). Press into an 8″ x 8″ baking pan lined with parchment paper or foil. Sprinkle the remaining 1/4 cup of granola over the top and press gently so it sticks.

Bake at 350F for 18-22 minutes (depending on your oven) or until the center is set. Remove from the oven and allow to cool completely in the pan. Using the parchment paper or foil edges, lift the brownies from the pan and cut into squares. If you want nice, clean edges put your brownies in the refrigerator for about 30 minutes to cool, then cut into squares.

Tip: individual brownies can be plastic-wrapped and frozen for a quick snack to drop into your child’s lunchbox (or your own). It’s perfect for back-to-school snacks, after school snacks, or my-kids-are-grown-and-I-just-want-a-granola-brownie-for-myself treats. Unconventional? Perhaps, but they’re still nutty, and gooey, and delicious. And just like that, a fail becomes a win.

Recipe credit: brownie base is America’s Test Kitchen “Bake Sale Brownies”

16 Comments

Filed under Food & Recipes

Mom’s Raw Peach Pie – Two Ways

Mom's Raw Peach Pie - on brown sugar biscuits or cinnamon sugar pie crust

Summer reminds me of fresh fruit – strawberries, blueberries, watermelon and peaches – and hot summer weather reminds me of my mother’s raw peach pie. It’s what I call a “freestyle” recipe. She made it every summer when peaches came in season. It’s a family favorite and a perfect summer treat because it’s easy, light, refreshing and delicious. Mom always made hers with pie crust, but for the sake of shortcake lovers, I’m giving you TWO versions to choose from. One is made with cinnamon sugar pie crust and one is made with brown sugar biscuits. I have a personal favorite, but I’ll let you decide which one sounds best.

There are only a few basic ingredients:
fresh peaches – peeled and sliced
sugar – to sweeten the peaches
whipped cream – I prefer homemade
your favorite biscuit mix OR pie crust recipe
cinnamon sugar to sprinkle on your biscuits/pie crust
brown sugar (optional, if you’re using the biscuit method)

To prep your raw peach pies, begin by peeling and slicing your peaches. Sample a few slices to determine how sweet your peaches really are. If they need it, add a few tablespoons of sugar, give them a good stir, and place them in the refrigerator to macerate for at least one hour. If you don’t need extra sugar on your peaches, e-mail me immediately and let me know where you’re buying yours. Our peaches smell fabulous, but they’re not very sweet.

The next step is deciding which crust appeals to you – are you a biscuit guy/gal or a pie crust person? If you’re making pie crust, simply use your favorite recipe, roll the dough into a rectangle and place it on a baking sheet. Brush the pie dough with melted butter and sprinkle generously with cinnamon sugar. Bake at 425F until the crust turns a beautiful shade of light brown, as if you’re baking a pie. Remove from the oven and allow the pie crust to cool to slightly warm or even room temperature. Can you cheat and use that store-bought brand that comes in a box and rolls out? Absolutely! Who’s going to know except you?

If you are a biscuit lover, grab your favorite biscuit mix. I prefer Pioneer Buttermilk Baking Mix, but if you are a loyal Bisquick user, that works, too. Depending on how many people you’re serving, measure the biscuit mix into a bowl. Add 2 tablespoons of brown sugar for extra flavor (this is dessert, after all), stirring to combine it with the biscuit mix. Then add enough milk or buttermilk to form a nice biscuit dough. Place it on a floured surface and roll it to approximately 3/4″ thick. Cut into round biscuits, placing them on a baking sheet. Brush the tops with melted butter and sprinkle generously with cinnamon sugar. Bake at 425F until they are fluffy and light brown. Remove from the oven and allow them to cool to slightly warm or even room temperature.

While your pie crust or biscuits are baking, beat up a batch of homemade whipping cream. I like to use one pint of really cold heavy cream, 1/4 cup of granulated sugar and 1/2 teaspoon of vanilla bean paste. You can use vanilla extract. It works just as well, but I love those vanilla bean flavor flecks you get with vanilla bean paste, so if you can find it, use it. You’re worth it.

To assemble, grab a serving bowl or plate and begin with a layer of pie crust or biscuit. If you’re using biscuits, I like to split them in half. If you’re using pie crust, just grab your slab of cinnamon sugar crust and break it into serving dish size pieces. Top your crust of choice with a big spoonful of sweet peaches and a dollop of whipping cream, then create another layer. You can stack them as high as you like; the sky and gravity are the limits. Or you can just pile cut biscuits or pie crust into the bottom of a bowl and top it with peaches if presentation is not high on your priority list. It’s your bowl; do whatcha’ wanna do. Now for the big flourish – top with a generous blob of whipped cream and you’re done. Grab a spoon and a glass of ice tea and enjoy the best summer and my Momma has to offer. Thanks, Mom.

20 Comments

Filed under Food & Recipes