Tag Archives: desserts

Simple Apple, Pear & Cranberry Pie

Hello, Fall. I’ve missed you terribly. You didn’t write. You didn’t call.

Apple Pear Cranberry Pie - Inside NanaBread's Head

I love fall fruits, especially apples and pears. Earlier this week, a blogger tweeted that she’d just tried her first SweeTango apple and it blew her mind. She mentioned her favorite apple had always been the honeycrisp, and that’s what caught my attention. Honeycrisps are my favorite apple, too. So my next visit to the grocery store, guess what I looked for? You got it. And was she right? You betcha. Crisp, super sweet and beautifully colored, I’m afraid these are going to become my new apple obsession. They are spectacular. Pie worthy, in fact.

Apple Pear Cranberry Pie - The Fruit

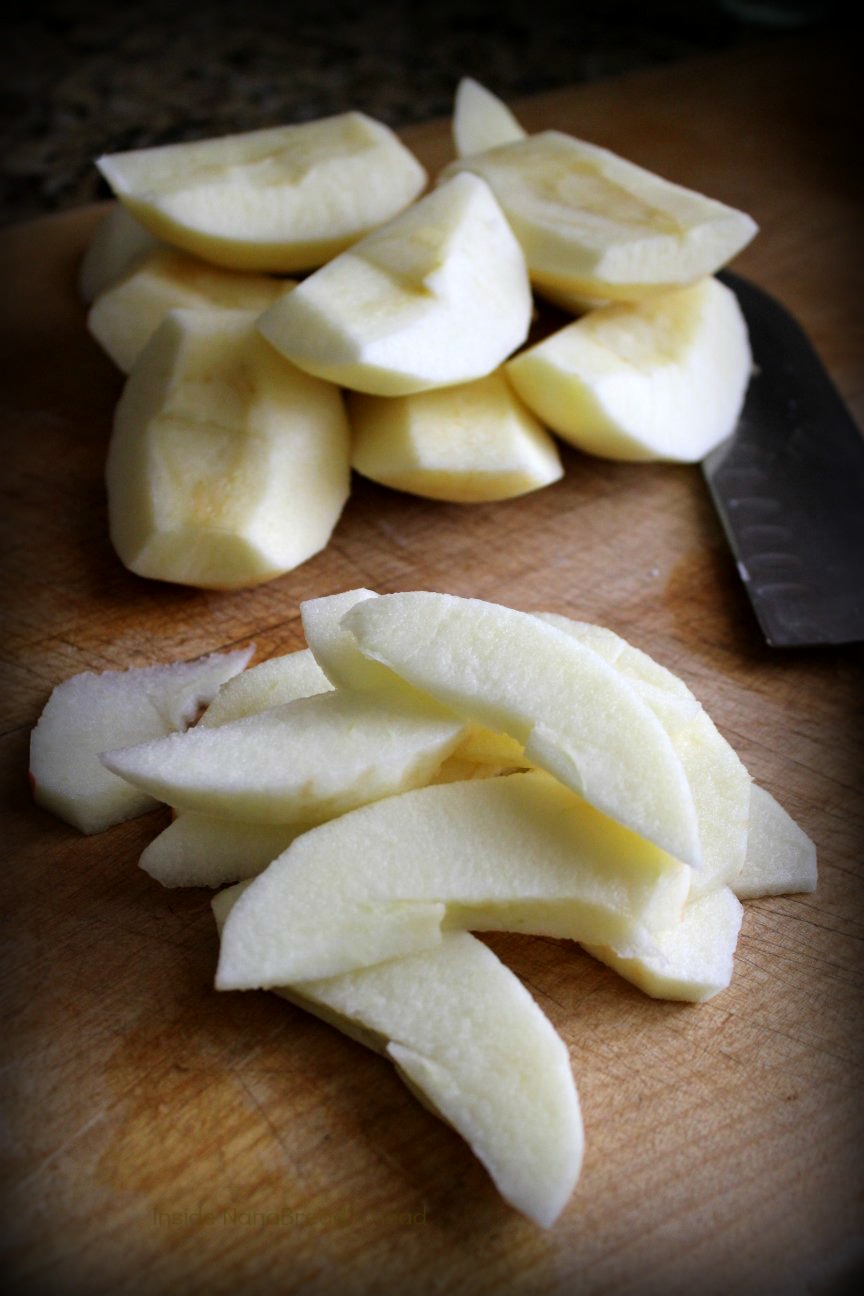
For this pie, I sliced my apples thin and my pears even thinner. I usually like a big chunky apple pie, but for this one, I wanted thin slices piled high and dotted with dried cranberries. The heart wants what the heart wants.

Apple Pear Cranberry Pie - Sliced Fruit

Here’s food for thought… I watched an episode of Cook’s Illustrated on PBS and they used fruit pectin powder to thicken a peach pie. Say what? Now I’ve used pectin for years when canning fruit, but it never occurred to me to bake with it. Makes sense, if you think about it, so I decided to try it with this one. And since I used instant tapioca granules to thicken my peach pie this summer, I wondered what would happen if I did both. For science. Why not, right?

Apple Pear Cranberry Pie Thickeners

Combining apple juice, sugar, instant tapioca, pectin & vanilla extract, I made a slightly thick, gently sweetened, vanilla-kissed filling that paired perfectly with the apples and pears and created a nice balance for the tart cranberries. Once the mixture was thickened, I just poured it over the fruit and tossed it to coat. So quick and simple. The tapioca still looks a little cloudy here, but don’t worry – it’s clear and unrecognizable once it’s baked.

Apple Pear Cranberry Pie - Fruit & Thickeners

After that, it’s just dough, butter, blah blah PIE! Man, how I love pie. But seriously, there’s only one pie dough recipe for me, and it’s Kirsten’s ‘No Excuses Pie Dough’ from ComfortablyDomestic.com. Once you make this one, nothing less will do. I make it in batches, wrap it in plastic, seal it into heavy bags and pop it in the freezer so I can produce pies on a whim. And that’s another reason I love this recipe – Kirsten’s dough freezes beautifully.

Apple Pear Cranberry Pie - Kirsten's Pie Dough

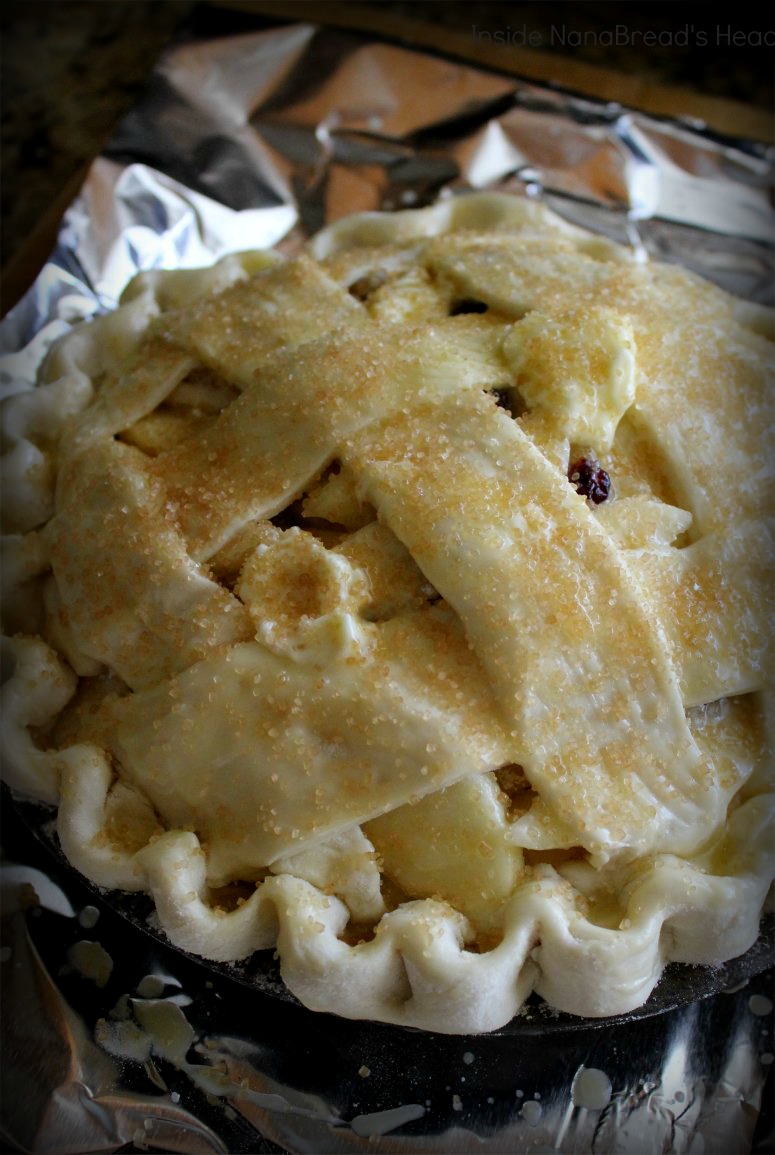
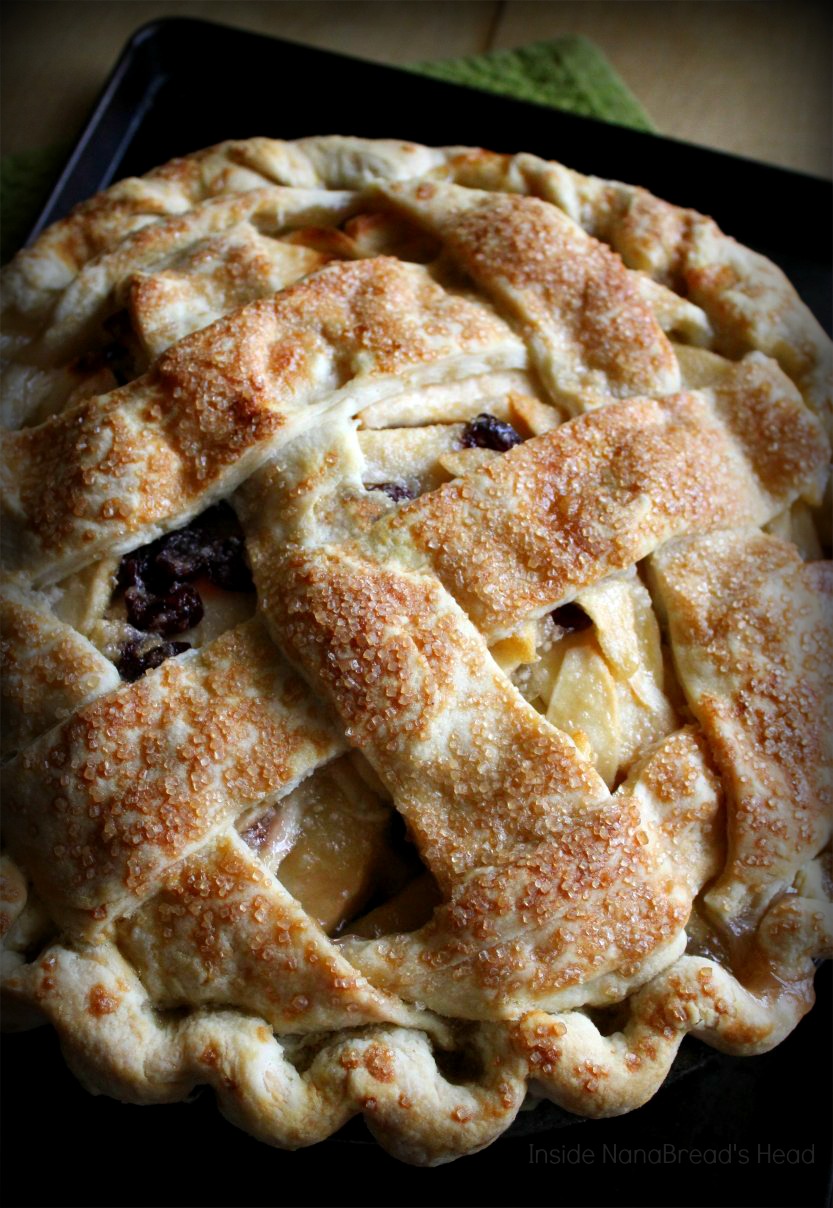
Just thaw, roll on a floured surface, and pop it in a pie tin. And then concentrate on stuffing every last bit of that filling into that shell. Top with a fat, rustic lattice, crimp the edges, brush with melted butter and sprinkle generously with raw sugar crystals. Easy, right?

Apple Pear Cranberry Pie - Ready for Baking

It really is easy. The only hard part is the waiting – for it to come out of the oven when it smells so amazing, for it to thicken and cool, for dinner to end so you can cut it. It’s always the waiting part that gets me.

Apple Pear Cranberry Pie - Warm from the Oven

NanaBread’s Apple, Pear & Cranberry Pie:
1 recipe for Kirsten’s ‘No Excuses’ pie dough
1 1/2 pounds (3 large) SweeTango apples
1 1/2 pounds (3 large) Star Krimson red pears
1/2 to 2/3 cup Craisins dried cranberries (to taste)
1 cup apple juice or apple cider
3 tablespoons quick-cook tapioca granules
1 tablespoon powdered fruit pectin
1/2 to 2/3 cup granulated sugar (to taste)
1/2 teaspoon pure vanilla extract
1/2 stick unsalted butter, melted
2 tablespoons raw sugar granules

Start by making the pie dough and chilling it in the refrigerator for at least 2 hours or the freezer for 30 minutes. While your dough is chilling, prep your fruit and filling.

Peel, core and thinly slice the apples and pears. I sliced my pears a little thinner than the apples since they take a little longer to bake. Place in a large mixing bowl and sprinkle in the dried cranberries.

In a small saucepan, combine the apple juice or cider, tapioca granules, pectin and sugar. Cook over medium-low heat, whisking often, until the sugar is melted and the mixture begins to bubble. Turn off the heat and whisk in the vanilla extract.

Remove the pie dough from the fridge and roll out a bottom crust, placing it gently into the pie tin. Roll a top crust and cut into wide strips (1 1/2″) so you can form a rustic lattice top.

Pour the filling over the fruit and toss to thoroughly coat all the fruit. Spoon it into the pie shell, pressing it gently into the crust to compact the fruit. Lattice the pie dough strips onto the top of the pie, then roll the lower crust edges around the edge of the pie tin and crimp all around.

In a small bowl, melt the butter and brush the entire crust. If there is melted butter left, simply pour it over the top of the pie. Sprinkle the entire pie with the raw sugar granules.

Bake in a pre-heated oven (375F) for 45-60 minutes, turning every 20 minutes, until light golden brown. Watch it once it starts to brown. Everyone’s oven is different, and yours may take more or less time depending on how hot it runs. Once golden brown, remove the pie from the oven and allow it to cool completely before serving (4-6 hours).

Apple Pear Cranberry Pie - Cut Pie - Inside NanaBread's Head

This pie was so good! It’s going on my ‘must make’ list for the holidays now. I might even rank it above all former apple pie recipes as my new favorite. Maybe even above most other pies in general. It’s definitely invited for Christmas.

Sorry, Pumpkin Pie. I’m breaking up with you.

It’s not you. It’s me.

15 Comments

Filed under Food & Recipes, Things I Love

31 Days of Dark Chocolate Peanut Butter? Let’s make that 32.

Dark Chocolate Dreams PB Cookies & Salted Caramel Ice Cream Sandwiches

Dark Chocolate Dreams Peanut Butter. It’s the stuff dreams are truly made of, especially if you love chocolate and peanut butter like I do. Peanut Butter & Co makes one that blows my skirt up every single time I crack the lid. I’ll eat it on anything – crackers, toast, bagels, cake, waffles, a spoon, or even my finger. (Hi. My name is Jeanne, and I’ve been a peanut butter addict since forever.)

Keep reading all the way to the bottom, people. This is going to get good!

Dark Chocolate Dreams Peanut Butter Close-Up

Oh, baby. This is the good stuff. It’s my super-duper favorite. For real.

Dark Chocolate Dreams Peanut Butter - One Glorious Spoonful

This week Peanut Butter & Co released a new cookbook titled 31 Days of Dark Chocolate Dreams‘. As a newly minted member of Peanut Butter & Co’s Yum Squad, I was thrilled to receive an advanced copy as well as a 28-ounce jar of Dark Chocolate Dreams to play with. Man, I love these guys. Great company, great products, and always such fun to work with. (Hi, Adam!)

Dark Chocolate Dreams Box - Instagram

The cookbook is amazing. As I flipped through it, I kept squealing “Oooo! I’ll make that! I’ll make THAT, too!” So many drool-worthy recipes to choose from. I’m seriously thinking of trying the dark chocolate peanut butter flourless cake first. Then maybe the marble pound cake. Or maybe ALL OF THEM.

First, though, I jumped in to make a batch of my new favorite peanut butter cookies. They’re made with coconut oil instead of butter (I know… I know… I love butter, too) but the coconut oil adds great flavor and I love the texture of these. Even better, you can stuff them with Häagen-Dazs Salted Caramel Gelato and BAM! – ice cream sandwiches to die for. Let’s start with the cookies first.

Dark Chocolate Dreams PB & Coconut Oil Cookies - Ingredients

Dark Chocolate Dreams Peanut Butter & Coconut Oil Cookies
(Original recipe credit to AverieCooks.com)

3/4 cup Dark Chocolate Dreams Peanut Butter
1/2 cup organic coconut oil, softened to room temp
1 cup light brown sugar, packed
1 jumbo or large egg
1 tablespoon pure vanilla extract
1 cup + 1 tablespoon all-purpose flour
2 teaspoons cornstarch
1 teaspoon baking soda
1/4 teaspoon salt

Pre-heat your oven to 350F. Make sure your coconut oil is softened to the consistency of softened butter (I had to microwave mine for 12 seconds). It sounds insignificant, but making sure your coconut oil is not too firm or too melted is key to the texture of these cookies. When you’re there, combine the peanut butter and coconut oil and beat for 3-4 minutes with an electric mixer. Scrape down the sides of the bowl, add the vanilla extract, and beat for 30 seconds more.

Stop the mixer and again scrape down the sides of the bowl. In a small mixing bowl, combine the flour, cornstarch & baking soda and whisk to combine. Add the flour in one batch to the peanut butter mixture, then on LOW speed, mix until flour is starting to incorporate and then turn the speed up to medium and beat just until the flour mixture is well combined and the dough starts to pull away from the sides of the bowl. It should look like this:

Dark Chocolate Dreams PB Cookie Dough - Perfect Consistency

If the mixture is too dry and crumbles easily, add a little more coconut oil and beat it again. If it seems too sticky and doesn’t easily form into a ball, add more flour – 1 to 2 tablespoons at a time – until your dough is the consistency of a new can of Play Dough. When it’s ready, grab a medium ice cream or cookie scoop and your baking sheets. I recommend using silicone baking mats for most baking projects. They guarantee your hard work won’t stick to the pan, causing violent bouts of cursing or childish hissy fits (or so I’ve heard).

Dark Chocolate Dreams PB Cookie Dough - Perfect Scoop

That, my friends, is a perfect scoop. To get it, I simply drag the scoop through the dough then scrape it up the side of the bowl as I remove it. See how the dough presses perfectly into the scoop? That’s when you know it’s the right consistency. Scoop onto lined baking sheets, 2″ apart so you can press them.

Dark Chocolate Dreams PB Cookies - Perfect Scoops

Note: if you don’t want to press these cookies flat for ice cream sandwiches, you can leave them like they appear in the above photo. They will take 2-3 minutes longer to bake, but result in a thicker, brownie-like cookie. For ice cream sandwiches, I pressed them with the bottom of an old glass candy dish.

Dark Chocolate Dreams PB Cookies - Pressed

I love the pattern this makes in the cookies. If you don’t have a fancy cookie press, I highly recommend flipping over old decorative bowls or glasses. If there’s a great pattern in the bottom, it can be used as a cookie press. Be adventurous and try it!

Bake at 350F for 9-10 minutes. Remove from the oven and allow the cookies to cool completely before removing them from the pans. Because I was making ice cream sandwiches with mine, I let the cookies cool completely on the pan, then popped the entire pan in the freezer to make sure they were super cold.

Dark Chocolate Dreams PB Cookies & Salted Caramel Ice Cream Sandwiches - Close-Up

For ice cream sandwiches:
Grab a pint of your favorite ice cream or gelato and let it sit out on the counter until it starts to get nice and soft (about 5 mins). I happened to have a pint of Häagen-Dazs Salted Caramel Gelato in my freezer (lucky girl!), but Ben & Jerry’s Cherry Garcia or Coffee Coffee Buzz Buzz Buzz, or any flavor you love will work.

Dark Chocolate Dreams PB Cookies - When the Magic Happens

Using the same scoop I used for the cookie dough, I placed a row of cookies ‘bottoms up’ on my tray, then placed a scoop of softened gelato in the center of each. With a flat metal spatula, aka pancake flipper, I flattened each scoop of gelato into a smooth, even layer.

Dark Chocolate Dreams PB Cookies - Topped with Gelato

Top with a second cookie and immediately wrap in plastic wrap. Pop them back into the freezer for at least 2-3 hours, or until they are frozen solid. To eat, just unwrap and dig in. If you plan to nibble them one at a time, place the wrapped ice cream sandwiches into an airtight container with a tight-fitting lid. They should keep for at least 4 weeks in your freezer. This recipe makes 16 individual cookies approximately 3″ in diameter, or 8 ice cream sandwiches.

Of course, you can also use a small cookie scoop and make these more bite-size for portion control. Or you can double the recipe and keep the baked cookies in the freezer in an air-tight container so you can enjoy them plain or build ice cream sandwiches on demand. Or just eat the cookies and wash them down with a glass of milk. That works, too. But I recommend the ice cream sandwiches. Because more is more, or something like that.

Dark Chocolate Dreams PB Cookies & Salted Caramel Ice Cream Sandwiches - Stacks & Jar

Now for the best part of this post – Peanut Butter & Co has generously offered to ship a copy of ’31 Days of Dark Chocolate Dreams’ and a 28-ounce jar of Dark Chocolate Dreams peanut butter to one lucky reader. To participate, simply leave a comment. It could be “I love peanut butter!” or “Peanut Butter & Co is awesome!” or even “I’m a cookbook hoarder.” One reader will be chosen at random, and Peanut Butter & Co will ship this tasty prize pack directly to their door. The deadline for this drawing is Friday, February 7th at 12:00 midnight, Central Standard Time, so jump on it now. Right now! What are you waiting for?!

Dark Chocolate Dreams Cookbook

If you don’t win or can’t wait to get your hands on the cookbook, you can purchase it online by clicking HERE, along with other Peanut Butter & Co goodies and peanut butter products. The Cinnamon Raisin Swirl blows my mind and Mighty Maple is both creamy and dreamy.

Disclaimer: This is not a paid post. Peanut Butter & Co sent me an advanced copy of the cookbook and a jar of peanut butter to play with, as stated above. I am a member of their Yum Squad, which is also unpaid. Put simply, I love their products, and they have occasionally sent me peanut butter to experiment with. For example, check out my ‘The Heat is On’ Spicy Peanut Butter Shortbread Cookies made with their spicy chili-laced peanut butter. As always, all opinions are my own and are not influenced in any way by the company. I just love the quality of their stuff, and enjoy sharing that joy with you.

UPDATE: Congratulations to Linda (comment #4), winner of the Peanut Butter & Co prize pack giveaway. Thanks to all who participated, and high five to Linda. You’re going to love the cookbook AND the peanut butter! -jeanne

52 Comments

Filed under Food & Recipes, Things I Love

Mom’s Fudge Drops

Or in this case, Mom’s Fudge Balls since I rolled them. These were one of my favorite treats as a child. Mom would make them and my four sisters and I would devour them like a plague of locusts. Then we got old enough to make them ourselves so we made them all the time. And we devoured them like locust.

Mom’s Fudge Drops – no one can eat just one. I’m serious.

Anywho… did I mention this snack was always one of my favorites? Well, I made them again just so I could share them with you. Because I think you need these. No, I KNOW you need these. And while they look totally decadent, they’re really not bad. Okay, stop laughing and shaking your head. I mean it – there are whole oats in there. Old-fashioned oats. So they’re practically a health food (she says with her fingers crossed behind her back). Okay, judge for yourself then.

Mom’s Fudge Drops:
1 stick butter, unsalted
1 cup sugar (Mom used 2 cups; I use 1)
1/2 cup good quality cocoa powder
1/2 cup milk
1/2 cup peanut butter, smooth or crunchy
2 teaspoons pure vanilla extract
3 cups old-fashioned oats (I love Bob’s Red Mill)
1/2 cup shredded or flaked coconut (optional)

Grab a large saucepan with a heavy bottom and melt the stick of butter over medium heat. While that’s melting, combine the sugar and cocoa in a small mixing bowl and whisk until well combined. Once the butter is melted, whisk in the sugar/cocoa mixture and add the milk, whisking until blended. Turn the heat up to medium-high and continue to whisk until the mixture comes to a boil. Don’t walk away while this is cooking, or it will burn! Stand there and whisk it until it comes to a boil and has the texture of glossy hot fudge sauce.

Add the peanut butter and vanilla extract and whisk until smooth, then turn off the heat. Using a sturdy wooden spoon, add the old-fashioned oats and coconut, stirring until well combined. Using a cookie scoop or a metal spoon, scoop and drop onto parchment or waxed paper-lined baking sheets. Allow them to cool to room temperature. Once cool, they will still be soft and pliable. If you want to roll them into balls, now is the time. Gently roll each drop in your hands until a ball forms and put them back onto the waxed paper. Or, if you like them just fine as drops, leave them as is. Either way, pop the baking sheet into the refrigerator for about an hour to allow them to firm up completely. Once firm, you can layer them into an airtight container. These will keep in the fridge for 3-4 weeks.

If you really want to get fancy, you can roll the balls in cocoa powder, powdered sugar, ground peanuts or even graham cracker crumbs before you refrigerate them. Talk about getting dressed up for a party!

Pop a few in a plastic bag, and these make a perfect lunchbox treat for school kids or a great afternoon snack for a working girl or the perfect easy breakfast for a stay-at-home mom. At my house, they’re all mine. The Complete Package won’t touch them. And that, my friends, is what they call a win/win.

Fudge, oats, coconut & peanut butter for the win!

Now DROP me a line and let’s talk favorite childhood treats. Was yours homemade or store-bought? Do you still make them as an adult, either for yourself or for your children? And if your favorite was the ever-present never-perishable Twinkie, that’s okay too. No judging here. I grew up eating those, too. Although, for the record, I will always be a pink & fluffy Snowball kind of girl.

15 Comments

Filed under Family Stuff, Food & Recipes

Apricot & Marmalade Fried Pies

Texas-style fried pies filled with warm fruity goodness

My friend and favorite Canadian, Karlynn of The Kitchen Magpie, recently put out a call for guests posts for her Pieday Friday series while her family is on vacation. I love Karlynn and her Friday pie features, so I immediately jumped in. I’d love it if you would drop by and check out my Apricot & Marmalade Fried Pies and tell her “Howdy!” from NanaBread.

Fried Pies are easy with a great pie dough & the filling of your choice

Speaking of pie dough, my guest post includes a shout out to my friend Kirsten from Comfortably Domestic. Her “No Excuses” Pie Dough recipe makes an appearance. In fact, I couldn’t have done this without her. Thanks, Kirsten!

You want ice cream with that?

Thank you, Karlynn, for the opportunity to share Texas-style fried pies with your readers. To read my guest post, click HERE. Thanks, y’all!

24 Comments

Filed under Food & Recipes

Recipe: Dorie’s Baby Cakes

NanaBread's take on Dorie Greenspan's Baby Cakes


I made my first Dorie Greenspan recipe this week. That’s not a big deal for some people, but it is for me. Fancy French food intimidates me, and I think of Dorie as one of those great French cooks. She writes cookbooks, for God’s sake. Fancy, wonderful, gorgeous cookbooks. Don’t get me wrong – I love eating French food. It’s the making/baking part that freaks me out. Here’s what I learned from Dorie this week: fabulous doesn’t have to mean fussy. This recipe was beyond fabulous, and it could not have been easier. All you need is a handful of ingredients and a few pieces of the right equipment.

On Dorie’s blog this week, she posted a recipe for Almond Baby Cakes. I was intrigued. As I read it, I was amazed that so few ingredients were required. Then I got to the part where she said, “If you play around with the recipe, let me know what you do … please.” Those of you who know me know it takes very little to get me to play with my food. I have a hard enough time sticking to recipes; I’m a recipe fiddler. But when you INVITE me to mess with a recipe, well I just can’t say no. There’s something wrong with my wiring when it comes to stuff like that.

So here’s what I did to Dorie’s Baby Cakes. Instead of almonds, I chose pecans. And since I love coconut, I decided to throw some of that in there, too. Coconut and pecans go together like peas and carrots. Chocolate and peanut butter. Biscuits and gravy. And since the recipe called for a little rum, I grabbed my bottle of Parrot Bay Coconut Rum. Laugh all you want, but God help me if coconut rum & Coke over ice isn’t a little piece of paradise on a hot summer day. So armed with my collection of substitutions and one secret ingredient, here’s how my version of Dorie’s Baby Cakes went down.

The Ingredient Perp Walk - they're all guilty of being delicious

Coconut Pecan Baby Cakes:
1 cup of pecans, halves or pieces
1/2 cup of flaked, sweetened coconut
2/3 cup of granulated sugar
3 eggs, at room temperature
5 tablespoons of unsalted butter, at room temperature
1 1/2 tablespoons of coconut rum

To start, make sure you place an oven rack in the center rung of your oven and pre-heat it to 350F. Using a standard 12-count muffin pan, butter each cup of the muffin tin generously. Using parchment or waxed paper, cut a small circular piece of paper to fit the bottom of each muffin cup. (Hint: I used a small-mouth canning jar lid ring as my pattern.) Place the paper in the bottom of each cup, then generously butter the paper as well.

In a shallow baking pan, I toasted my pecans and coconut for approximately 10 minutes, or until I could smell their lovely fragrance coming from my oven. Dumping them into the food processor with 2 tablespoons of the sugar, I pulsed the pecans and coconut until they were coarsely ground, but not dust. If you have a few pea-sized chunks in there, don’t sweat it.

Using my KitchenAid stand mixer with the whisk attachment, I combined the rest of the sugar with the eggs and beat on medium-high speed for 5 minutes. Turning the mixer off just long enough to add the pecan/coconut mixture, I then turned it back to medium-high and beat for one additional minute. At this point, you’ll want to stop the mixer and scrape down the sides of the bowl.

Turning the mixer back to medium-high, I added the softened butter (you’ll want it to be super soft) one tablespoon at a time. (Note: Dorie’s recipe says to use 5 tablespoons of butter, but I softened an entire stick and lost track, stopping at 6 tablespoons. The extra tablespoon of butter didn’t seem to hurt at all, but next time I will use 5, as directed.) Once the butter is incorporated, turn the mixer to low speed and add the coconut rum, beating just until blended.

The batter will look a little curdled, just as Dorie described, so don’t panic. There’s no flour in this recipe to smooth things out, so just relax and go with it. Why? Because Dorie says so. I used a gravy ladle to spoon equal portions of batter into each of the 12 muffin cups. Each cup should end up about half-full.

Here’s where my secret ingredient came into play. It was this little can of dark chocolate-coated cocoa nibs from my friend Kirsten of Comfortably Domestic. She sent them in a box of goodies earlier this week. I’d never had them before, and my eyes just about bugged out of my head when I tried them. The nibs are crunchy, the chocolate coating is creamy, and together they are simply dreamy. SO when my baby cakes were ready to go into the oven, I sprinkled 10-12 of them on top of my cakes. I left 3 plain, just to try them without the cocoa nibs. BIG mistake. Lesson learned: next time, go all in.

Dark chocolate-coated Cocoa Nibs on top? Yes, please!

Bake the cakes on the center rack for 27-29 minutes, turning the pan halfway through the baking process. In my case, I set the first timer for 14 minutes, then turned the pan and re-set it for another 14 minutes, which turned out perfect. You’ll know they’re done when the edges are crispy brown and a toothpick comes out clean from the center. Remove the pan from the oven and invert immediately. (Hint: I used a flat cookie sheet that was a little larger than my muffin pan. Just turn the cookie sheet upside-down on the muffin pan, then grab both pans with hot pads and flip them both at the same time.)

Baby Cakes so yummy you'll just want to nibble them to death

Gently tap the muffin pan to release the cakes. Once the cakes are out of the muffin tin, give them a few minutes to cool, then remove any parchment paper that may still be stuck to the bottoms, and use a flat spatula to flip them back to their full upright positions. These are best served warm or at room temperature. Even better, serve them with homemade whipped cream spiked with a little vanilla bean paste. That stuff makes everything better, but it is BFFs with whipping cream. Plop a big spoon full on the top and go to town.

Nothing beats homemade whipped cream with vanilla bean paste

If you’re like me, don’t even bother with a plate and fork. Just blob on some whipped cream and eat it with your fingers. The toasted pecans and coconut paired with all that butter and coconut rum makes these dreamy. But the addition of the chocolate-covered cocoa nibs pushed this recipe right over the cliff. I swear I don’t know how these could get any better.

Dorie, you said to let you know if we messed with the recipe, so here’s my contribution. If you try these, I hope you’ll return the favor and let me know. Until then, I can’t thank you enough. These may be Baby Cakes, but they are absolutely HUGE in flavor. And I am totally in love with these little cuties.

Note: this recipe makes 12 baby cakes which can be stored in an airtight container at room temperature for 2 days, or frozen in the same container for up to 2 months. Here’s the recipe link again in case you missed it: http://doriegreenspan.com/2012/03/im-chugging-away-on-a.html

11 Comments

Filed under Food & Recipes

TCP Cooks: Raspberry Ice Cream

TCP's homemade raspberry ice cream

Those of you who visit this blog regularly know that The Complete Package, my beloved husband, loves to make ice cream. He has ever since he brought Christine home. Using a knock-off recipe for Ben & Jerry’s Sweet Cream Base, he has experimented with many flavor combinations. Some were treasures (coffee, maraschino cherry & pecan, peanut butter) and some were just plain good (coconut, peppermint brownie chunk). This weekend, while I was visiting the kids in Austin, TCP tried a new one – raspberry. It’ not just good, it’s fabulous. Like seriously wonderful. Last night, he kicked it up a notch and made me a raspberry milkshake. While I watched The Bachelor. And it was life altering. Here’s how he did it.

The Complete Package’s Raspberry Ice Cream:

For the raspberry puree:
2 cartons of fresh raspberries (6 ozs. each)
3/4 cup sugar
water

Combine raspberries and sugar in a saucepan; add just enough water to cover the berries and whisk with an immersion blender. Bring to a rolling boil so sugar is thoroughly dissolved. Strain to remove the seeds, and set it aside to cool down to room temperature.

For the ice cream custard:
2 large eggs
3/4 cup sugar
2 cups heavy whipping cream
1 cup milk
1/8 tsp salt
1/2 teaspoon vanilla extract
raspberry puree (from above)

Whisk the eggs in a bowl until fluffy (about 2 minutes). Whisk in the sugar a little at a time until completely blended, then beat one minute more. Add the cream and milk and whisk until thoroughly combined. Add in the salt, vanilla extract, and cooled raspberry puree; whisk until smooth. Pour into ice cream maker and freeze. (Note: you may have to divide the mixture in half and run as two batches depending on the size of your ice cream maker.)

Makes approximately 1 quart. Or 8 bowls. Or 10 milkshakes. Or 1 really colossal ice cream binge (including freezy headache). Consider yourself warned.

PS – Yes, I posted two ice cream stories in a row. For that, I sincerely apologize. To make up for it, I’ll be posting a soup recipe later in the week. It’s delicious and healthy, so thanks in advance for forgiving me.

12 Comments

Filed under Food & Recipes

Pie Week: If it’s Tuesday, it must be time for Bananas Foster Fried Pies

Bananas Foster Fried Pies. No fooling. It's Bananas Foster. In a Fried Pie.


What do you get when you combine six gregarious bloggers with one fabulous pie dough recipe? Pie Week, of course! Kirsten at Comfortably Domestic inspired us when she posted a recipe for fabulous “no excuses” pie dough made in a food processor in mere minutes. Needless to say, I had to give it a shot. My last few attempts at pie dough failed miserably. Too dry. Too wet. Too flavorless. Too pathetic. Father, forgive me for I had sinned; Pillsbury pie dough from the dairy aisle had become my ‘go to’ for all things pie. But not anymore. Using Kirsten’s pie dough as our common denominator, the following bloggers decided to unite and shout our love of pie from the rooftops.

Want to know who’s participating?
MondayKirsten from Comfortably Domestic
Tuesday – Jeanne from Inside NanaBread’s Head (hey, that’s me!)
WednesdayKat from Tenaciously Yours
ThursdayMads from La Petite Pancake
FridayMegan from Wanna Be A Country Clever
SaturdayAllison from Decadent Philistines Save the World

Each of us will be posting our own pie selection using Kirsten’s amazing pie dough recipe as the common thread. My contribution came to me when I was contemplating what to do with a bowl of rapidly ripening bananas. A few minutes later, I was rummaging through my pantry and accidentally ran into a bottle of Bacardi. What? Like you’ve never done that before. But hey… this isn’t about me and my burgeoning booze stash. It’s about PIE, so let’s get to it!

The cast of characters - all laid out and ready to roll. Ha! I kill me.

NanaBread’s Bananas Foster Fried Pies:
Kirsten’s pie dough (link above; I doubled it)
3 tablespoons of your favorite rum (or more, to your taste)
24 individually wrapped Kraft caramels
1/2 cup of evaporated milk
1/2 teaspoon of vanilla extract or vanilla bean paste
1 ripe banana (ripe but still firm works best)
1 egg plus 2 tablespoons of water (for egg wash)
Oil for frying, approximately 24 ounces
powdered sugar for dusting

Start by placing a small skillet on the stove; add the rum, then turn heat on to medium. Once it starts to bubble lightly, use a long kitchen match or long-neck butane lighter to flame the rum and burn off the alcohol. Please be careful here. I don’t want anyone to get burned. Allow the rum to flame until it goes out on its own; reduce to 1 tablespoon. Pour the rum into a heatproof bowl and set it aside.

Unwrap your caramels and place them in a microwaveable bowl; add the evaporated milk. Heat in 30 second intervals, stirring or whisking each time, until the caramels are melted and incorporated into the milk. Add the rum and vanilla; whisk until smooth. Set it aside and let it cool until it’s the consistency of creamy peanut butter. If you need to speed up the process, put it in the refrigerator. Just check it every 5 minutes to make sure it doesn’t get too firm.

While your caramel is cooling, flour your work surface and roll your pie crust thin (approximately 1/8th to 1/16th of an inch). You don’t want it too thick or it won’t fry properly and nothing is worse than a gummy fried pie. While we’re talking about rolling pie dough, I have to say that Kirsten’s version rolls beautifully. No jagged edges. No tearing. I could roll it thin and still pick it up to move it around without it tearing. So far, it’s a solid A+.

Look how smooth and perfect Kirsten's pie dough turns out.

Using a bench scraper (or a knife), cut the pie dough into 5″ squares. In a small bowl, whisk the egg and water for your egg wash. Working with four squares at a time, use a pasty brush or your fingers if you’re not fussy like me and brush each square with egg wash to help seal your edges.

Which came first - the caramel or the banana?

Place one tablespoon of caramel into the center of each square. Slice your banana on a bias to make longer, uniform pieces approximately 1/2″ thick. Place one slice of banana on top of the caramel on each square. Fold into a triangle and gently press the edges to seal. I like to let mine sit for a few minutes to give the egg wash time to do its thing. Using a fork, dip the ends of the tines in flour and gently crimp your fried pies. Set the crimped pies onto parchment or waxed paper and allow them to rest while you assemble the rest of the pies.

Make sure your oil is at 300F before you start frying.

In a large heavy-bottomed pan, heat 1″ of oil to 300F. I use canola oil, but you can use whatever you prefer. Once your oil is hot, fry the pies one at a time until they are golden brown on each side. I like to use a flat frying ladle and spoon hot oil over the top as they’re frying. This helps create those gorgeous bubbles in the dough. Check it out. (PS – I love the morning light at my kitchen window.)

Now that, my friends, is a perfectly fried Fried Pie.

Drain the fried pies on paper towels to absorb the oil and allow them to cool. To serve, dust lightly with powdered sugar and drizzle lightly with the remaining caramel sauce. If it’s too thick to drizzle, microwave it for 15-30 seconds, or until it softens enough to drizzle easily. Or you could skip the powdered sugar, add a scoop of vanilla ice cream, and drizzle caramel over that. Or you could skip the powdered sugar and the extra caramel and just eat these plain or with whipped cream. Trust me; these are plenty sweet on their own. Must be all those buttery sweet caramels. Mmmmm… caramel.

Crispy, chewy, sugary, gooey. It doesn't get any better than this.

If there are any pies left over {go ahead…I’ll wait until you stop laughing} wrap them in parchment or waxed paper and slip them into freezer bags. Store in the freezer for up to 2 weeks. To reheat, unwrap the pies and place them on a baking sheet. Bake at 350F for 10 minutes, or until they are warmed through. Could you microwave them instead? Sure, but baking will help restore that crispy crust to the outside. And I’m all about crispy, flaky pie crust.

Thank you, Kirsten, for sharing your recipe with the world and for inspiring our pie shenanigans this week. See what you started? And speaking of – be sure to check in with Kat, Mads, Megan and Allison as Pie Week continues. There’s no telling what those ladies are up to, but it’s sure to be delicious!

Pie Week, Day 1 – click here to see Kirsten’s Monday entry – Apple Tart with a Cheddar Streusel Topping It’s sure to be an All-American family favorite.

Up Next: Kat at Tenaciously Yours tackles her first pie…EVER! Can’t wait for Wednesday to see it. Let’s just say they don’t call her ‘tenacious’ for nothing.

*UPDATE* November 16th is “Love the Pie” Party Day at www.TidyMom.net. Come join Love the Pie with TidyMom sponsored by Cherokee USA, Le Creuset, Wilton, Bags by Bloom and Harvard Common Press and browse the pie links bloggers are sharing. If you love pie like I love pie, you will not want to miss it!

38 Comments

Filed under Food & Recipes