OKMH – The December Issue

OKMH Collage 2013

Ah, the holidays. A time for family, friends, gifts, and food followed by more gifts and even more food. Am I right? This month, our One Kitchen Many Hearts band of merry elves kissed 2013 goodbye and bid 2014 a hearty hello with our last round of gift boxes for the year. My December box was from Beka of Kvetchin’ Kitchen fame. Here’s a look at the bounty she sent.

OKMH Dec2013 - All The Goodies

So many fabulous things stuffed in one box! Let’s start with The Cuteness.

Chippy Collage

Oh how I love a cute squirrel or chipmunk. Close friends & family know that I often joke about buying a squirrel ranch to retire to in our old age. I can picture The Complete Package and I sitting on the porch in our rockers, sipping on a bourbon, watching the ‘herd’ come in for the evening. Laugh if you want, but it’s a great way to use up the seven pounds of pecans & assorted nuts in my freezer. And every girl should have a dream.

Next up: The Sparkles

Nail Polish Collage - Dec2013

Mani/pedis (or what we like to call Paws & Mitts) are an OKMH staple. This month, Beka clearly outdid herself by sending a 14-pack of Elf Polish. Get it? Elf. Christmas. I see what she did there. Even more impressive than her holiday humor is the variety of colors & sparkles included in the set. My favorite is the color/sparkle combos like the metallic silver and the chunky silver & black glitter. Or the pastels paired with the white snowflake glitter. Want gold? We got it! Partial to pinks? They’re in there, along with a passionate purple/blue shade, a groovy green and a few not-so-naughty nudes. I love it all!

And now: The Edibles

Food & Bev Collage

Just take a second to soak this in. That’s apple pie cream liqueur, coconut jam (aka coconut curd), and a bottle of Dr Pepper jelly beans. First of all, that coconut jam is off the charts amazing. I sampled it with a spoon and was this close to eating the entire jar. So creamy, so dreamy, so…. coconutty. I want to pair it with chocolate. Or smear it on a roasted banana. But what I don’t want to do is share. Speaking of sharing, the grandkids (Jonah Bear & Lilly Bug) were here when the box arrived and immediately volunteered to sample the jelly beans. They got 4 thumbs up, Beka. Way up. I have yet to try the apple pie liqueur, but that won’t last long. It’s supposed to be close to freezing in Houston tonight, and The Complete Package & I don’t do ‘cold’ well. I’m thinking hot toddies of apple pie cream liqueur mixed with my homemade Apple Pie Moonshine may be in order, or perhaps a spiked vanilla latte.

And that’s where the next part of Beka’s box comes in: The Drinkables

Coffee Cocoa Collage - Dec2013

Know what pairs well with Apple Pie Cream Liqueur? I’m guessing caramel macchiato or vanilla bean coffees and/or vanilla rose cocoa mix. Thanks, Beka! Just in time for our cold snap. I feel toastier already.

Nothing warms the heart like friends & family, and Beka’s last gift brings that point home. I’ll call our last reveal: The Collectibles

Frame & Card Collage

Adorable frame, Beka! And I know just which picture to put in it. It hasn’t been taken yet, but I have plans. Big plans. February plans. Did you notice? It’s a recordable frame. There’s a nifty recorder built into the back of the frame so you can record any message. Or song. That’s What Friends Are For, You Have A Friend In Me, Girls Just Wanna Have Fun, Feelings… so many earworms, so little time. Let me know if any of those sticks with you all day. You’re welcome.

Now if you want to see what I sent to Allison, CLICK HERE!
From there, you can see the fun unfold with:

Kirsten @ Comfortably Domestic
Megan @ Country Cleaver
Kat @ Tenaciously Yours
Mads @ La Petite Pancake
Beka @ Kvetchin’ Kitchen

Wishing you all health, wealth and a Happy New Year! -jeanne

8 Comments

Filed under Blogger Collaborations

Traveling TX: Lost Maples State Park

Do you ever dream of getting away from it all? Job, cell phone, e-mail, other people… all of it? The Complete Package and I found a place that does that for us. It’s called St. Clare’s Cabin near Leakey, Texas. If you’ve been a reader for a while, you’ll remember we went there last Christmas. This rustic, fabulous cabin is everything we look for in a getaway – quaint, quiet & remote.

LeakeyTX - Porch at St Clare's Cabin

The cabin is in the middle of nowhere in the Texas Hill Country – 4 miles from Vanderpool, 11 miles from Leakey. Still don’t know where that is? Well, that’s the point. It’s waaaaay out there, in the mountains northwest of San Antonio. So far out I had to drive to Bandera to get a cell signal. For real. And I loved it.

Last year, we went just before Christmas. This year, we decided to go right after Thanksgiving and I’m so glad we did. There was still some fall color to ‘ooh & aah’ over. To make the most of it, we visited Lost Maples State Park to try to catch the maples at their finest. We were almost too late, but there was still some beauty to behold. Here’s a sampling of our afternoon hiking Lost Maples.

Lost Maples - Lone Maple with Cliffs

Lost Maples - Pond at Trailhead

Lost Maples - Orange Maple

Lost Maples - Creek withTexas Rock

Did you notice that big rock in the middle of the creek? It immediately caught my eye. Why? Because it looks like the state of Texas, if the entire eastern side of the state crumbled and fell off. Err… sorry, Houston!

Lost Maples - Texas Rock

I’m taking that as a sign that we should move to the Hill Country. {wink} Another cool feature found near the water is the limestone rock that has literally been picked up by the cypress tree roots and incorporated into the trees.

Lost Maples - Cypress Stump with Rocks

The trails through Lost Maples are lovely. Some are steep and challenging; some are more level and lazy. Whichever you choose, the most important thing is to get out of the car and enjoy the trails. Pack a picnic lunch and find a quiet spot by the river. Take a nap under a maple or hike the loop & enjoy the foliage.

Lost Maples - Steps on Maple Loop

It’s so beautiful under the canopy of maples, you can’t help but relax.

To learn more about Lost Maples State Park, visit Texas Parks & Wildlife.

14 Comments

Filed under Family Stuff, Travel Tales

Luscious Leftovers: Lettuce Wraps

We meal plan in this house. Each Sunday evening, I sit with a notepad and plan out our week. Lately, my game plan involves picking a few main dish meats that can be re-used as leftovers in a variety of ways. With just two of us, it makes it easier to buy, easier to stretch, and easier to save money as well.

For example, The Complete Package recently smoked a rack of pork ribs. That night, we had a traditional barbecue feast of ribs with beans and macaroni salad. The next night we one of my favorite simple go-to meals – Asian lettuce wraps. When I say this one is easy, I’m not even kidding. Not one little bit.

Lettuce Wraps - Inside NanaBread's Head

Here’s what you’ll need:

  • leftover smoked pork (ribs, pulled pork, chops, etc.), warmed up
  • a small pan of steamed white rice (we love basmati)
  • scallions, cut into 2″ strips lengthwise
  • butterhead or Boston lettuce, rinsed & patted dry
  • your favorite Asian hoisin or sweet chili sauce

Lettuce Wrap - Inside NanaBread's Head

To serve, simply lay out a leaf or two of lettuce. Add a spoonful of steamed rice, some smoked pork, a few scallions and a drizzle of your favorite hoisin or chili sauce (or both). Roll it up and stuff it in your pie hole. BAM! So good, and ready in mere minutes. This meal confirms my favorite motto: Keep it Simple.

Lettuce Wraps Collage - Inside NanaBread's Head

What is your go-to dinner in a hurry meal? I’d love for you to share it! -jeanne

9 Comments

Filed under Food & Recipes

Happy Thanksgiving, everyone!

Thanksgiving Turkeys

5 Comments

November 26, 2013 · 9:00 AM

Pie Week: Black & White Coconut Tart

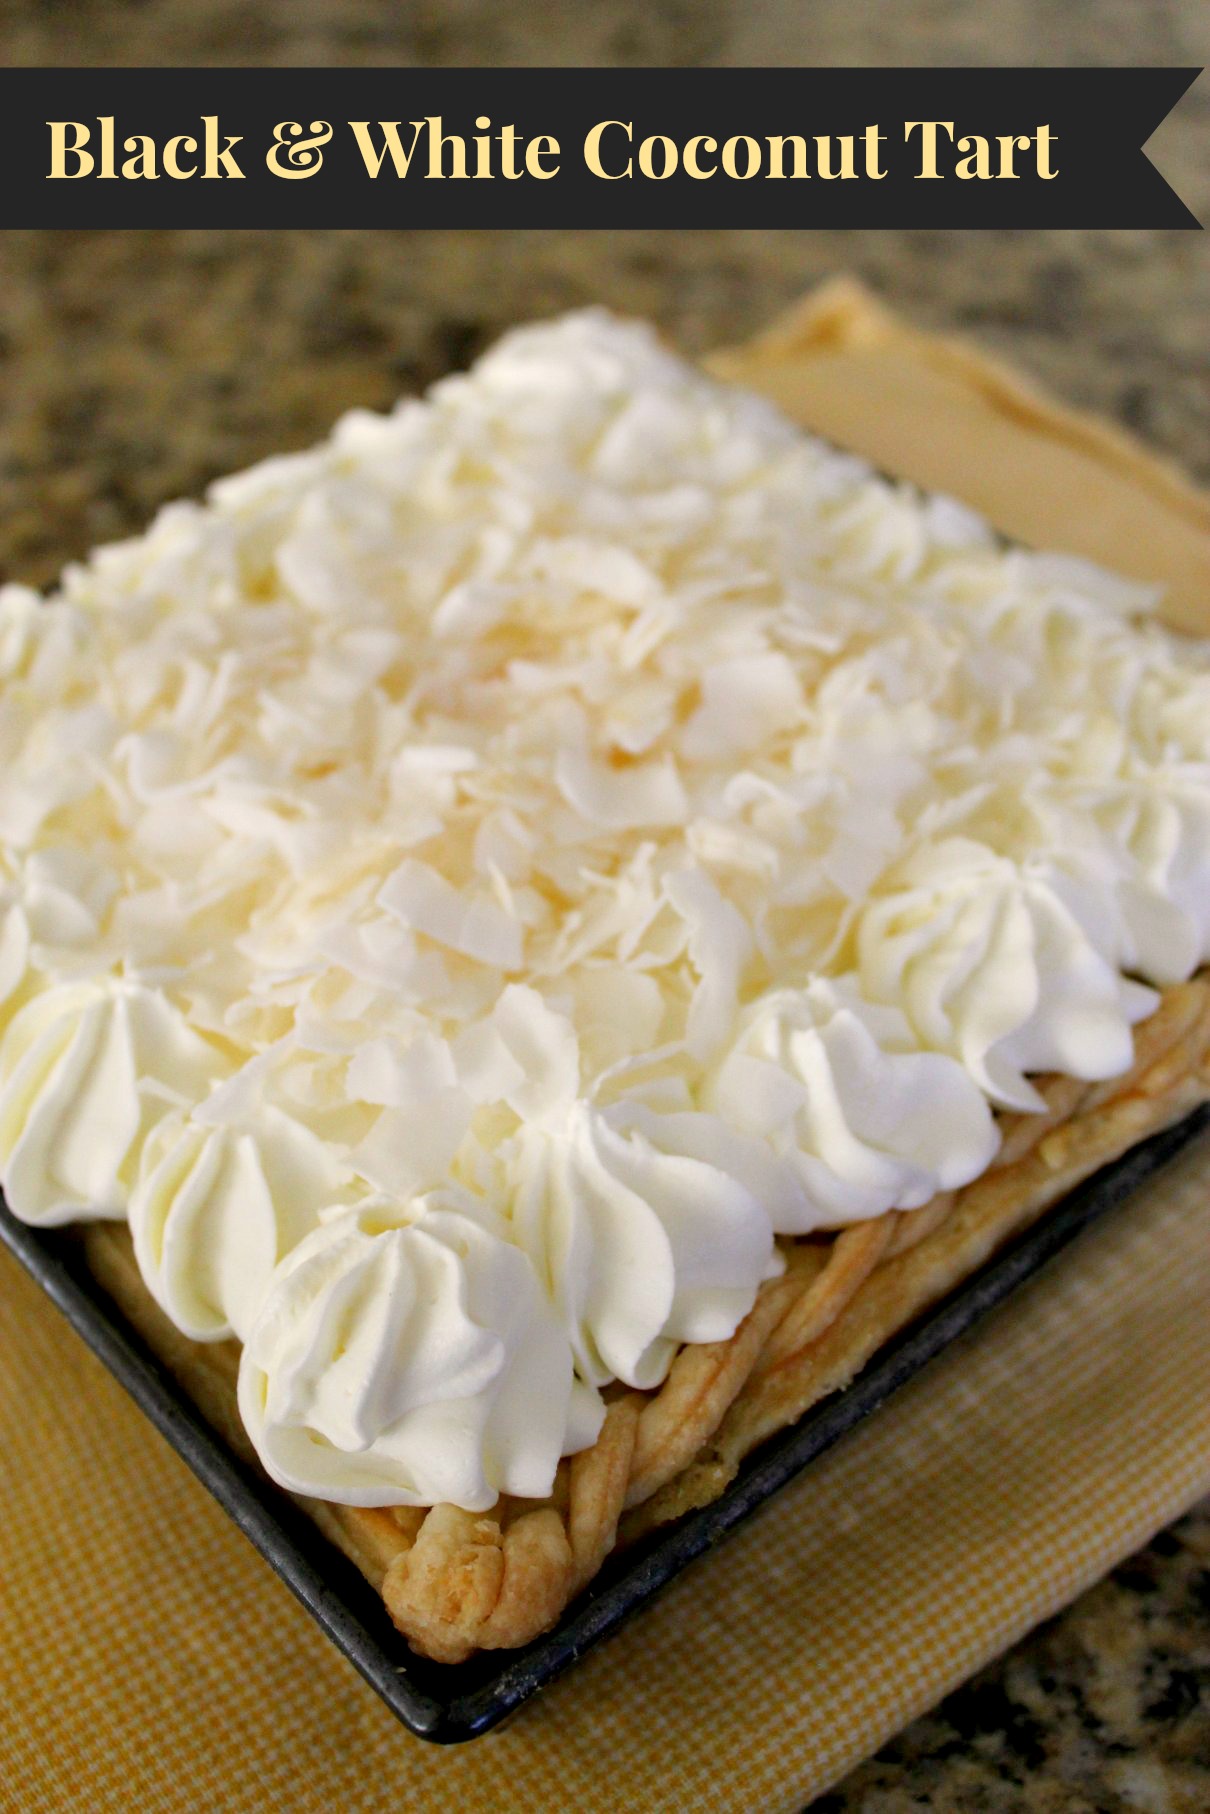
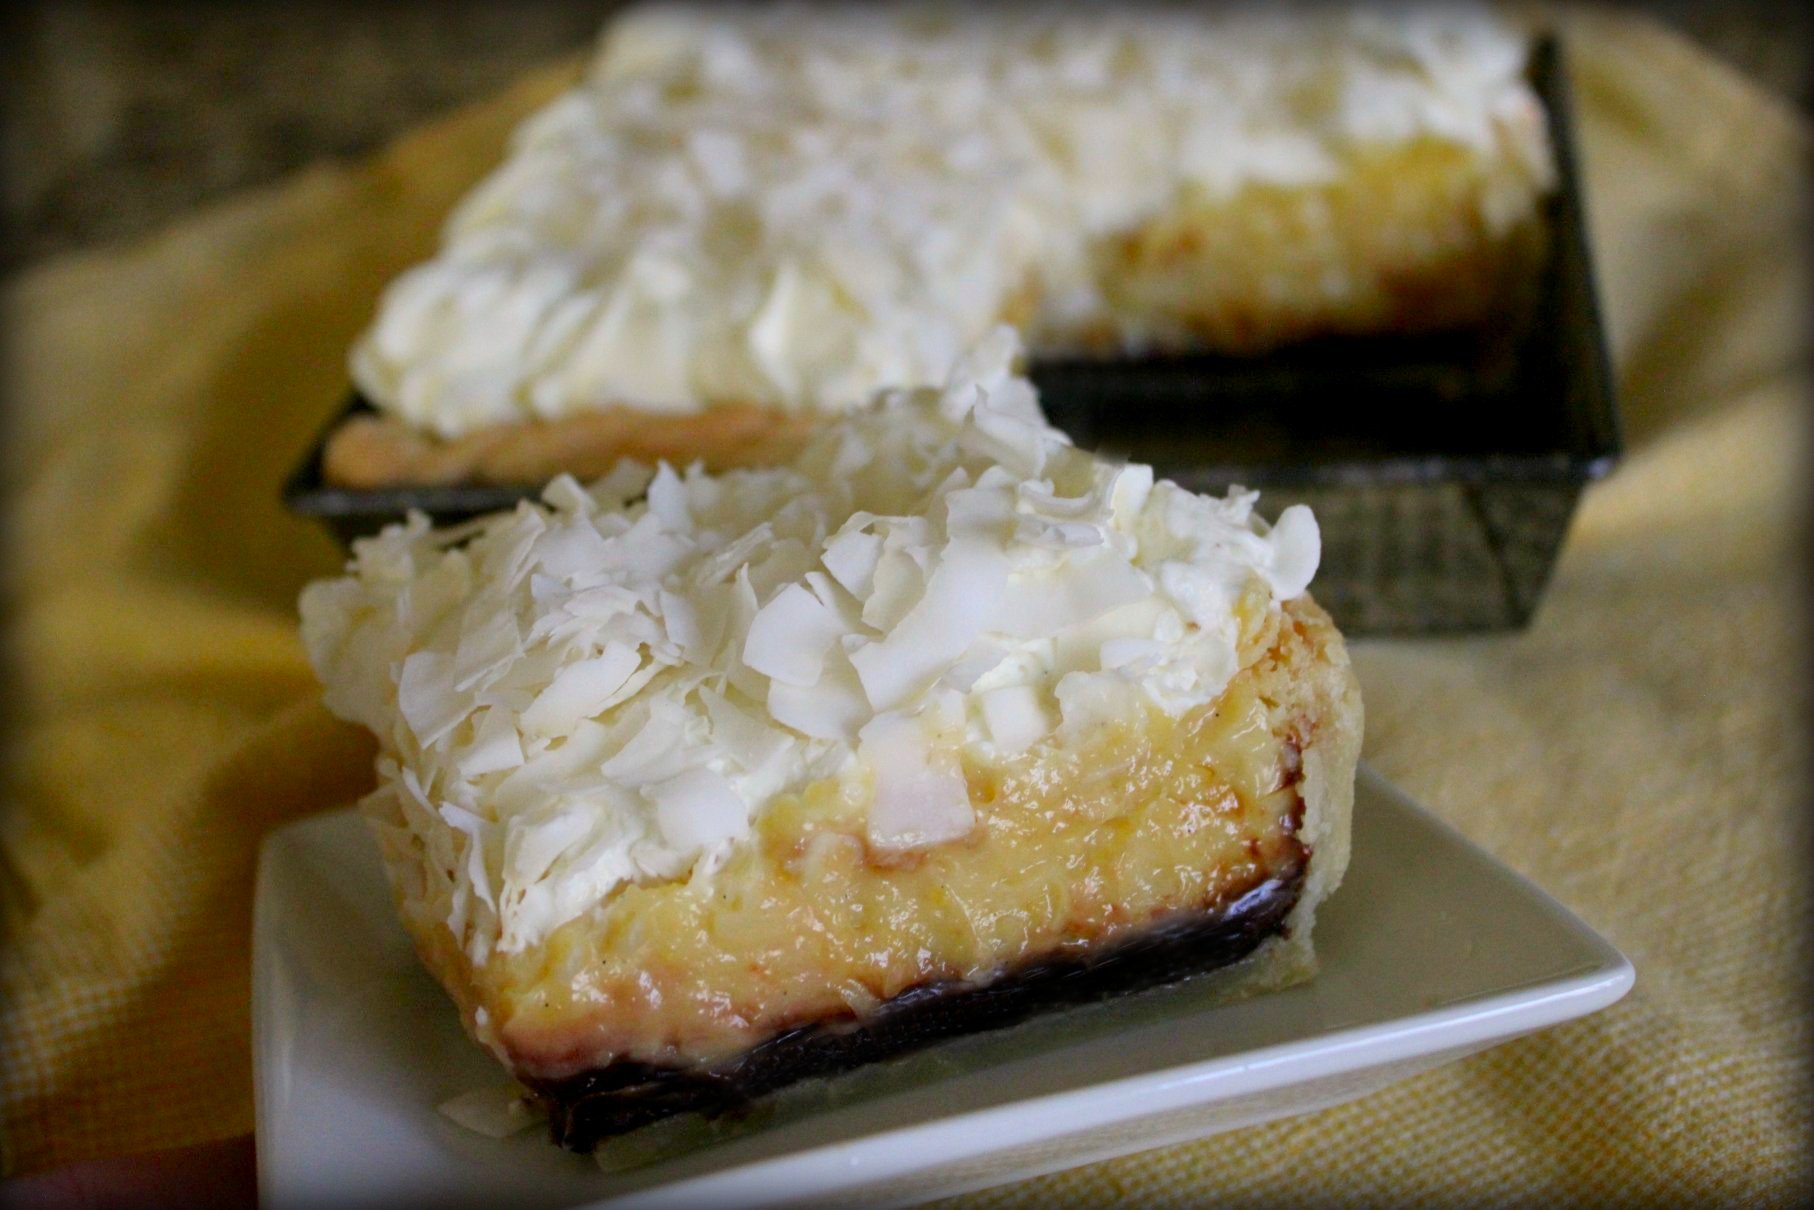
The Theme Weavers are ringing in the holidays with PIE WEEK. Wahoooooo! I love pie. Love, love, love it. It’s my favorite of all of the Food Groups – Pie, Bacon, Cheese, Chocolate & Booze. If only we could all be in one room so we could face plant into all the glorious pies to be featured this week, it would be a dream come true. Also dreamy, this gorgeous Black & White Coconut Tart.

Black & White Coconut Tart - Banners

It starts with Kirsten’s ‘No Excuses’ pie dough recipe, pre-baked into the perfect vessel. Then it gets a schmear of hot fudge sauce (it’s okay… just breathe) and a luscious layer of coconut cream. Finally, it’s crowned with glorious mounds of whipped cream and toasted coconut. Have I mentioned that I love pie?

Let’s start at the beginning – a very good place to start. Pie dough. When I say this one is easy, I’m not joking. Made in the food processor, it’s ready in a flash and flawless every single time. It’s the only recipe I use.

Black & White Coconut Tart - Kirsten's Pie Dough

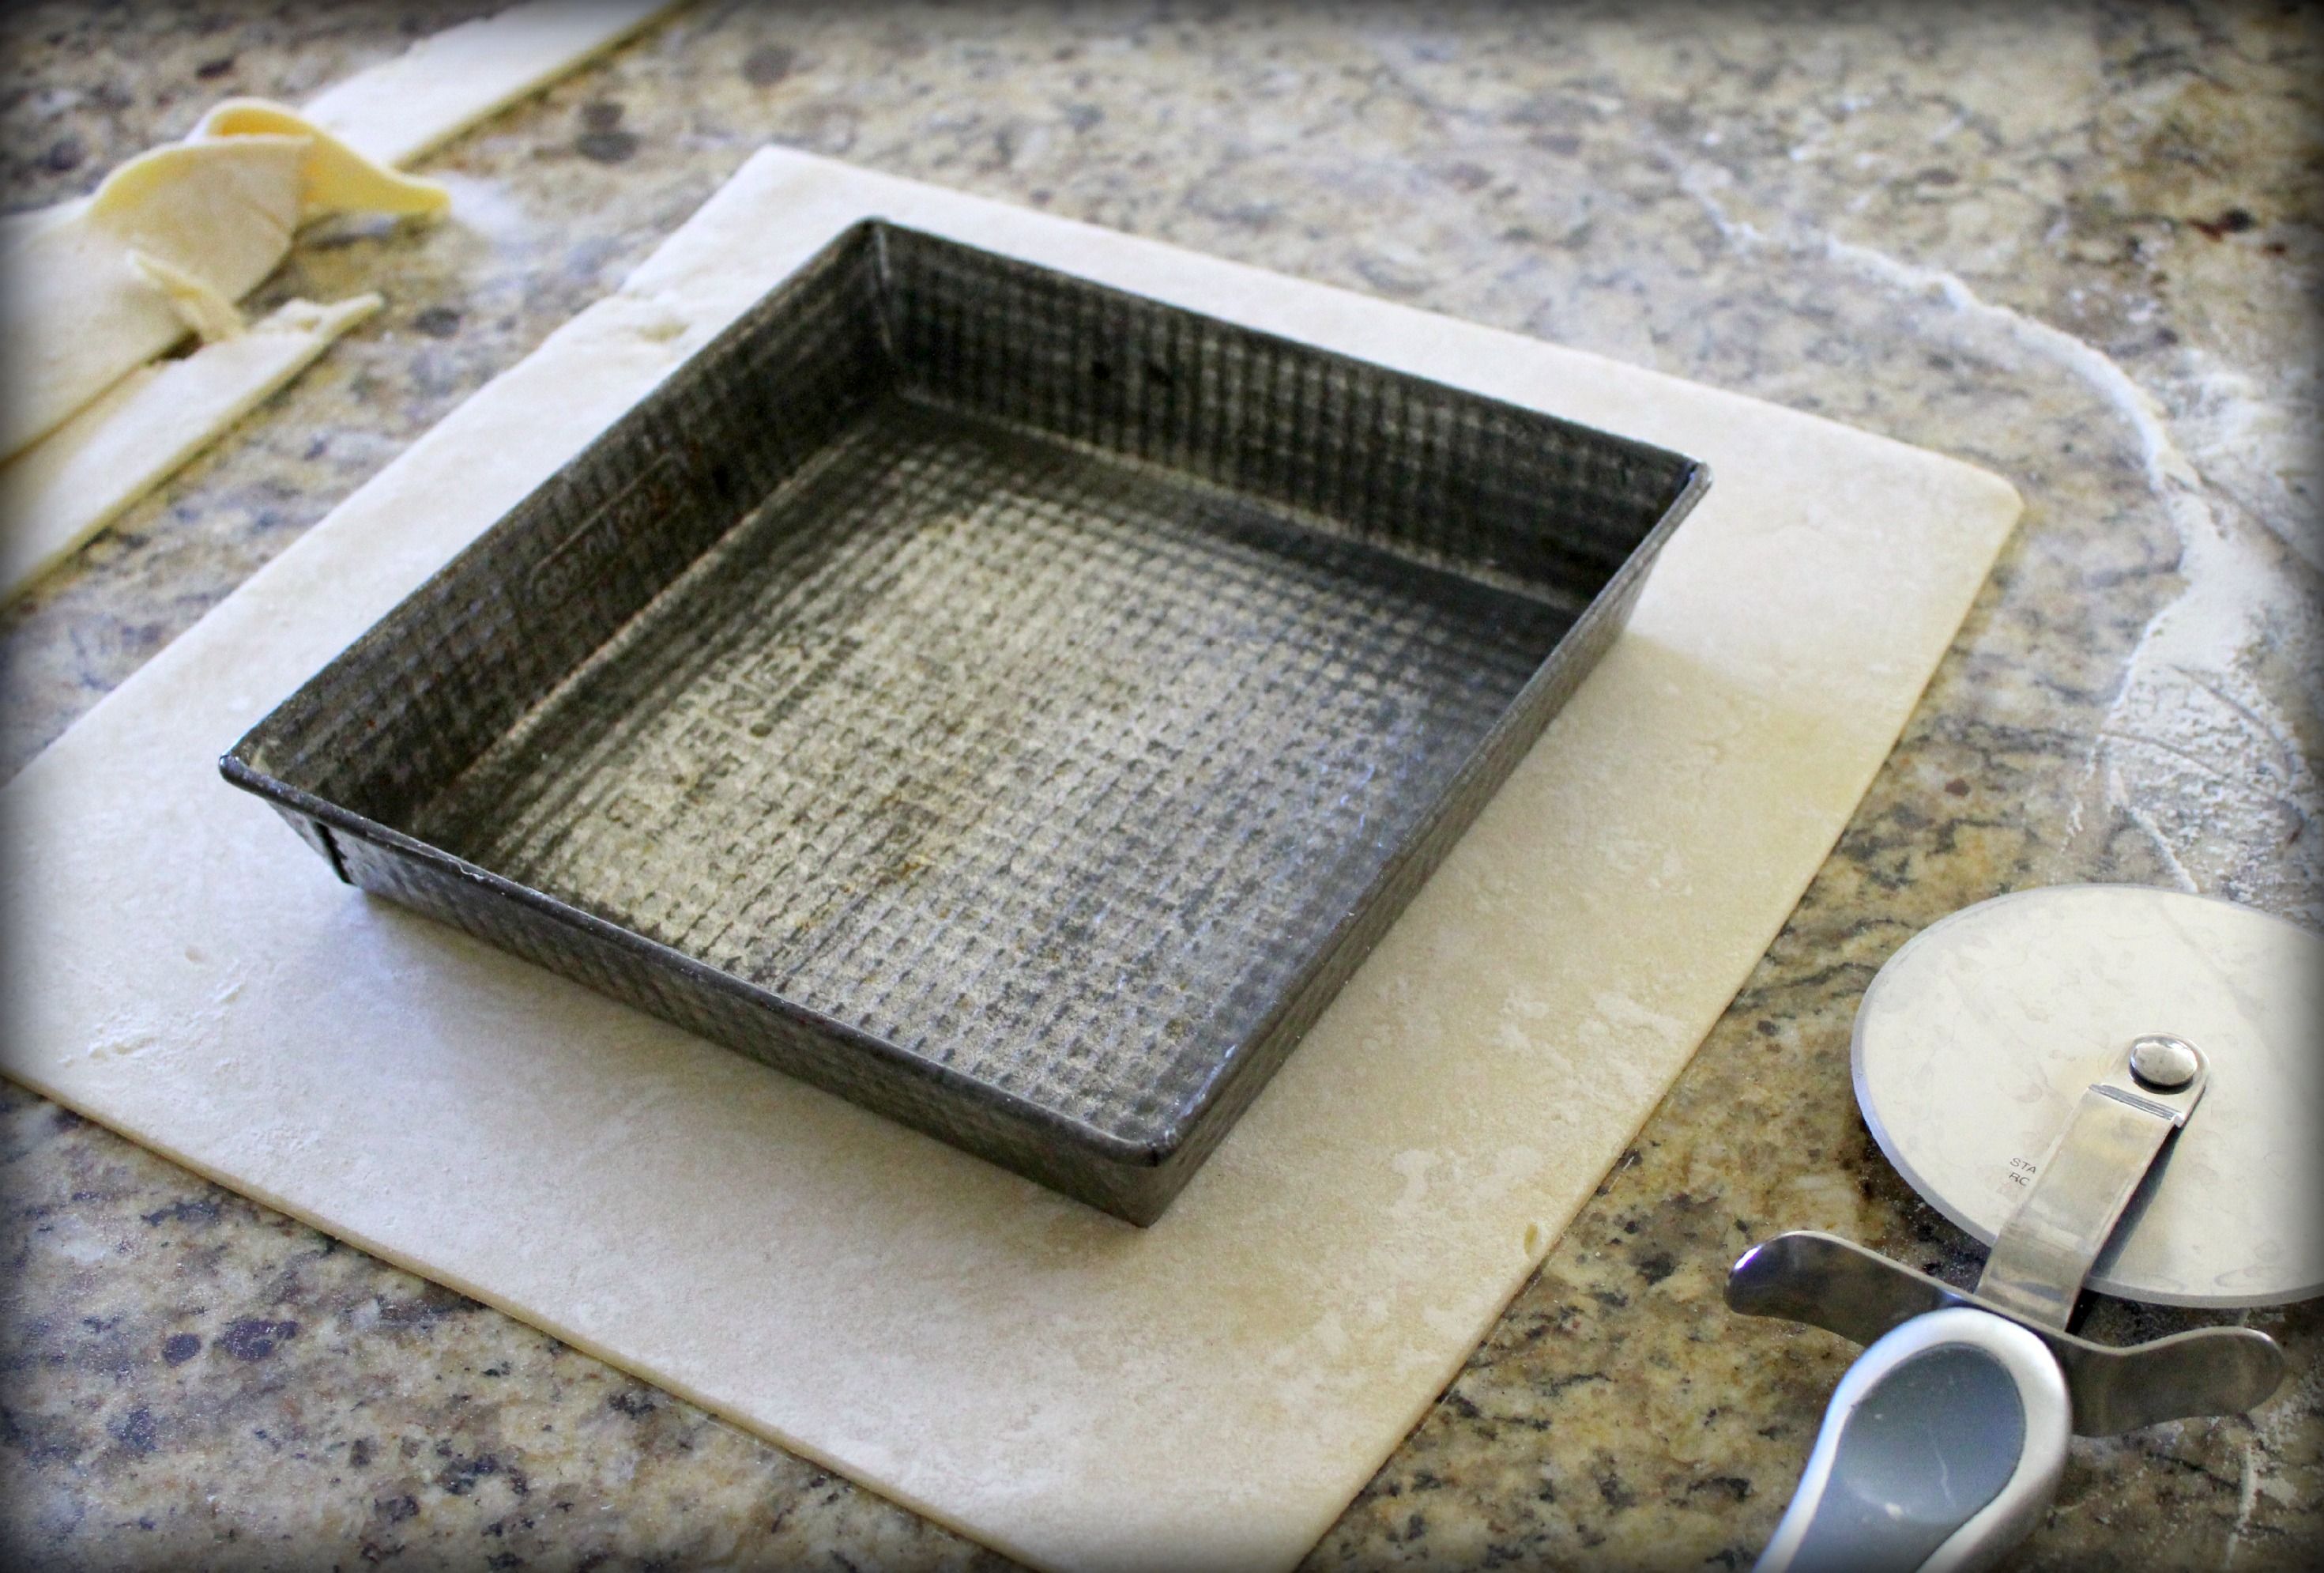
For this tart, I chose to use a vintage 8″ square baking tin I found while antiquing with Kirsten last May. Using the pan reminds me of her and proves two points – 1. food = love and 2. blogging friends are real (and are lots of fun).

Black & White Coconut Tart - Fitting Dough to Pan

One of my favorite pie tools – a pizza cutter. I love a good sharp edge when working with pie dough. There’s no better example of that than this next shot, where I decide to make a fancy braided edge for my tart. Curse you, Pinterest!

Black & White Coconut Tart - Braid Collage

Did I just hear you say “Whatever!”? Oooo… I’m gonna… Ha! Not really. Truth is, this trick is not as complicated as it looks. I found the key is pinching the ends together and pressing them into the countertop to anchor the strands. From there, it’s just a regular braid. When you’re done, pinch the other ends together to seal the deal, then apply it to the tart with a little egg white as glue.

Black & White Coconut Tart - Egg Wash Glue

Once applied, press gently to make sure it’s stuck, then pop then entire thing into the freezer for half an hour. Why? Because a frozen pie shell bakes much better than a room-temperature pie shell. More flaky layers; less shrinkage. After 30 minutes, remove it from the freezer, line it with parchment paper and fill it with dried beans or pie weights to keep the crust from falling into the pan while it bakes. My tip: cut two paper strips to create a sling instead of trying to fold parchment into the corners. Ain’t nobody got time for that!

Before (L) and after (R) - the beans keep the dough in place.

Before baking (L) and after (R) – the beans keep the dough in place.

Bake in a hot oven until it’s a light golden brown, then allow it to cool for at least 15 minutes with the beans still in place. After 15 minutes, you can lift out the beans and allow the tart shell to cool completely. If you plan to put your dried beans back in the pantry for soup later, be sure to let them cool completely before you seal them into a container. If you don’t, they’ll create steam in the container which will cause them to mold later.

While my tart shell was chilling, I made a batch of coconut custard from the America’s Test Kitchen Family Cookbook. I chose this filling because it used coconut milk for extra flavor, which was a good call – it’s dreamy. Cooked on the stove, it comes together quickly. The hardest part is resisting the urge to eat it while it cools. Once it’s done and slightly cooled, the trick is to cover it with plastic wrap so it doesn’t get that tough pudding skin layer on top. Two words that should never be used together – pudding & skin.

Black & White Coconut Tart - Coconut Custard

So now you have a baked & cooled tart shell and a cooled custard. What’s next? Assembly! First up is a layer of your favorite fudge sauce, then a thick layer of coconut custard, and finally a piped dome of whipped cream sprinkled with lightly toasted coconut. Licking the spatula is highly recommended.

Black & White Custard Tart - Filling Collage

Days like this make me happy to be one of those people who plays with their food. This one was fun to put together. Have you ever made anything that turned out so perfectly you thought, “Man, I hate to cut this!” Yeah, me neither.

Black & White Coconut Tarts - A Slice

NANABREAD’S BLACK & WHITE COCONUT TART:

One recipe of No Excuses Pie Dough (use half, freeze half for later)
One batch of America’s Test Kitchen Coconut Cream Pie custard:

  • 1 14-oz. can coconut milk (not cream of coconut)
  • 1 cup whole milk
  • 1/3 cup shredded coconut
  • 2/3 cup sugar (divided in half)
  • 1/4 teaspoon salt
  • 5 large egg yolks
  • 1/4 cup cornstarch
  • 2 tablespoons unsalted butter (cold & diced)
  • 1 1/2 teaspoons pure vanilla extract

One batch of stabilized whipped cream topping:

  • one pint heavy whipping cream
  • 1/4 cup sugar
  • 1 heaping tablespoon instant vanilla pudding powder

One cup of your favorite hot fudge sauce (at room temperature)
One cup lightly toasted unsweetened coconut flakes, for garnish

To make the pie shell:
Roll the pie dough out and place in a lightly sprayed pie or tart pan. Flute or attach a decorative edge, then freeze for 30 minutes. Remove from the freezer, line the pie shell with parchment paper, fill with pie weights or dried beans, and bake at 400F for 15-20 minutes, or until the edge is a light golden brown. Remove from the oven and cool 15-20 minutes, then lift out the paper & beans and allow it to cool completely.

To make the custard:
In a heavy saucepan, bring the coconut milk, whole milk, shredded coconut, 1/3 cup of sugar and salt to a gentle bubble, stirring often. In a separate bowl, whisk together the egg yolks, remaining 1/3 cup sugar, and cornstarch until smooth. Slowly ladle about 1/2 cup of the hot custard into the egg yolk mixture, whisking vigorously to avoid lumps. Once combined, whisk the egg yolk mixture into the pan of custard and whisk to combine. Continue to simmer over medium-low heat until the custard begins to thicken. Whisk in the vanilla extract and turn off the heat. Move to a cold burner and allow it to cool for 15 minutes, then cover with plastic wrap and allow it to cool, covered, until it comes to room temperature.

To make the whipped cream topping:
In the bowl of a stand mixer, combine the heavy cream and sugar. Whisk on high until the cream just begins to thicken. Sprinkle in the instant vanilla pudding powder and continue to whisk until stiff peaks form. Scrape into a piping bag with a large star tip and keep refrigerated until ready to use.

To assemble the tart:
Spread a 1/4″ to 1/2″ layer of your favorite hot fudge sauce into the tart shell, spreading it an even layer. Gently spoon the coconut custard onto the fudge sauce layer and spread it into an even layer. Top with whipped cream and shaved coconut and chill until ready to serve. Makes four large servings or six smaller ones, if baked in an 8″ x 8″ square pan as seen above. Keep refrigerated.

Black & White Coconut Tarts - My Slice

Before you face plant into that last shot, be sure and check out these Theme Weavers and their crusted contributions to Pie Week:

Monday, Nov. 18:
Kirsten @ Comfortably Domestic – Mile High Apple Pie
Anne @ From My Sweet Heart – Cranberry Cherry Ricotta Pie
Haley @ The Girly Girl Cooks – Coconut Cream Pie
Katie @ The Hill Country Cook – New Mexico Apple Pie

Tropical Tuesday, Nov. 19:
Mads @ La Petite Pancake – Pineapple Pie
Monica @ The Grommom – Papaya Pie
Jeanne @ Inside NanaBread’s Head – Black & White Coconut Tart (that’s me!)

Wednesday, Nov. 20:
Kat @ Tenaciously Yours – Grandma’s Chocolate Pie
Carrie @ Bakeaholic Mama – Chocolate Cream Pie
Kirsten @ Comfortably Domestic – Maple Sweet Potato with Swiss Meringue

Thursday, Nov. 21:
Shanna @ Pineapple and Coconut – Boozy Pumpkin Eggnog Pie
Carrie @ Bakeaholic Mama – Sweet Potato Tartlets
Christina @ Buffy and George – Deep Dish Apple Pie

Friday, Nov. 22:
Madeline @ Munching in the Mitten – Sweet Potato Pie
Allison @ Decadent Philistines Save the World – Refrigerator Pumpkin Porter Chocolate Pie with Toasted Pumpkin Porter Marshmallow “Meringue”
Lauren @ Climbing Grier Mountain – Mini Butternut Squash Glazed Pie Stacks with Marshmallow Frosting

Saturday, Nov. 23:
Megan @ Country Cleaver – Biscoff Pie with Whiskey Mallow Fluff
Kirsten @ Comfortably Domestic – Berry Cherry Pie
Shanna @ Pineapple & Coconut – Persimmon & Pear Brandy Pie with Vanilla Bean Crumble

OLYMPUS DIGITAL CAMERA

32 Comments

Filed under Blogger Collaborations, Food & Recipes

The Master Bath Remodel Project

MBR Project - Before - Tub & Shower

Until last month, this was our 24 year-old master bathroom (minus the decorations and 47 shampoo bottles). Sad trombone says ‘wah wahhhhhh’ and I agree. Here’s what was bugging us about our old shower/tub area.

MBR Project - Before - What is Wrong

Where to start? Old carpet (Q: Who carpets a bathroom? A: Everyone in 1989.) A huge 2-person garden tub that was rarely used except when the grandbabies swam in it. They’ll be the only ones to miss it.

MBR Project - Before1

Shower tile, some of which literally comes out of place every few years, a shower door so low The Complete Package has a history of banging his head on it, and glass so short water from every shower flies out and sprays the entire bathroom. Ugh. What are you gonna do?

That’s right… rip it out, baby!

MBR Project - Ripping out the old shower & tub

Boom. Gone! We found a contractor we enjoyed working with, agreed on every single decision (a rarity), dug in, and got it done right on schedule. Seriously, everything went like clockwork. The only minor hiccup was a corroded pipe behind the old shower tile, which was quickly replaced.

MBR Project - Corroded Pipe2 Collage

So here was our game plan:
1. enlarge the shower & add a bench
2. replace the tub with a smaller soaking tub
3. raise the shower tile & glass
4. replace carpet with new tile flooring

Let the framing begin!

MBR Project - New Framing Begins

Next up – plumbing rough-in for the new fixtures and a new concrete base for the shower floor. For the record, our old shower did not have a concrete base but should have. It also didn’t have a vapor barrier or waterproof backer board. The things you learn when tile is ripped out, man. We’re lucky we didn’t suffer a serious leak over the past 24 years. It’s kind of a miracle.

MBR Project - New Shower Concrete

This time around, we had a contractor that knew how to do it right and the difference between old and new is like night and day. We’re completely thrilled with the new stuff. One last look at the before photos before I start revealing.

Tub & Shower Collage1

First up, the new soaking tub. It’s smaller, deeper and rectangular versus oval.

MBR Project - Soaking Tub

Because it’s rectangle in shape, you can actually stretch out farther than you could in the bigger oval tub. Don’t ask me how. #Science

All I know is that I love this tub. When you want to soak, the water actually comes above your shoulders. As it should. Also cool – the front tile panel is held on with magnets, so if you ever need to access the plumbing, you don’t have to wreck the tile work. Genius! And that decorative border? It’s in the shower, too.

MBR Project - New Soaking Tub

But before I show you the shower, here’s the new floor tile. It’s the same tile used for the tub and shower, but in much larger 18″ squares. I love it. Goodbye nasty old carpet. Hello clean shiny tile!

MBR Project - 18 Floor Tiles

Other than the decorative band, we used the same tile throughout the entire bathroom in different sizes. This same floor tile is in the shower floor in a 3″ x 3″ version. Wanna see? Do you want to see it now? Okay… here you go.

MBR Project - Shower View

How do I love my new shower? Let me count the ways. I love the larger size – at least a foot deeper and about 18″ wider. I love the taller frameless glass. I love that the tile goes all the way to the ceiling. And I love the new fixtures.

MBR Project - New Shower Hardware

Old shower – small shower head. New shower – bigger shower head and a hand-held wand. Even better – there’s a new diverter valve so you can toggle between the two or use both at once. Love it! There’s also a new niche for shampoo and soap (his & hers, of course). But what I love most is the new granite-topped bench. (The next photo was taken before the shower glass was installed.)

MBR Project - New Shower Bench with Granite Top

No more bending over to shave my legs, or throwing a leg up and hoping I won’t slip and fall. (Don’t try to picture that last part, just move along.) It’s at least 4 feet long and 12″ wide, and we were able to hand pick our piece of granite, which includes some really cool streaks of gemstones. I could not be happier.

MBR Project - My New Shower

An unexpected bonus – because the new shower glass is much taller, it holds in the steam thereby turning the new shower into a steam shower. That’s going to be lovely this winter when our Houston temps dip to 45-ish. I joke, but it really is nice when the bathroom is chilly. Except that you want to stay in the shower and not come out. Like ever. Do they make wine racks for showers?

MBR Project - Before - What is Wrong

MBR Project - Finished Shower & Tub

Have I said how much we love our new bathroom? Because we really, really do. So we moved into the guest bedroom and bathroom for 4 weeks. Who cares? So we had to move our clothes and all of TCP’s computer equipment (since he works from home). Done! So we had to wrap our entire bedroom, study and both closets in plastic sheeting to protect it from construction dust. No big deal!

MBR Project - Taping Off the Bedroom

Unless you’re a big Dexter fan. Then that part got a leeettle bit creepy. :)

54 Comments

Filed under Family Stuff, Miscellaneous Thoughts

OKMH – The October Box

OKMH Collage 2013

It’s that time again, kids – time for another One Kitchen Many Hearts box. Wahoo! I love mail days like OKMH, where blogging buddies send care packages to one another round-robin-style. For October, I sent a box of love to Madelyn in California and received a box from Kat in Minnesota. Here’s what Kat sent. It started with this card. So much promise in a 4×6 format.

OKMH - October 2013 - Card

As promised, there was so much to squeal over. As the postscript hints, there was a pashmina (possibly from Paris) in a lovely blue hue. So pretty. Ooo la la!

OKMH - October 2013 - Pashmina

And two bags of what can only be deemed the Rolls Royce of rice.

OKMH - October 2013 - MN Wild Rice

I already have plans that involve roasted chicken with mushrooms and grilled shrimp with lemons. Or maybe a wild rice salad with dried cranberries, oranges and nuts. So many possibilities hidden in those gorgeous ebony grains. In sharp contrast, these next goodies have no possibility of lasting. Zero. Zip. Zilch.

Caramello Bar - RIP

No mincing words here. That Caramello Bar died instantly. Thankfully, it was a quick & painless death. I made sure of that. It wasn’t pretty, but it was quick. These are lasting a little longer, but not by much.

Chocolate & Caramel Collage

Okay, confess. When you see a chocolate bar with grid lines, and that bar breaks contrary to said lines, are you compelled to ‘fix’ it by evening it up? To the point that you may eat additional squares just to make sure the bar is neatly within the lines? No? Tell the truth! It can’t just be me!

Yes, I color within the lines.

But my favorite squee-inducing gift from Kat is the vintage cookbooks (cookbooklets?) from the 30’s, 40’s and 50’s. Seriously, they are too much fun!

OKMH - October 2013 - Vintage Cookbooks

Techniques, ingredients and product sizes may have changed over the years, but the tried & true recipes and killer artwork of yesteryear never go out of style.

40's Cookbook Art Collage

Vintage Cookbook Collage

Never has a sandwich filling been so happy to leap onto a loaf of bread.

OKMH - October 2013 - 50's Happy Sandwich

Hello 1950’s Thanksgiving Dinner. Hubba hubba! Please pass the gravy.

OKMH - October 2013 - Thanksgiving Spread

Pillsbury’s annual bake-off contests have been bringing home bakers together through blood-sport baking battles throughout the years, but I had no idea how many years. Kat’s flea market collection included these two vintage gems.

OKMH - October 2013 - Vintage 50's Baking Books

OKMH - October 2013 - Pillsbury Bake-Off Book

That’s the $25,000 winner from the second annual Pillsbury Bake-Off. From 1950. At the Waldorf Astoria Hotel in New York City. Amazing. Also stellar – Mrs. G. Harold Kirk of Bar Harbor, who knows how to dress for an occasion.

OKMH - October 2013 - Dolled Up Contestant

In an age where people feel comfortable wearing their pajama pants to shop and/or board airplanes, Mrs. Kirk is a breath of fresh air. She is, without a doubt, even more fabulous than her prize-winning crabmeat cobbler.

I was super excited to find this recipe for Raisin Cream Pie, since it reminded me of the Sour Cream Raisin Pies of my youth, and then this recipe card fell out of the booklet and I got a bonus recipe for Baked Beans. Like a gift from heaven.

OKMH - October 2013 - Bonus Baked Beans Recipe

The best indication a recipe was loved is the stains all over it. This one was obviously a favorite. Most touching for me, was this wee booklet that still had the mailing label attached. It was a simple shortening recipe booklet from Swift & Co. addressed to Mrs. Robert Fleischehhacker of Fort Ripley, MN.

OKMH - October 2013 - Vintage Mailing Label

Did you catch that? Two pennies for postage? No way! Most notable was her address – Route #2 with no zip code. These, my friends, were simpler times. When people knew their neighbors, shared their tables and crafted meals not only from scratch, but with a great deal of love. And just like the recipe booklets, this box from Kat is meant to be shared. I may make a dish soon to share on the blog. And I’m thinking of baking a wild rice casserole for our extended family at Thanksgiving. But I probably won’t share the chocolate.

And just when you thought I was getting sentimental.

OKMH - October 2013 - 40's Cookbook Art1

To see what everyone else shipped & received this month, visit:

Mads @ La Petite Pancake – recipient of my box
Kat @ Tenaciously Yours – who sent this box to me
Beka @ Kvetchin’ Kitchen
Kirsten @ Comfortably Domestic
Megan @ Wanna Be A Country Cleaver
Allison @ Decadent Philistines Save the World

16 Comments

Filed under Blogger Collaborations, Food & Recipes

Roasted Sweet Potatoes & Pineapple with Almond & Honey Streusel

Roasted Sweet Potatoes & Pineapple - Title & Text - Inside NanaBread's Head

Sweet potatoes are one of my favorite things about fall and one of the first comfort foods I reach for when the temperature drops and leaves start to turn. This year, I’m jumping into fall with a simple but flavorful sweet potato side dish for Eileen of The Joy of Caking and her collaborative Fall Harvest Dinner.

Fall Harvest Dinner Logo

Don’t let the term “simple” fool you – this dish is packed with flavor. It starts with one pound of peeled & cubed sweet potatoes, two cups of fresh pineapple chunks, a simple sauce of pineapple juice, orange juice and vanilla and is topped off with a lovely streusel of almond meal, flour, butter, honey & cinnamon sugar. The result? Sweet potato perfection.

Roasted Sweet Potatoes & Pineapple with broiled struesel topping - Inside NanaBread's Head

Roasted Sweet Potatoes & Pineapple with Almond & Honey Streusel:
1 pound fresh sweet potatoes, peeled & cut into 1″ cubes
2 cups fresh pineapple chunks (or 1 can, if needed; juice reserved)
3 tablespoons canola oil
3 tablespoons butter, unsalted
3/4 cup orange juice
3/4 cup reserved pineapple juice
1/4 cup agave nectar or honey
1/2 teaspoon vanilla extract
1 1/2 teaspoons cornstarch

Pre-heat your oven to 350F. Peel and chop the sweet potatoes and drain the pineapple chunks, reserving the pineapple juice for the sauce.

In a large non-stick skillet over high heat, combine the canola oil and butter, and heat until melted. Toss in the sweet potatoes and cook, stirring occasionally, until they are nicely browned. Add the pineapple and stir to combine, then turn off the heat. In a small bowl, whisk the orange juice, pineapple juice, agave nectar or honey, vanilla extract and cornstarch until smooth. Pour the sauce over the sweet potatoes and pineapple and place the skillet into the oven to bake for 20-25 minutes, or until the potatoes are soft and fork tender.

While your sweet potatoes and pineapple are roasting, mix up your streusel topping and set out a ceramic serving dish (or individual dishes).

For the streusel:
1/2 cup Bob’s Red Mill almond meal
1/4 cup all-purpose flour
1 teaspoon ground cinnamon
2 tablespoons brown sugar
2 tablespoons butter, melted & cooled slightly

In a bowl, combine the almond meal, flour, cinnamon and sugar; blend with a fork until well blended. Add the melted butter and stir until combined. Using your fork, break it up into 1/2″ clumps or crumbles and set it aside.

When the sweet potatoes are fork tender, remove from the oven. Spoon into your ceramic serving dish(es) and evenly spoon the crumbles of streusel mixture across the top. TIP: Place the dishes on a rimmed baking sheet to make them easier to get in and out of the oven. Turn your oven to the “Low Broil” setting, and pop the tray under the broiler just until the streusel turns a light golden brown. (Keep a close eye on it so it doesn’t burn.) Serve warm with a drizzle of honey or agave nectar over the top. If there are leftovers, try spooning this over the top of a bowl of oatmeal the next morning. Yum!

Roasted Sweet Potatoes & Pineapple - Ready to Eat - Inside NanaBread's Head

Please don’t forget to visit our Fall Harvest Dinner bloggers, who’ve contributed everything from a fall tablescape to cocktails, salads to main dishes, and of course – dessert. You don’t want to miss this!

• Eileen (our hostess) from The Joy of Caking – Invitation & Roasted Chicken
• Sandra from Sweet Sensations – Fall Harvest Tablescape
• Terra from Café Terra – Homemade Apple Pie cocktail
• Monet from Anecdotes and Apple Cores – Harvest Goat Cheese appetizer
• Dionne from Try Anything Once – Eggplant Caviar appetizer
• Amy from Ms. Toody Goo Shoes – Roasted Pear Salad with White Balsamic
• Jeanne from Inside NanaBread’s Head (that’s me!) – side dish
• Denise and Sharon from BeBetsy – Onion Rolls
• Liz from That Skinny Chick Can Bake – Pumpkin Challah Bread
• Anne of From My Sweet Heart – Cinnamon Applesauce Tart

23 Comments

Filed under Blogger Collaborations, Food & Recipes

What we ate this summer.

Boy, did we eat well this summer! We may have consumed more than our fair share of fresh veggies in a wide variety of simple yet flavorful dishes. What is summer for, after all, if not the consumption of goodies from the farmers market and excuse to work on your tan? Here’s a peek at what we ate this summer.

Chicken Stir-Fry - My Bowl

It started with this chicken stir-fry over rice. I’m pretty sure I’ve mentioned this before, but The Complete Package and I love rice. Like L-O-V-E it. You could put a bowl of plain rice in front of us and we’d be happy, but smothering it with this zesty stir-fry made us really happy campers. The recipe came from the Weber’s New Real Grilling Cookbook. Seen it yet? Well, you should. Holy smokes (yes, that’s a grill joke) – it’s exceptional.

When I brought this book home from the BlogHer Food Conference in Austin (Thank you, Dole!), we immediately decided to jump in and try as many recipes as we could as quickly as possible. Here’s another winner from the book.

Weber  - Avocado, Red Onion & Sun-Dried Tomato Quesadillas

This beauty is an avocado, red onion and sun-dried tomato quesadilla. It’s ooey, gooey, crispy and crunchy. It was meat-free, but it still had it all, and in an easy to eat portable package, too. So much flavor!

This next one came from an internet search TCP did for smoked chicken. Now that he has officially conquered brisket and ribs (his are to die for), he decided to tackle smoked chicken. The recipe he found was for a ‘competition grade’ chicken, and while I don’t think he’ll be competing anywhere, this bird deserves a blue ribbon. Isn’t it gorgeous? Smokey, juicy poultry in motion.

A Smoked Chicken

Next was our pizza phase – where we attempted to live out our “More Is More” motto to the fullest. This one was grilled chicken with a smokey BBQ sauce, red onion, sliced jalapenos and a blend of cheddar and monterrey jack cheese.

BBQ Chicken Pizza

Think that one was loaded? You ain’t seen nothing yet. THIS baby was loaded. I call it “All The Veggies” pizza, and it was an exercise in excess. Instead of a tomato sauce, I smeared a whole wheat dough with basil pesto, then layered on oodles of veggies – artichoke hearts, mushrooms, orange & yellow bell peppers, roasted piquillo peppers, fresh spinach, kalamata olives, and red onions – then topped it with ricotta, toasted pine nuts and a drizzle of olive oil. We could hardly pick it up, but the flavors were over-the-top fabulous.

DeLallo Veggie Pizza

Speaking of flavor, this simple dish from the Weber’s grilling book blew our minds. It is deceptive in that it doesn’t look like much, but practically explodes in your mouth. Yummy is an understatement. It starts with eggplant grilled over charcoal, which is then topped with a sun-dried tomato, shallot & garlic relish dressed in a balsamic vinaigrette. Wow. Just wow.

Grilled Eggplant with Sun-Dried Tomato Topping

Next up was a Cuban Sandwich made with leftover smoked pork tenderloin (also from the Weber book), but the star of this show was the tostones we made on the side. Ever had tostones? It’s hard to describe them, but if you ever have an opportunity to try them (or even make them), take it. They’re like thick chips made from plantains. Now, if you think plantains are just fat bananas, you are mistaken. They’re actually starchy like a potato, and unless you let them over-ripen, they are not sweet. Think of them as a potato substitute.

Cuban Sandwiches from Grilling Book - July10, 2013

To make tostones, peel and slice plantains and fry them in a little canola oil until they just start to crisp a little. Remove them from the oil, drain on paper towels, and flatten them with a metal spatula. Then, and I know this sounds strange, throw them BACK into the oil until they are a golden, crispy brown. Sprinkled with kosher salt & served with your favorite salsa, I promise you will never reach for corn chips again.

All this talk of chips and pizza is making me thirsty, which brings me to my last treat of the summer. The fine folks at Double Decker were kind enough to ask if I’d like to try their wine. I don’t think I could have said “Heck yes!” any faster. To my surprise, they sent two full-size bottles – Pinot Grigio (white) and their Red Blend. The red was opened first. We drank half the bottle with a nice steak dinner and used the last half the bottle for Blackberry Sangria. Mmm…. I can still smell and taste it just looking at this photo. My friend Beka pointed out that it appears the ice is giving a fist-bump. Wildly appropriate; it rocked!

Double Decker Blackberry Sangria - Inside NanaBread's Head

Blackberry Sangria is my new ‘must have’ for summer. To make, muddle one pint of fresh blackberries with 1/3 cup of sugar and add to a bottle of Double Decker Red Blend. Cap it and put in the refrigerator for at least 24 hours so the berries & wine can fall in love. Then strain and serve over ice with a few fresh berries for garnish. So good, and so refreshing. This would also work with red plums or raspberries. The pinot grigio is superb and crisp on its own, but also makes a great summer sangria with the addition of peaches, apples, orange slices and a handful of white grapes. If you lika de’ bubbles, top it with a splash of champagne, club soda or lemon-lime soda. Then sit back and reflect on a summer worthy of the record books.

Did you try anything this summer that knocked your socks off? Do tell!

8 Comments

Filed under Food & Recipes, Miscellaneous Thoughts, Things I Love

DIY: A Pink Ombre TuTuTorial

Lilly Bug, our sweet spunky granddaughter, just turned four. FOUR! Can you believe it? We can’t. To celebrate her big day and her inner ballerina, I whipped up an easy pink ombre tutu inspired by Pinterest and just in time for her first ever dance classes. The best part – it only takes a few items from the store and about an hour of your time.

It starts with a specific type of stretchy headband. I found a set of 5 in various colors for only $3 at my local HEB (grocery) store. Two were pinks. Bonus!

Lilly's Tutu - headband starter
Next, you’ll need three shades of pink tulle, sold in 6″ wide rolls. I purchased a pale pink, medium pink and deep raspberry pink. To cut it into even lengths, I used a piece of cardboard that was 8 1/2″ x 11″ (or you can grab a picture frame off your shelf). Wrap the tulle around the 8 1/2″ side of the frame multiple times, then cut along both edges to create a handful of 8 1/2″ lengths of tulle. Start with 40 pieces in each shade, but be prepared to cut a few more, if needed.

I love how easily this comes together – NO SEWING! It’s all hand tied.

Tutu Collage1

1. Place the headband around a roll of paper towels to hold it in place.
2. See the gaps? We’ll be looping tulle through them, starting at the top.
3. Fold one piece of tulle in half and bunch it together at the fold.
4. Working along the top row, stick the fold through & make a 1″ loop.

Tutu Collage2

5. Grab both loose ends and pull them through the loop.
6. Gently pull the ends until it is firmly knotted.
7. Skipping one hole, start the process again.
8. Work around the headband until you have one row of the lightest pink, then repeat the process in the middle of the headband with the medium pink, and then around the bottom edge with the deepest pink. If your tulle is cut in advance, it will take approximately 30-45 minutes to complete the tutu. So easy!

This is how it looks on the inside of the headband when you’re done. Clean, simple, with no loose ends and plenty of stretch left in the headband.

Lilly's Tutu - Tied On

This is how it looks on the outside. I love the ombre effect!

Lilly's Tutu - Finished

Lilly's Tutu - Ombre Detail

If you have any tulle sticking out in odd places, simply trim them with a pair of scissors until all of the tulle is uniform in length. That’s it! Easy peasy tutu breezy. Because it was for Lilly Bug’s birthday, I tied it to the top of her other presents and put a flower on it to create a big fluffy bow.

Lilly's Tutu - Flower On Top

Lilly's Tutu - As Gift Topper

She really had no idea it was a tutu until she untied it to open her packages. It was so much fun. And here’s our little ballerina showing it off.

Lilly's Tutu Collage

Oh, Lilly Bug. You really are too sassy & cute for words, girlfriend!

21 Comments

Filed under Craft Projects, Family Stuff