Tag Archives: easy candy recipes

The Bee’s Knees Marbled PB Buckeyes

Bees & honey = a perfect pair. Peanut & chocolate = a match made in heaven. Put them together and what do you get? Chocolate peanut butter candy bliss.

Bee's Knees PB Buckeyes - Inside NanaBread's Head

Have you tried Peanut Butter & Co peanut butter yet? It’s The Bee’s Knees – quite literally. Their honey-infused peanut butter is a dream come true for peanut butter lovers like me who’ve been stirring honey into peanut butter since birth, or shortly thereafter. As a child, peanut butter was my go-to snack. Mom could get me to do just about anything for a jar of peanut butter. Hand me a jar and a spoon, and I would fold laundry or mop floors like it was my job. Flash forward to adult me, and I’m still stirring honey into peanut butter for a quick snack. That is until Peanut Butter & Co did it for me with The Bee’s Knees. As a member of the PB&CO Yum Squad, I accepted their challenge to play with my food and create a recipe to show off their Bee’s Knees peanut butter. They sent me two jars to play with (yum and thank you) and here’s what I did.

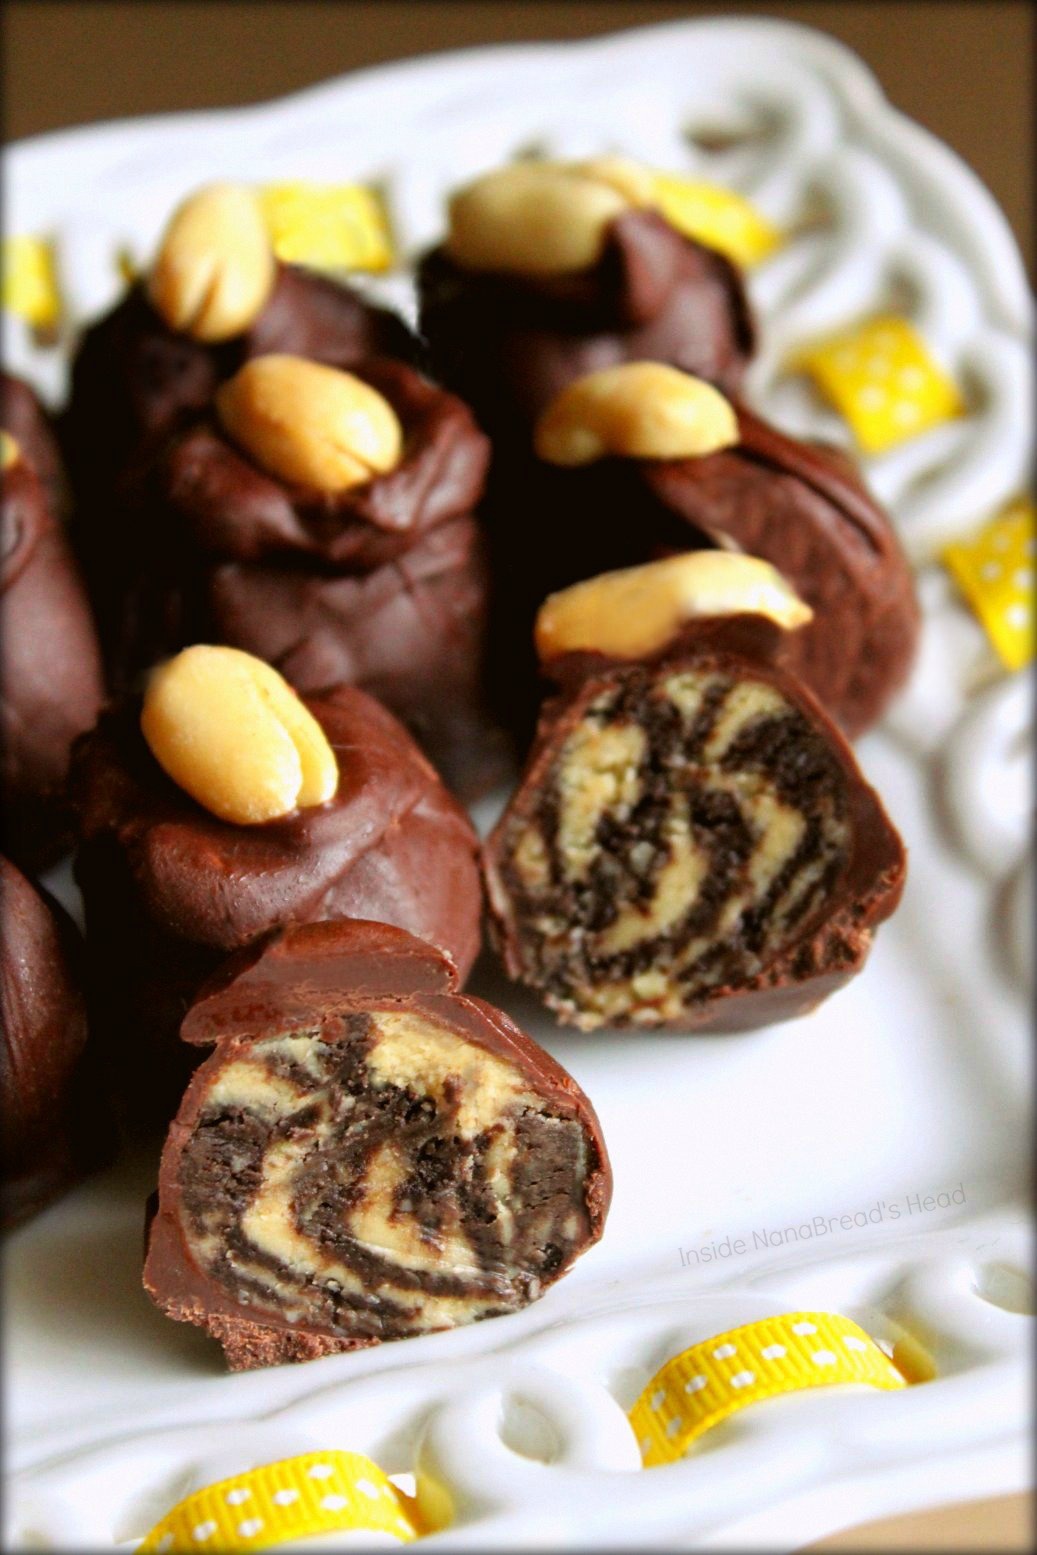
NanaBread’s Marbled Chocolate & Peanut Butter Buckeyes:
1 cup Bee’s Knees honey peanut butter
1 stick (8 tbsp) unsalted butter, at room temperature
1/2 teaspoon vanilla extract
1/4 teaspoon salt
2 1/2 cups powdered sugar, sifted & divided (see below)
1 cup Bob’s Red Mill almond meal
1/2 cup Hershey’s Special Dark cocoa powder
2 cups (12 ozs) chocolate chips (I used semisweet)
3 tablespoons paraffin (Gulf Wax), grated (optional)
salted, roasted peanuts for garnish

In a stand mixer, combine peanut butter, softened butter, vanilla, salt, 2 cups of the powdered sugar (setting aside 1/2 cup for later) and the almond meal. Blend on low speed until combined, then turn to medium speed and mix for 2 minutes until smooth. The dough should be the texture of soft play dough. Turn the mixture out onto a cutting board or sheet of parchment and divide it in half.

Gently knead the additional 1/2 cup of powdered sugar into half of the candy mixture until combined and smooth. For the other half, gently knead in the 1/2 cup of cocoa powder. Roll the chocolate dough into a square roughly 1/4″ thick. Roll the peanut butter dough into the same size square, then lay it on top of the chocolate square to form two layers of dough. Cut the square in half, forming two rectangles and stack them on top of each other, creating a rectangle four layers deep. Cut the rectangle into 1″ squares. Roll each piece into a ball and set aside on a parchment lined baking sheet. Rolling the dough into balls with your hands will create a pretty marbled effect. Once all the dough is rolled into balls, pop the baking sheet into the freezer so the buckeyes can firm up.

While the candy is chilling, melt the chocolate chips over a double boiler. If you don’t have one, simply place a metal mixing bowl over a saucepan with 3-4″ boiling water over medium heat. Once it starts to melt, whisk the chocolate until smooth. Add the grated paraffin (which helps set the chocolate so it doesn’t melt as easily when you pick it up) and whisk again until smooth. Dip frozen buckeyes into the melted chocolate, covering completely, and set them back onto the parchment lined baking sheet. Once dipped, place them in the refrigerator to firm up. Scrape the remaining melted chocolate into a plastic zip-style food bag and twist it to work the chocolate into one corner of the bag.

To garnish, snip the tip off the corner of the bag and pipe a spiral of melted chocolate on top of each buckeye. Top with a salted roasted peanut, and pop the sheet back into the fridge to set. Finished buckeyes should be stored in an air-tight container in the refrigerator, and should keep for up to one month.

Bee's Knees PB BonBons - CloseUp of Cut Candy

Besides being fabulously sweet & slightly salty, these peanut butter buckeyes are fun to make. I always tell people I love to play with my food, so I think my favorite part of this recipe was playing with the dough to make these candy bees (8 in all). As I said, the candy mixture is the texture of play dough, and I couldn’t resist. I also couldn’t stop giggling over them and the personality they had.

Bee's Knees PB BonBons - Bee CloseUp

I’m still playing with my Bee’s Knees peanut butter. My attempt at chocolate chip pancakes wasn’t a complete failure, but wasn’t what I’d hoped for. What did work was the peanut butter & honey topping. To make, combine 2 tablespoons of Bee’s Knees peanut butter with 2 tablespoons of unsalted butter, and microwave for 30-45 seconds until it is melted. Add 4 tablespoons of your favorite honey and whisk until smooth. Pour over your favorite pancake recipe and voilà! It’s a great way to enjoy that fabulous peanut butter & honey combo and add a little protein to your breakfast routine. It’s so good! If you don’t believe me, ask these guys.

Oops… looks like that little guy might not have gotten any. {burp!}

Bee's Knees Bees & Pancakes Collage - Inside NanaBread's Head

NOTE: As a member of Peanut Butter & Company’s Yum Squad, I am occasionally sent jars of peanut butter and/or peanut butter products to play with. No further compensation is received, and all opinions are my own.

PB&Co Bee's Knees Peanut Butter

Advertisement

9 Comments

Filed under Blogger Collaborations, Food & Recipes

Tart Cherry Dark Chocolate Bark


Remember this box of cherry goodness I got from my friend Kirsten at Comfortably Domestic? She held a giveaway to highlight local Michigan cherries from one of her favorite companies, The Cherry Republic. I thank my lucky stars every day that her brilliant son pulled my name from that hat. It has truly been a gift that keeps on giving. I started on the bag of dark chocolate-covered cherries first, since I could not resist them. Oy vey! They were spectacular. So much so, I haven’t been able to stop thinking about them.

Next up? The bag of mixed nuts and dried cherries. The nuts were raw, and I like mine roasted, so I simply separated out the cherries, threw the nuts into a dry skillet, and toasted them until they smelled heavenly. Once they cooled, I mixed the cherries back in and stored them in a jar to keep them fresh. These are great for snacks or as an oatmeal topper. But I still couldn’t stop thinking about dark chocolate-covered cherries. So what does a girl do when she has a jar full of toasted nuts and dried cherries, but chocolate on the brain? That’s right, you clever little minxes. She smothers them in dark chocolate. So, without further ado… I give you Tart Cherry Chocolate Bark. Shazam!

What you’ll need:
One bag of good quality dark chocolate chips (I love Guittard)
Two cups of dried cherries & mixed roasted nuts

Start by lining an 8″ square pan with parchment paper. It’s easiest if you cut two strips and lay them in opposite directions. Did you know that cellophane tape will not stick to parchment paper? Neither did I. Lesson learned.

Using a double boiler or a metal or glass mixing bowl over a pan of boiling water, melt your chocolate then whisk until smooth. Be careful not to burn yourself, either on the hot mixing bowl or the steam. Once your chocolate is creamy and smooth, remove the bowl and set it on a kitchen towel. Next up, grab your cherry and nut mix. The Cherry Republic version is awesome. Notice those gorgeous tart cherries and those giant nut halves? No little bits or pieces here.

Add your cherry & nut mix to the melted chocolate and stir until well combined. Pour it into your prepared pan and flatten it with a spatula until it’s about 3/4″ thick. Put it into the refrigerator to set up for about an hour.

Once it’s set, remove it from the pan and cut it into squares with a sharp kitchen knife. Store in an airtight container. I like to keep mine in the refrigerator since it’s so dang hot in Houston. And that’s it! The only thing left to accomplish is a little self-restraint. Can’t help you there, but I wish you luck! Lots of luck.

Stay tuned. The last item from the gift box is a jar of cherry chipotle salsa, and there’s no telling what’s going to happen with that! Thanks again, Kirsten. Your taste in cherries is impeccable.

18 Comments

Filed under Food & Recipes

December 2010 – Let’s just call it the month of chocolate-dipped everything

Dig in or run away? It's the classic holiday diet dilemma.

This year, I’ve made more holiday goodies than ever. Maybe it’s because I’m filled with holiday cheer, or maybe it’s because I’ve fallen in love with barks. I mean, take just about anything you like and smother it in chocolate. How awesome is that? Easy + quick + chocolate = PERFECT in my book. But it’s not ALL about barks. I also made sausage balls, orange slice cookies (see the recipe in a previous post), toffee, jam thumbprint cookies & snickerdoodle bars this week, but mostly it’s been about the chocolate. First up, white chocolate gingersnap truffles that I whipped up based on a recipe for Oreo truffles.

Gingersnap Truffles - Oh, baby...these are fabulous!

In a food processor, I ground up a one-pound bag of gingersnaps with one cup of toasted pecans. I ground them into dust, or actually the texture of sand. Then I dumped in a large tub of store-bought cream cheese frosting and stirred until it was all perfectly combined. Using my cookie scoop, I scooped the gingersnap mixture onto a wax paper-lined cookie sheet, which I promptly put in the freezer for 20 minutes. While the gingersnap balls were freezing (okay, stop giggling), I melted a pound of white chocolate over a double-boiler. Using a skewer, I stabbed each one and drowned it in the melted chocolate, making sure to coat it heavily. It helps to spin it around a little so the excess can drip off. Then I placed each truffle back onto the waxed paper, making sure to fill the skewer hole with a little more chocolate. Once they were all dipped, I went back and sprinkled a little gingersnap dust on the top. Then they all went back into the freezer for another 20 minutes to set before they went into an air-tight container. These turned out great. They have so much flavor, and the subtle spice of the gingersnaps is a perfect complement to the creamy sweetness of the white chocolate. HELPFUL TIP – use a good quality gingersnap for the best flavor.

Next, I made two white chocolate barks. The first was planned. It’s the pistachio and dried cranberry bark from The Brown Eyed Baker. When I saw her photo, I knew I had to make it. When I thought about tart dried cranberries combined with white chocolate, I knew I had to make it. When I saw that it only had 3 ingredients, I knew I had to make it. It couldn’t have been easier. You melt a pound of white chocolate, stir in a cup of shelled pistachios and a cup of dried cranberries (I love Ocean Spray’s Craisin brand) and pour it into a foil-lined pan.

White Chocolate Pistachio Cranberry Bark

Pop it in the fridge for half an hour to set up, then cut it into squares and store it in an air-tight container. Done! Of course, Michelle used a 1/2 cup of pistachios and a 1/2 cup of dried cranberries, but I’m all about excess at the holidays. So sue me. The second bark was accidental, but awesome. I had leftover white chocolate from my first bark and the gingersnap truffles, so I dumped 2 cups of trail mix that had mixed nuts, raisins and M&M candies into a bowl with some leftover roasted cashews I found in my pantry and poured the extra white chocolate over the top. Once it was mixed well, I poured it into a 9″ x 9″ baking pan lined with foil, and pressed some dark chocolate M&M’s onto the top. Again, you just pop it into the fridge to set up, then cut it into squares and store it in an air-tight container. I like this one for several reasons – the raisins make it a little chewy, the nuts make it a little salty, and the dark chocolate M&M’s add a nice contrast to the sweetness of the white chocolate. Both barks were easy to make.

Trail Mix Bark - chewy, salty, nutty & crunchy

The last bark I made was a fabulous contradiction. For taste, it was a solid 10+ but for appearance, it’s a pathetic 2 at best. It’s my version of dark chocolate peppermint bark. I used two different bags of my favorite chocolate chips – Guittard. The first bag was my beloved Extra Dark Chocolate (so good I eat them straight out of the bag) and the second was a new one I hadn’t tried yet – Akoma Extra Semi-Sweet baking chips. I’m telling you, there is something magical about Guittard chocolate chips. They are just on a different level than other brands. I think they’re made by angels or something. But back to the peppermint bark. I melted these two bags of chocolate together over a double boiler, then spread the melted chocolate onto a wax paper-lined cookie sheet. Then I opened a bag of Andes red & white Peppermint Crunch baking chips and sprinkled them all over the top. My thought process was this – I don’t like hard peppermint candy bits getting stuck in my teeth, so why not use the softer Andes baking chips with the texture of a chocolate chip? I mean, it should be smooth, pepperminty and wonderful, right? Truth is, it WAS smooth, pepperminty and wonderful. The combination of the powerful dark chocolate with the super minty Andes chips is spot on. World class. Life changing. The problem? It’s just not pretty. In fact, it’s so ugly, I call it Bacon Bark. Ugh! See for yourself:

Bacon Bark - Okay, it's not bacon, but it sure looks like it!

I swear it looks like someone put raw bacon on top of melted chocolate. This is definitely one of those times when you have to suck it up or just close your eyes so you can enjoy it, because honestly it tastes amazing. It’s my new favorite chocolate candy concoction. If these make it to December 25th, it will be a Christmas miracle. It’s that good, and that addictive. Pray for me, please. Pray that I don’t kill The Complete Package for eating it all before I get a chance.

Last up was the Rolo Pretzel Bites from the Glorious Treats blog. This was another one that spoke to me when I saw it. Actually, I thought my son-in-law Bama Boy would love these. He’s a fan of turtles and toffee, so these should be right up his alley. They’re also easy to make, and only have 3 ingredients. It’s turning out to be my holiday theme – quick & easy with only 3 ingredients. I can’t thank my fellow bloggers enough for sharing their favorites. I’m really enjoying the fact that someone else is doing all the thinking for me. Thanks!

The 3 stages of Rolo Pretzel Bites construction

For this one, you’ll need a bag of the square-shaped pretzels, two bags of Rolo caramel-filled chocolate candies, and toasted pecan halves. What!?!…again with the 3 ingredients! I know, it’s awesome! First, pre-heat your oven to 250F. Then line a baking sheet with waxed paper. This is important…if you don’t use the waxed paper or foil, these will stick to the pan. Next, spread out the pretzel squares, then spend 30 minutes unwrapping the individually wrapped Rolos (it would help if you had little munchkins in your house to help with this step). Place a Rolo candy on top of each pretzel and top with a pecan half. Carefully slide the baking sheet into the oven, turn off the heat, and let them sit in there for about 4-5 minutes. The Rolos should soften, but not melt. To test one, press on the pecan half. If you’re able to press it down into the candy, they’re ready. Remove the pan from the oven, and working quickly, press each pecan half down into the candy, which will in turn press the candy down into the pretzel. (For a peek at the finished product, click on the link to the Glorious Treats website at the top of the paragraph.) Once they’re all pressed into place, slide the baking sheet into the freezer for 20 minutes to allow them to set up. Once firm, remove from the freezer and store in an air-tight container. If you love salty pretzels, milk chocolate, caramel and pecans, you’re going to love these. Think turtle candies with a pretzel base. Thank you, Glory @ Glorious Treats.

Okay, I’m done for now. My teeth are starting to hurt just talking about all this candy. Did I tell you my dentist bought a yacht for Christmas? Just kidding. Although, if I eat all of this I could probably make it happen. I’m sure he’d appreciate it. Forget it, Burt. I’m generous, but not that generous. Happy holidays everyone, and happy baking/making/sharing. I’m off to make a salad.

7 Comments

Filed under Food & Recipes